
Changelog
Dec 7th, 2024: My yearly update to let you know that this integration continues to work just fine and the m3u playlits are still being maintaned by me.
Dec 17th, 2023: Updated a few broken links. The integration cotninues to work just as described in this blog post.
Sep 20th, 2022: Updated the information regarding running custom scripts within a Tvheadend Docker container. This change is in connection with recent changes introduced by the folks maintaining the linuxserver.io image. For details, see this issue. Other than that, Streamlink is now on version 5.0 and the integration documented here continues to works just as well as before.
Mar 15th, 2022: It’s been a while since I last updated this article but all the information here is still up-to-date. Streamlink is on version 3.2.0 at the time of writing but everything works just as before and as outlined in this guide. You can track changes to my curated m3u playlists and related utility scripts on my tvhlink Github repository.
July 16th, 2021, Update #2: Added information about Twitch streams to the Conclusion section.
July 16th, 2021, Update #1: Updated all Youtube URLs to include the suffix /live, owing to changes to the Youtube plugin for Streamlink.
Jan 21st, 2021: Publication of the original article
Introduction
In my previous post titled Youtube live as IPTV channels for TVHeadend, I mentioned a method for capturing a Youtube livestream and feeding it into a TVHeadend (TVH) server via a Python utility called Streamlink. In this tutorial, I will present an easier and more reliable method of doing that for Youtube as well as any other supported sources. I called this integration TVHlink.
The simplified TVHlink integration is largely due to the release of a new version of the Streamlink utility (Streamlink v2.0.0) that includes many bug fixes and more flexible plugins for Youtube, Twitch, and other livestream sources. For Youtube, for example, it’s now possible to simply point to a channel URL and the parser will automatically try to grab its livestream, instead of using the old method of pointing to the exact livestream URL, which often changes from time to time. This is basically what I was doing with my youtube4tvh utility but now that the improved content parser has been implemented into Streamlink, we don’t need youtube4tvh anymore because the livestream URL is found upon each TVH client request, rather than previously stored into a .m3u playlist.
DISCLAIMER. All the software used here is free and open-source and all livestream sources are publicly available and are provided by the copyright owners themselves via either plataforms such as Youtube, Twitch, Dailymotion, etc., or their official channels (e.g., CBS News, DW, Reuters) for anyone to use. If you enjoy the content, please consider supporting the developers, streamers, and providers who make this possible.
Client demo
Here is a preview of how the TVHlink integration looks like for mulitple TVH clients. This is a non-exhaustive list because there are other TVH compatible clients. For more information about TVH client configuration, refer to the TVH clients section in this tutorial.
For reference, all client demos were tested with a modest connection of D:10Mbps / U:150Kbps, which shows that the TVHlink integration works fairly well even if you have limited connectivity. However, if your connection is better than that, you can expect much better performance than demonstrated in the videos, and fine-tuning the source quality via stream profiles will greatly improve performance as well (the demos used 720p for all streams). Performance is also very much client-dependent. The TVH client addon for Kodi has been the one that provided me the best experience so far. It uses the HTSP protocol, which was designed for streaming, and allows the use of predictive tuning, which pre-loads channels before you access them, making the transition between channels next to each other much smoother than via webUI or VLC, as you can see in the demos.
Overview
This tutorial is organized into six main sections. The first two sections introduce a few reasons two implement the TVH link integration (motivation) and a general picture of how it works (client-server flow). The third section, called hardware, contains a brief discussion about the hardware requirements to run a TVH server and my personal recommendation for new and experienced home users looking for hardware to buy.
The last three sections contain the actual how-to guide for the software components, such as the installation of a TVH server and Streamlink on a GNU/Linux host or Docker container, as well as their basic configuration. Afterwards, the TVHlink integration was described in detail, showing how to build customized IPTV networks of livestream channels. The TVH clients were discussed at the end of the tutorial, with a focus on my two favorite ones–namely, the Kodi PVR addon and VLC/m3u players.
If you have already read my previous post called Youtube live as IPTV channels for TVHeadend, you might want to skip straight to the software discussion and TVHlink integration. Note that the installation sections are much more detailed than before and the TVHlink integration was greatly simplified because now, we do not need to generate and update m3u playlists outside of the TVH server environment. That said, the current TVHlink tutorial is self-contained and does not require anyone to have read my previous post in order to implement the TVHlink integration.
If you are new to all of this, don’t panic! Grab a towel, save some time, and read through. Then, give it a try on your own first and if you run into an “unsolvable” issue, feel free to get in touch with me. I am glad to help out.
Motivation
There are multiple reasons to watch livestreams as if they were IPTV channels via a centralized server such as TVH. To mention a few:
- It is free and all programs are open-source;
- There is at least one 24/7 livestream that you enjoy. For example, the following Youtube channels:
- News: ABC News, Sky News, DW, France 24
- Space: NASA TV, Space Videos
- Webcam - Nature: Cornell Bird Cams, Monterey Bay Aquarium, Explore Nature
- Webcam - Other: earthTV, I Love You Venice, Railway
- Radio: BGM channel, Cafe del Mar, Stay See
- More options to access content from multiple networks using a single client;
- Keep your streaming services as centralized as possible. That is, instead of multiple applications, you can manage everything from a single server;
- Record livestreams with the push of a button on any client or via a schedule;
- Take advantage of fast and reliable content delivery networks (e.g., Akamai, Youtube CDN).
Client-server flow
The client-server flow underlying the TVHlink integration is illustrated next.
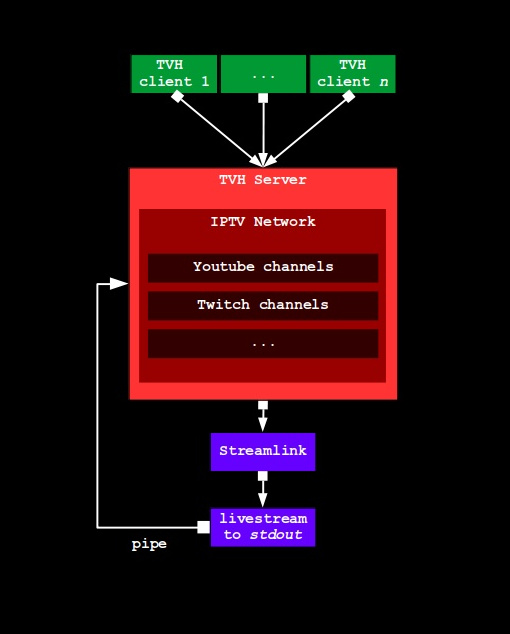
That is, the TVH server stores one or more IPTV networks as m3u playlists that contain one or more (livestreaming) channels as a track. When a TVH client (any IPTV/m3u player) connects to the TVH server, the server executes a Streamlink command, which will in turn try to find the livestream data. If successful, streamlink will output the data into the TVH server, which will then send back to the client that requested the livestream. Otherwise, the request will either return an error or timeout.
A TVH server is not capable of multicasting any livestream. This requires a third software component to the client-server flow, such as VLC. This topic is beyond the scope of the current tutorial but if interested, check the following guide: VLC Multicasting for IPTV into TVHeadend.
Hardware
The hardware requirement to run a TVH server depends largely on its usage. It runs on a huge variety of devices, from a tiny ARM-based single-board computer (SBC) to a powerful AMD/Intel x86-64 machine. (Users have even managed to run TVH on a travel router with 8MB of flash storage, 64MB of RAM, and a 600 MHz MIPS CPU.) However, if you want to use TV tuners in addition to the TVHlink integration, I strongly suggest you to use a x86-64 machine with at least one PCIe interface instead of a SBC. This will give you more options to choose from than relying exclusively on USB tuners.
Most of the resource requirements to run TVH come from transcoding and networking. For example, while a Raspbery Pi 3B (RPi) will be more than enough to run a TVH server and use the TVHlink integration with default settings, CPU-wise, the RPi will strugle if you enable transcoding via different streaming profiles and feed it to multiple clients. Fortunately, you can avoid transcoding altogether by configuring Streamlink to grab and feed lower resolution streams directly from the source, or even better, create _HD and _SD channels for the same livestream source and let the client choose what works best for them (e.g., in the pipe command to run streamlink, use the option --default-stream 1080p,720p,best for HD channels, and the option --default-stream 480p,360p,worst for SD).
Networking-wise, a 100Mbit ethernet port can get easily saturated if serving high-resolution streams to more than one client at once. Wireless connections are okay for clients but your TVH server should not rely on them because too many things can interfere with wireless communication. An alternative is to use the wireless interface for management (i.e., to access the webUI) and reserve one or more ethernet ports for streaming. My suggestion is that at the very least, reserve a 1Gbit ethernet port for TVH.
The RAM requirement is pretty low if not transcoding or recording to RAM. In general, plan on dedicating at least 1GB of RAM to the TVH server. Similarly, the TVH server uses less than 100MB of storage space. However, TVH let’s you record videos from any of your sources and depending on the recording profile, this can use a lot of space.
The hardware requirements for Streamlink are negligible.
Device recomendations
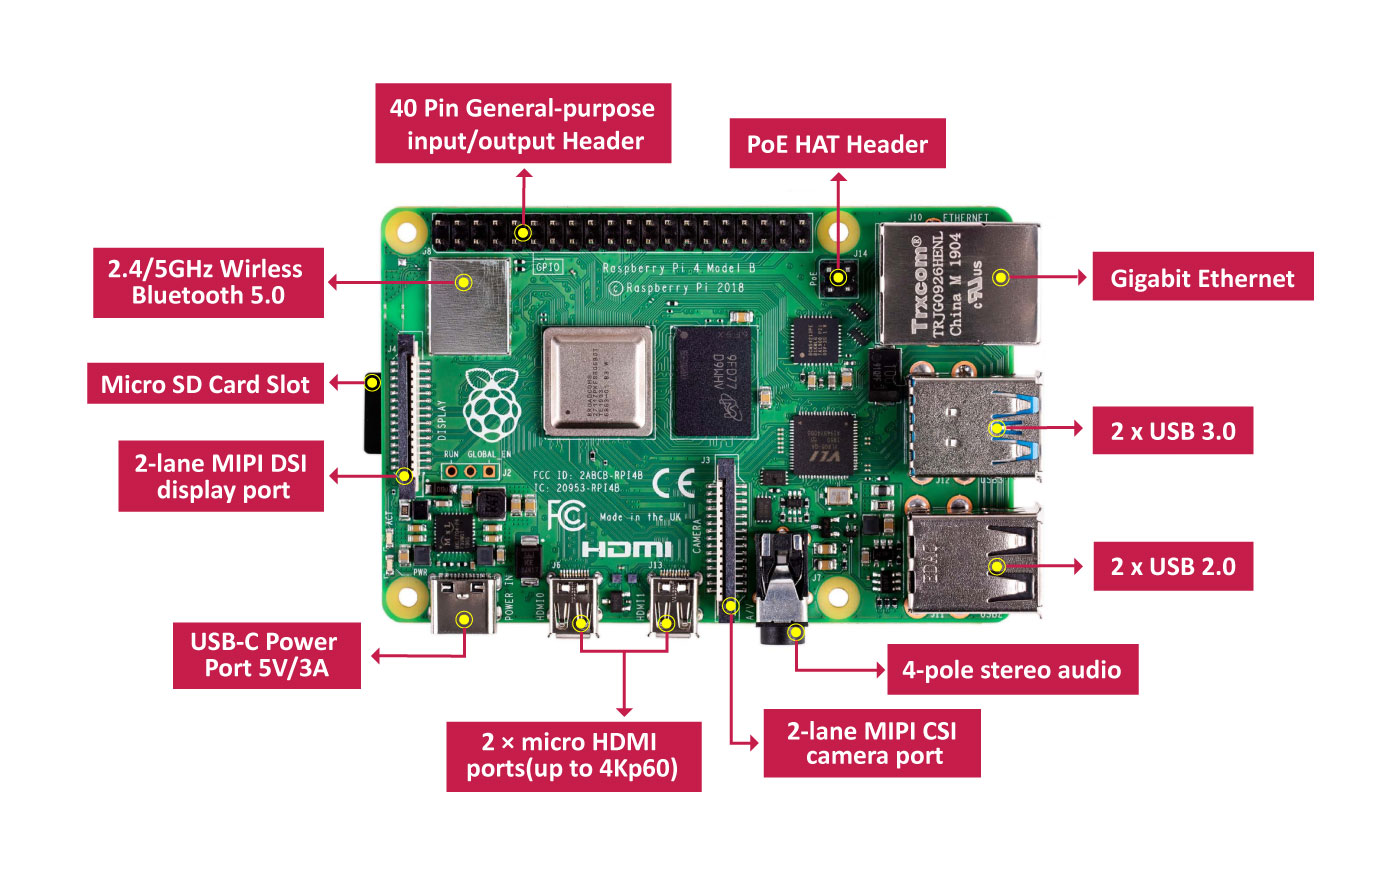
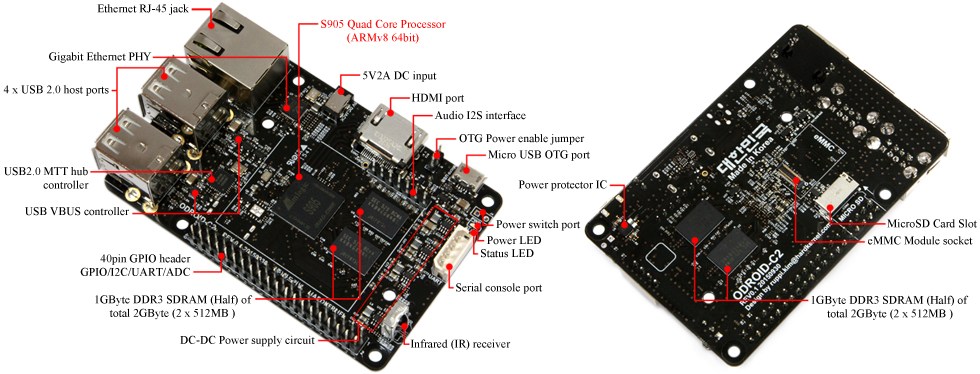
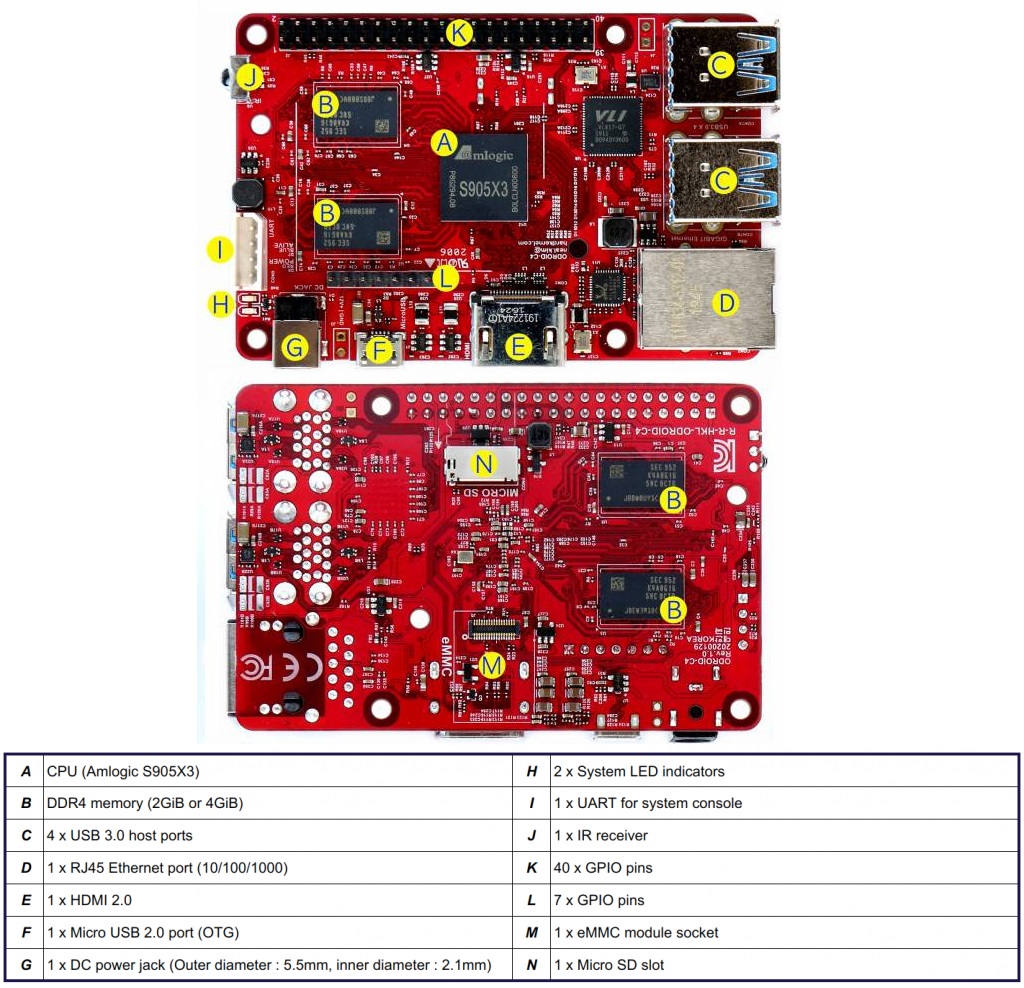
If you are new to all of this and are looking for cheap and efficient hardware to get started, take a look at the Raspberry Pi 4B and the Odroid C2 or its latest iteration, the Odroid C4, for example. They are solid, low-power devices that you can buy for less than US$ 50 and that meet the requirements to run a TVH server and more. They can even be used as an all-in-one box–that is, TVH server and client at the same time. All such boards are well-known and sold world-wide via AliExpress, Amazon, and the like.
However, if you are an experienced user, consider using virtualization with your existing hardware. This will save you money and provide an easy to manage plataform for TVH and other services.
Software
As the name suggests, there are two main software components to the TVHlink integration, namely TVH and Streamlink. The minor components are all their dependencies (e.g., Python3, ffmpeg) but their installation packages will take care of them in most cases. As mentioned before, both projects are free and open-source, so anyone can download, install, use, and help developing and maintaining the projects. (You don’t need to be a programmer to help out. Check if they need assistance with translations, for example, and check how to report bugs via the Github repositories whenever you find one.) Please consider supporting both projects if you find them useful:
-
TVH Donations: https://tvheadend.org/projects/tvheadend/wiki/donate
-
Streamlink Donations: https://streamlink.github.io/donate.html
In this section of the tutorial, I will go over the installation process of the related software, their basic usage, concepts, and configuration. Unless otherwise specified, I will assume the host is a GNU/Linux OS and more specifically, an apt based distribution, such as Debian or Ubuntu. If this is not the case, simply adapt the commands to use your OS pkg manager instead. In any case, a reference to the official documentation is always provided, which includes instructions for other distros as well. However, make sure that by the end of the installation, you are running the latest version of both programs. Otherwise, you will run into issues with the TVHlink integration.
TVHeadned
Tvheadend is a TV streaming server for Linux supporting DVB-S, DVB-S2, DVB-C, DVB-T, ATSC, IPTV,SAT>IP and other formats through the unix pipe as input sources.
The goal of this section is to cover the installation and basic configuration of a TVH server in order to use the TVHlink integration. Therefore, tuners, drivers, and electronic program guide (EPG) data usage won’t be covered here, even though they are all supported by a TVH server. Fortunately, the configuration of such aspects and the TVHlink integration are not mutually exclusive–that is, you can configure your tuners and EPG data however you like after implementing the TVHlink integration. Similarly, if you use IPTV services, you can also run them in parallel to the TVHlink integration.
Concepts
In addition to the client-server flow illustrated before, there are four key concepts related to how TVH organizes its content–namely, the notions of networks, muxes, services, and channels. In brief, a network is composed of one or more muxes, which define services that are mapped onto channels.
In the TVHlink and IPTV context, a network defines a meaningful m3u playlist (e.g., a livestreaming platform, like Youtube or Twitch) or the name of the IPTV service provider. The m3u playlist contain tracks, which are translated into muxes in TVH lingo. A mux carries and defines properties of each track, such as its name, icon, EPG source, provider, and so on. Once a mux is verified to contain valid streaming data, it creates a corresponding service, and services are then mapped onto specific channels that will be accessible to a TVH client.
The mapping of services onto channels is usually manual. However, in this guide, we use bouquets to automatically map services to channels and generate their tags. In the TVHlink/IPTV context, bouquets are just meaningful channel groupings with customized settings.
Installation
Here is a list of various installation procedures. Read the notes before following the official installation procedure. Whatever method you choose, after the installation, check that your TVH server is either version 4.3 or higher. Otherwise, review your installation or choose a different method because you are using an outdated version and compatibility is uncertain.
Host installation
-
Install on host Linux machine via APT: Suitable for Debian and Debian-based distros (e.g., Raspberry Pi OS, Ubuntu). This is the recommended procedure for compatible devices because it allows you to keep your TVH updated via APT along with the other installed packages on your OS.
In the apt source for tvheadend (
/etc/apt/sources.list.d/tvheadend.list), use the Unstable repository instead of the Stable one. The latter is too outdated.Before running
sudo apt install tvheadend, check the repo’s package version withsudo apt policy tvheadend. The package version must be4.3*or higher. If it’s not, double check your installation procedure or use a different installation method (see below).Specific package versions can be installed via
sudo apt install tvheadend=<version>, in which<version>is an exact match to a repo’s valid version (version table avaliable withsudo apt policy tvheadend). This is useful if the candidate version (i.e., what would be installed by defeault) is not the latest one. -
Install on host Linux machine via RPM: Suitable for Fedora and CentOS.
In the
config-managercommand, add either the Fedora Unstable (if FedoraOS) or the CentOS Unstable (if CentOS) repository instead of the other ones. The other repos contain outdated releases. -
Install on host Linux machine from the Github source: Alternative to using the APT/RPM repositories. It takes some time to build from the source because dependencies and conflits have to be fixed manually and it’s much harder to keep TVH updated this way.
Always build from the
masterbranch of the Github repo.
Docker installation
-
Install as a Docker Container with the LinuxServer image: Alternative to anyone who is not running a Linux host, for example, or already have other Dockerized services up and running. The image is provided by an unofficial but well-known source–namely, LinuxServer. The TVHlink integration is non-trivial because the container does not include Streamlink by default. However, I’ve covered this in the section about running Streamlink in a TVH Docker container. In short, it uses custom script execution to install and update Streamlink in the container.
Use the
latestimage tag for your architecture. This is the default, so you should not need to change anything to pull the right image.
Basic configuration
-
Open a web-browser and navigate to the TVH webUI. If the web-browser is running on the same host as TVH, then the webUI will be at http://127.0.0.1:9981; Otherwise, it will be at
http://HOST_IP:9981, in whichHOST_IPis the IP address of the machine hosting the TVH server.It goes without saying that the machine hosting the TVH server should have a fixed IP address at the local network because all the clients will be pointing to it.
-
If you provided admin credentials during the installation, you will be prompted to enter the credentials now.
- TVH will start the wizard the first time you access the webUI but go ahead and skip it altogether:
# Press Cancel - Notice that there are several tabs in the webUI but many options will not show up if the View level is set to
Basic. Change it toExpert, as follows:# Configuration > General > Base > Web Interface Settings > Default view level# Press Save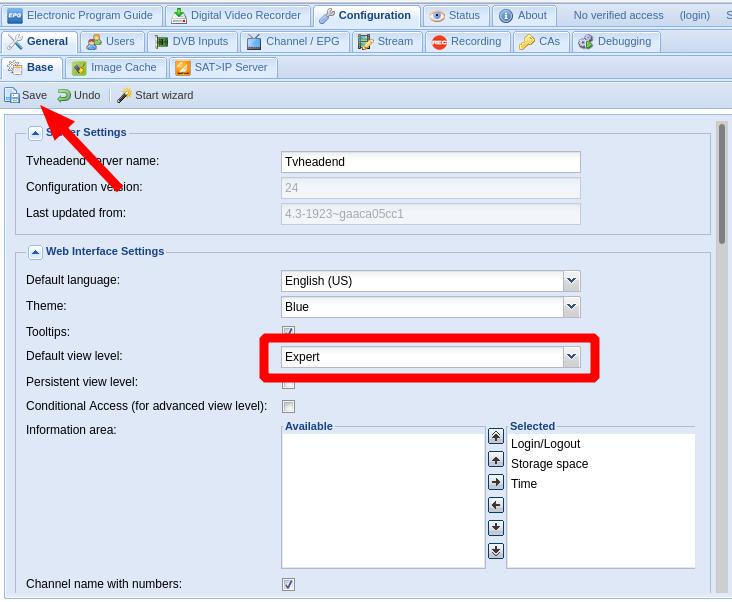
- Optional. In the same tab as before, change the Authentication type to
Both plain and digestto make the TVH server compatible with more clients than before. (VLC, for example, is unable to authenticate if type is set toDigest.)# Configuration > General > Base > HTTP Server Settings > Authentication type# Press Save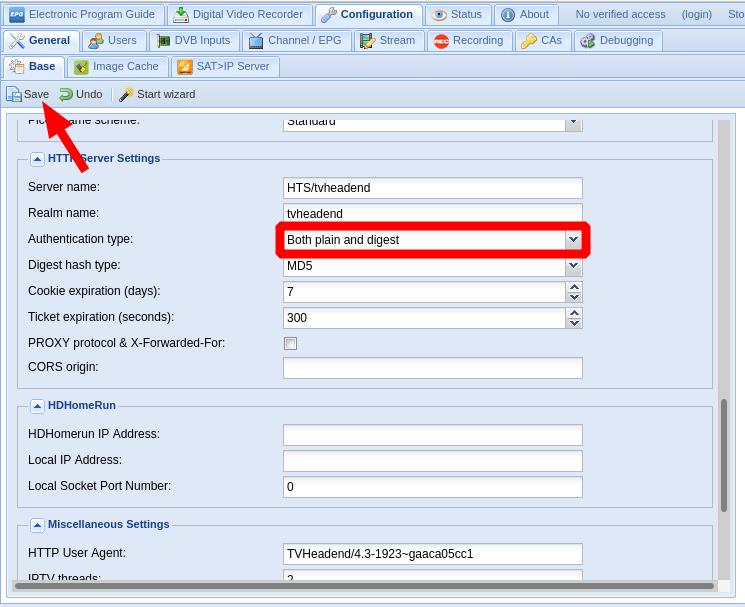
Note on exposing TVH to WAN. This configuration allows clients to send all their credentials in plain text. This is not a problem if your TVH server is only used locally. However, this is a problem if your TVH server is reachable outside your private network because the credentials will be accessible to anyone able to intercept the packets between client and server–you should always assume that this is the case when sending packets over the WAN. If you want to use your TVH server remotely, my suggestion is to either use (a) vpn or (b) wireguard or (c) ssh tunnel (key-based auth) or (d) a reverse proxy with SSL termination (TLS) and independent and hardened credentials.
- Clients can access TVH using the same credentials as you (admin access). However, as a general rule of thumb, that is not a good practice. Also, if you have multiple clients, it is nice to know what each one is trying to access on your TVH server. To create a single user called
clientwith passwordclientand permission to only access streaming, do the following:# Configuration > Users > Access Entries > AddThen in the Add Access Entry window:
# Enabled: Checked
# Username: client
# Streaming: Basic,Advanced,HTSP
# Comment: default streaming client user
# Press Create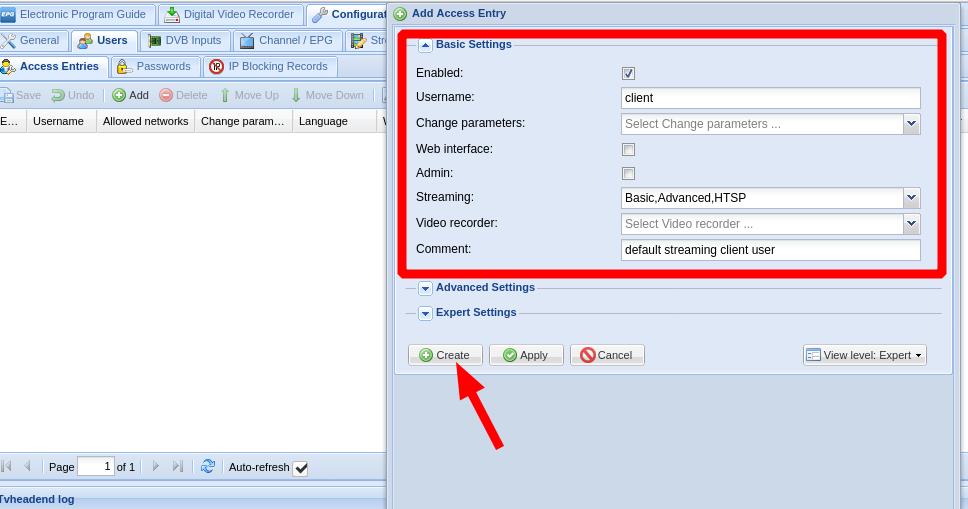
Now create a password for the
clientuser:# Configuration > Users > Passwords > AddThen in the Add Password window:
# Enabled: Checked
# Username: client
# Password: client
# Comment: default streaming client password
# Press Create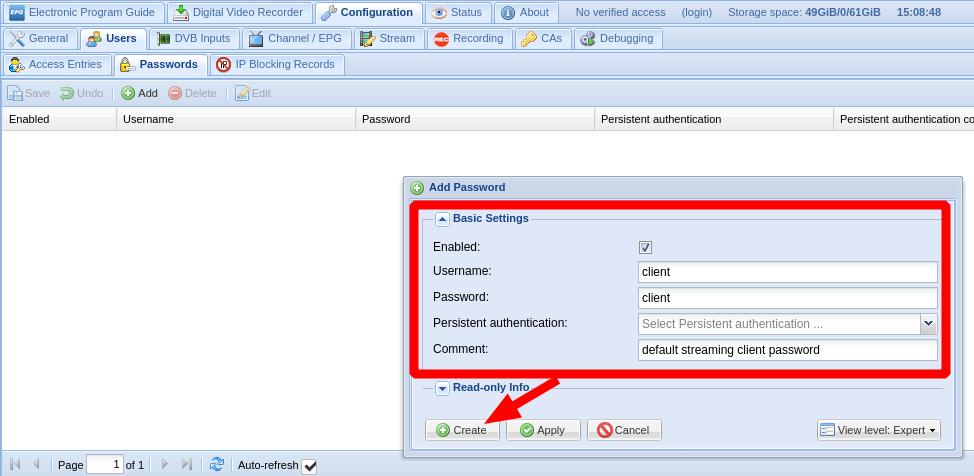
If you want to add more users, just repeat this step as many times as necessary.
-
Optional. By default, TVH will attempt to grab EPG data from any channel added to it at start-up. In the TVHlink context, however, EPG data either don’t make sense or there is no simple way of grabbing them.
Because some of the 24/7 news channels actually follow the same EPG as their Cable/Satellite broadcast, it is possible to use EPG tools like WebGrab+Plus to configure TVH to use them. However, this is way beyond the scope of this tutorial.
Therefore, you can safely disable automatic EPG grabbing at start-up, as follows:
# Configuration > Channel / EPG > EPG Grabber
# Uncheck all 'grab at start-up' options
# Press Save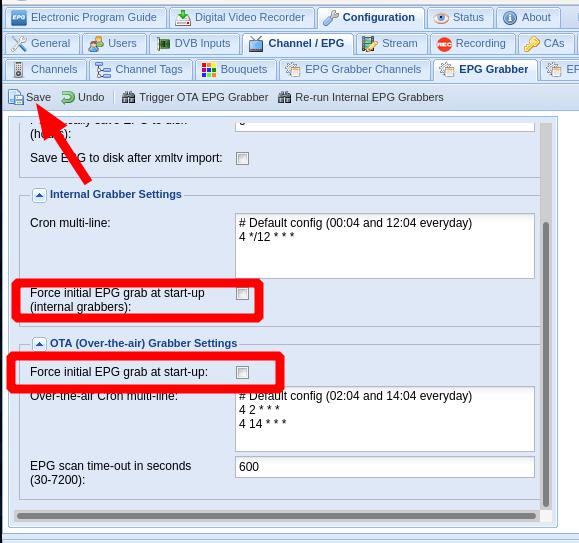
In addition, because you won’t be using any tuner for the TVHlink integration, you can also disable all EPG Grabber Modules, as follows:
# Configuration > Channel / EPG > EPG Grabber Modules
# For each enabled module (green icon), make sure enabled is unchecked (red icon)
# Press Save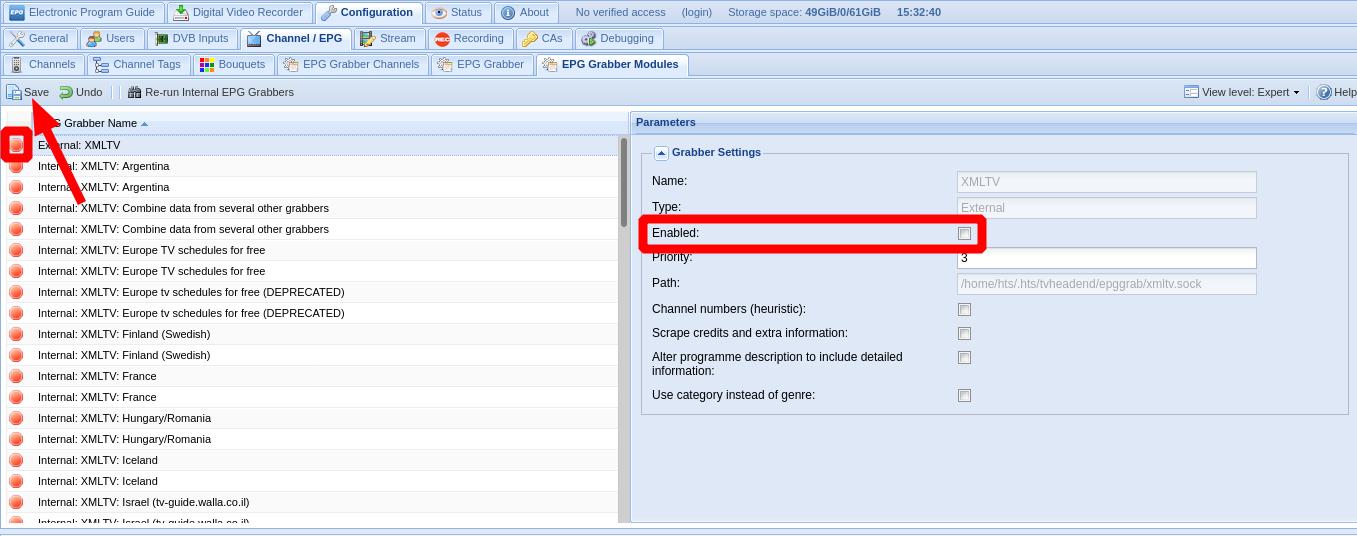
- That is it. There are many other things you can do configuration-wise but the ones covered are sufficient for the TVHlink integration. Other things you might want to take a look at are the recording settings and stream profiles.
Streamlink
Streamlink is a command-line utility which pipes video streams from various services into a video player, such as VLC. The main purpose of Streamlink is to avoid resource-heavy and unoptimized websites, while still allowing the user to enjoy various streamed content.
This is an awesome Python utility and if you have never used it before, make sure to check their documentation. In the TVHlink context, it is used to pipe data from a livestream channel to a TVH server, as illustrated in the client-server flow.
Streamlink has plugins for most of the major streaming platforms (Youtube, Twitch, Dailymotion, etc.) as well as a few specific websites (CBS News, NBC News, Reuters, etc.). For an exhaustive list of the available plugins, check their plugins list.
Installation
The official docs contain detailed instructions about how to install Streamlink on a variety of platforms. However, a few of the package repositories contain outdated versions of the Streamlink utility. If you choose to install via apt, pacman, dnf, and other common Linux distro package manager, make sure to install Streamlink version 2.0 or higher. In my experience, keeping Streamlink up-to-date is more important than the TVH server because the former is more prone to changes than the latter, owning to required fixes/updates to content parsers.
Once installed, you can find the version by running
streamlink --version
which should be at least 2.0 or higher, as mentioned before. You can find the latest version number and a summary of the changes on their Releases page.
Host installation
-
Install on host Linux or BSD machine via the system’s package manager: At the time this tutorial was originally published, this was compatible with Arch, Debian, Fedora, Gentoo, NetBSD, NixOS, OpenBSD, Solus, Ubuntu, and Void. This is the recommended procedure for compatible devices because it allows you to keep your Streamlink updated along with other packages installed on your OS.
-
Install via Python’s package manager,
pip: Alternative to other installation methods when Streamlink is not available in the system’s package manager or the version is outdated. This offers the highest cross-plataform compatibility–that is, as long as you can install Python, you can install Streamlink this way.Starting Streamlink version
2.*, the utility is only compatible with Python 3 (and I strongly recommend to use Python3.7or higher). Therefore, first, installpython3and its package manager,python3-pip. Then, install Streamlink viapip3to make sure it is installed as a Python 3 package instead of Python 2.On Linux distributions, Python’s package manager will install user-related packages on the user’s
$HOME/.local/bindirectory, which by default, is not part of the user’s$PATH. This means that if you try to runstreamlinkafter apip3 install --user streamlinkinstall, for example, your shell might not find the executable. To fix this, you need to add$HOME/.local/binto your user’s$PATHas follows:echo "export "PATH=$HOME/.local/bin:$PATH"" | tee -a "$HOME/.profile" > /dev/nullThen logoff and back on to apply the changes.
Docker installation
-
Install on the LinuxServer TVH docker container: Required for containerized TVH server installations because by deafult, the LinuxServer TVH container does not include Streamlink. I created a repo called tvhlink where I wrote a script to handle the automatic installation and update of the Streamlink utility via LinuxServer’s custom script execution feature. To use it, do the following:
- Install git on the docker host machine (not the container):
sudo apt update && sudo apt install git - Clone the tvhlink repo to
/opt:cd /opt && sudo git clone https://github.com/cgomesu/tvhlink.git - Go to the directory where your TVH container’s
/configis (edit<TVH_CONTAINER>below before running the command) and create a new dir calledcustom-cont-init.d. Any scripts in this dir are automatically executed at the container’s start-up:cd <TVH_CONTAINER> && sudo mkdir custom-cont-init.d - Copy the
streamlink_for_tvh_container.shscript from thetvhlinkrepo to the newcustom-cont-init.ddir:sudo cp /opt/tvhlink/tools/docker/streamlink_for_tvh_container.sh custom-cont-init.d/ - Fix the dir and script ownership to match the
PUID(e.g.,1010) andPGID(e.g.,100) of your TVH container (edit the values before running the command below; if uncertain, then typeid <TVH_USER>, in which<TVH_USER>is the user running the TVH container):sudo chown -R 1010:100 custom-cont-init.d/ -
Because the
custom-cont-init.ddir is outside theconfigdir, you now need to mount it within your TVH container just like any other volume (e.g.,-v <TVH_CONTAINER>/custom-cont-init.d:/custom-cont-init.d). Once done, (re)start your TVH container and the script should automatically install and update Streamlink at every startup. Check the logs for any[TVHlink]messages. If you don’t see any, just recreate the container and wait until it’s done installing–it can take a few minutes.Because the script is in the same dir as the
/configdir, it should persist after a TVH container update and will automatically be triggered at start-up to reinstall the required packages and Streamlink. If you notice it’s broken, check the tvhlink repo for an update or open an issue to let me know about it. The script also updates Streamlink after it has been installed, so it makes sure your container is always runnig the latest version of it. However, the script only triggers at start-up, so it will only try to update Streamlink then. Therefore, if there’s a new Streamlink release and you want to update it in the TVH container, simply restart the container and the script should take care of it. (The script uses Python’s package manager,pip, so it will only install the latest version available there.)
For other TVH docker images, either go to my tvhlink repo and open an issue to request support or you will need to install Streamlink manually and then disable automatic container updates.
- Install git on the docker host machine (not the container):
Standalone usage
After installing Streamlink, you should be able to run it by itself with
streamlink [OPTIONS] <URL> [STREAM]
in which <URL> is a livestreaming channel (e.g., Explore Live Nature Cams Youtube channel: https://www.youtube.com/channel/UC-2KSeUU5SMCX6XLRD-AEvw/live) or a parsable website URL; and [STREAM] is a streaming quality profile (e.g., worst, best, 720p, 360p)–if you omit the latter, streamlink will show a list of all available profiles for the given <URL>. You can find a complete list of additional options ([OPTIONS]) with the --help usage argument, as follows:
streamlink --help
Streamlink is compatible with multiple popular video players, such as VLC and MPV. For a non-exhaustive compatibility list and their transport modes, check the official player compatibility table.
TVHlink
Now that you have installed both TVH and Streamlink, the TVHlink integration is rather trivial. In fact, the only difference between its implementation and the implementation of any IPTV is that in the configuration of each mux in the TVH server, we will be using a pipe:// command with our streamlink utility, instead of pointing it to an external MPEG-TS or similar file.
Single livestream channel
To add a single livestream channel to your TVH server, first, you need to manually create an IPTV network and then add muxes to it. We will configure the network to automatically create services for the muxes, instead of scanning them one by one, and then enable a bouquet to automatically map services to channels.
- Open your TVH webUI and go to the Networks tab of your TV inputs settings:
# Configuration > DVB Inputs > Networks - Create a new network called
Youtube:# Press AddIn the Add Network window, select the following:
# Type: IPTV Network
Now, in the Add IPTV Network window, change the following:
# Enabled: Checked
# Network name: Youtube
# Create bouquet: Checked
# Provider name: Youtube
# Ignore provider's channel numbers: Checked
# Character set: UTF-8
# Scan after creation: Unchecked
# Skip startup scan: Checked
# Service ID: 1
# Press Create
- Create a new mux called
France 24 English:# Configuration > DVB Inputs > Muxes# Press Addand in Add Mux window, select the following:
# Network: Youtube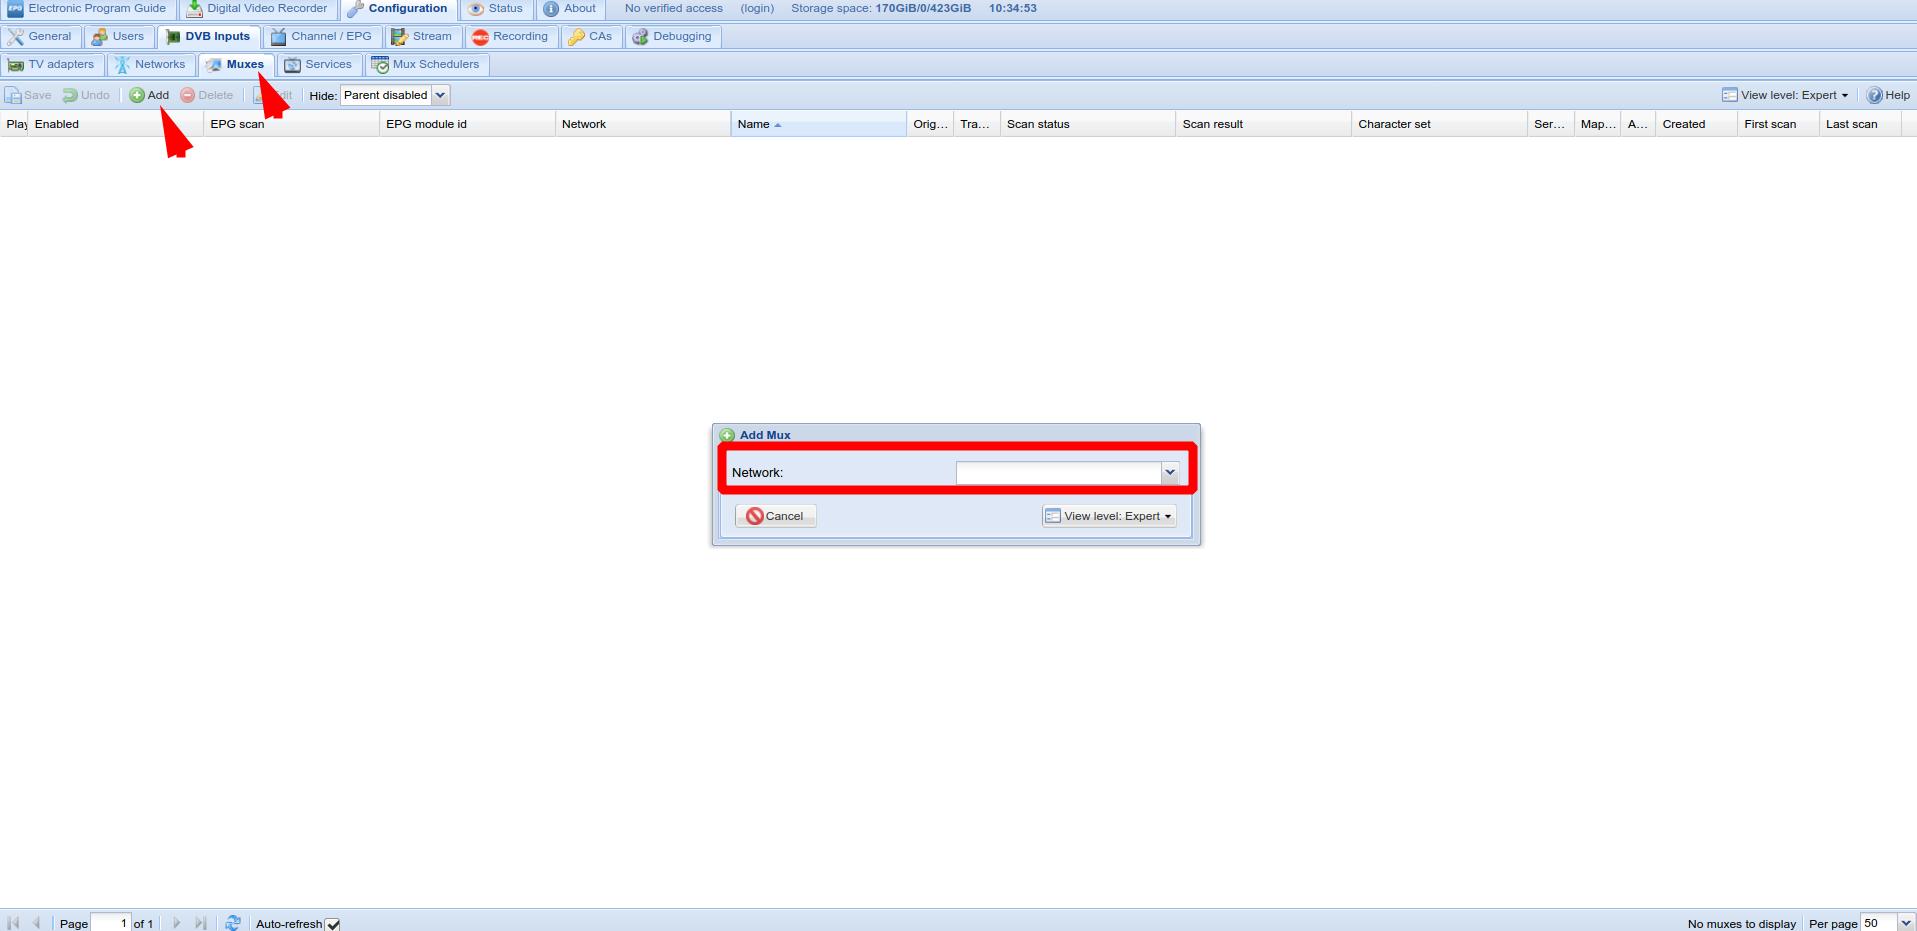
Then, change the following settings:
# Enabled: Enable
# EPG scan: Disabled
# URL: pipe:///usr/bin/env streamlink --stdout --default-stream best --url https://www.youtube.com/user/france24english/live
# Mux name: Youtube - France 24 English
# Channel number: 1
# Service name: France 24 English
# Icon URL: https://yt3.ggpht.com/ytc/AAUvwnjQokqv8-b-XLH34XJulaY0W27AzlCmyeEY7TayMw=s176-c-k-c0x00ffffff-no-rj
# Channel tags: News
# Accept zero value for TSID: Checked
# Press Create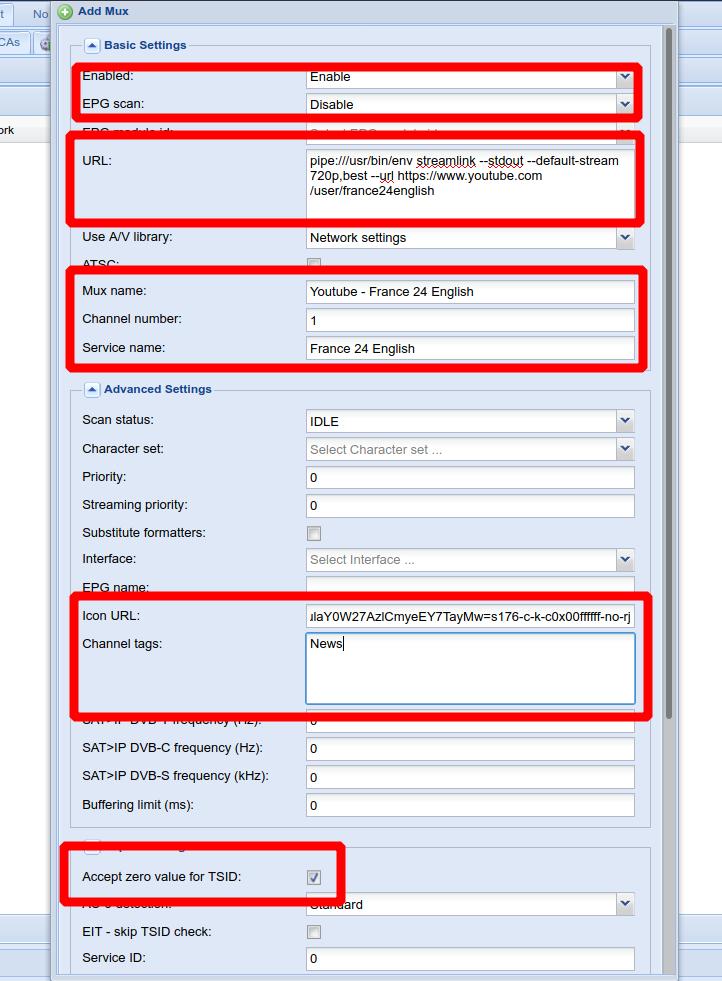
Notice the
pipe://command in URL. In brief, it tells your TVH server to callstreamlinkwith the options:--stdout: Output the stream data tostdout, which will be read by your TVH server--default-stream: Stream quality, which isbestbut could be720p,480p, or whatever is acceptable by the source (Youtube)--url: France 24 English Youtube channel URL. Sometimes, this will be the channelID instead of an alias.
It is possible to include additional options but these are both necessary and sufficient to get the TVHlink integration working. Also, I tend to use the Icon URL from the official Youtube channels because the address has proved to be quite reliable and the image format is perfect for what we are doing. Lastly, Channel tags are optional but it will help your clients finding what they want more efficiently.
-
Open the Tvheadend log window in the webUI (at the bottom) and check that the TVH is correctly requesting and reading data from
streamlink. If it is, you should see something like this:
2021-01-21 10:31:51.171 bouquet: new bouquet 'Youtube'
2021-01-21 10:55:26.380 mpegts: Youtube - France 24 English in Youtube - tuning on IPTV #1
2021-01-21 10:55:26.381 subscription: 0001: "scan" subscribing to mux "Youtube - France 24 English", weight: 5, adapter: "IPTV #1", network: "Youtube", service: "Raw PID Subscription"
2021-01-21 10:55:26.381 spawn: Executing "/usr/bin/env"
2021-01-21 10:55:27.575 spawn: [cli][info] Found matching plugin youtube for URL https://www.youtube.com/user/france24english/live
2021-01-21 10:55:30.524 spawn: [cli][info] Available streams: 144p (worst), 240p, 360p, 480p, 720p, 1080p (best)
2021-01-21 10:55:30.524 spawn: [cli][info] Opening stream: 1080p (hls)
2021-01-21 10:55:41.380 mpegts: Youtube - France 24 English in Youtube scan complete
2021-01-21 10:55:41.380 subscription: 0001: "scan" unsubscribing
And in the Scan result of the mux, you should now see a
OKstatus, which means we can configure the bouquet to automap the service to a channel that any TVH client will be able to watch. - Enable the
Youtubebouquet, as follows:# Configuration > Channel / EPG > BouquetsScroll down until you find
Youtubeand enable it:# Enabled: Checked# Press Save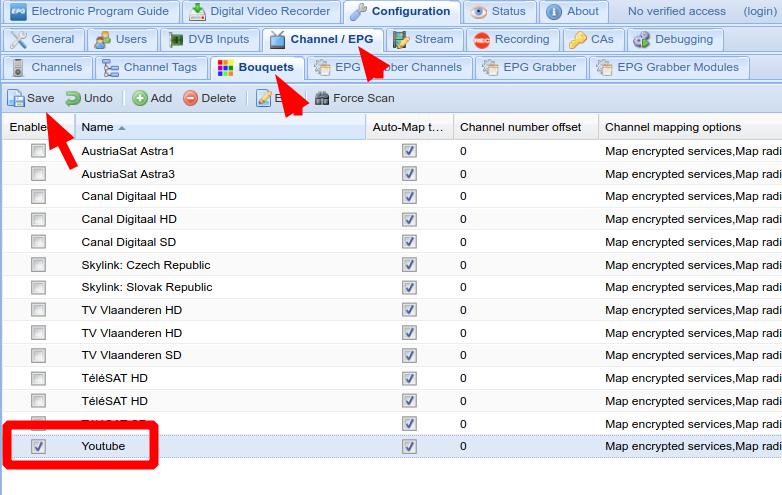
And in the Tvheadend log, you should see a message confirming that the service was mapped:
2021-01-21 11:02:41.575 bouquet: Youtube/Youtube - France 24 English/{PMT:0}: mapped service from Youtubewhich will then show up in the Channels tab:

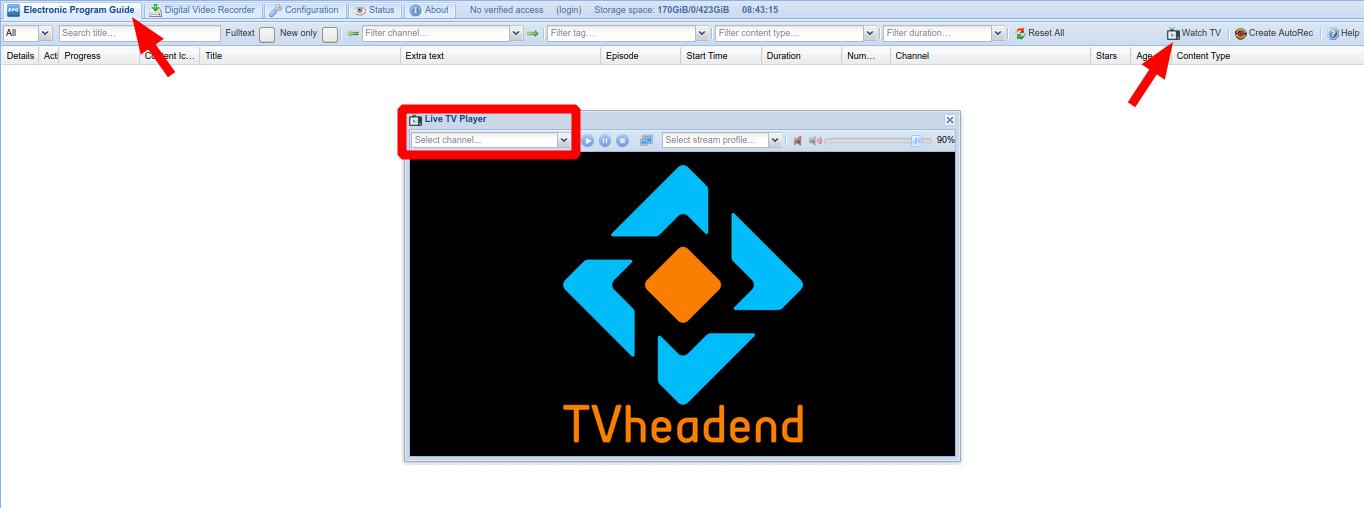
- To test your new channel using the webUI itself, do the following:
# Electronic Program Guide > Watch TV# Select channel: 1 France 24 EnglishThe webUI playback is not very reliable because lots of things depend on the web-browser you are using and how it handles the video playback. (In other words, even if you’re unable to see the video or hear the sound using the webUI, chances are the stream is working just fine when using a proper video player.) If you really want to test the connection at this point, then skip to the TVH clients section and use one of the methods described there.
Automatic network of livestream channels
If you were paying attention to the IPTV network creation step described before, you might have noticed that there is an IPTV Automatic Network option in the network Type. In this type of network, we import an external m3u file to the TVH server and it reads its tracks as muxes, which means that we don’t need to create muxes one by one. The drawback is that you need to know the m3u syntax in order to build one yourself or find someone who has already done that for you and made the file available. In this section, I will describe both alternatives.
Building m3u playlists
Anyone can create and edit m3u playlists using any simple text editor, such as Pluma, nano, vi, Vim, and so on. For example, open a text editor of your choice and copy and paste the following:
#EXTM3U
#EXTINF:-1 tvg-name="France 24 English" tvg-language="English" tvg-country="FR" tvg-logo="https://yt3.ggpht.com/ytc/AAUvwnjQokqv8-b-XLH34XJulaY0W27AzlCmyeEY7TayMw=s176-c-k-c0x00ffffff-no-rj-mo" group-title="News",France 24 English
pipe:///usr/bin/env streamlink --stdout --default-stream 720p,best --url https://www.youtube.com/user/france24english/live
#EXTINF:-1 tvg-name="France 24" tvg-language="French" tvg-country="FR" tvg-logo="https://yt3.ggpht.com/ytc/AAUvwngwSBIFO5UNdycjzkUjIRFEq0n5YWKTOgsfbgKdoQ=s176-c-k-c0x00ffffff-no-rj-mo" group-title="News",France 24
pipe:///usr/bin/env streamlink --stdout --default-stream 720p,best --url https://www.youtube.com/user/france24/live
#EXTINF:-1 tvg-name="DW English" tvg-language="English" tvg-country="DE" tvg-logo="https://yt3.ggpht.com/ytc/AAUvwngnDcvUkm6jCn6TEENsvO8bdy60g-T4lCgUWOyemCs=s176-c-k-c0x00ffffff-no-rj-mo" group-title="News",DW English
pipe:///usr/bin/env streamlink --stdout --default-stream 720p,best --url https://www.youtube.com/user/deutschewelleenglish/live
#EXTINF:-1 tvg-name="DW Deutsch" tvg-language="German" tvg-country="DE" tvg-logo="https://yt3.ggpht.com/ytc/AAUvwnhXY-iIvV4naxL4WWuS_JQKOqfjqwSgzMswGp4aJUc=s176-c-k-c0x00ffffff-no-rj-mo" group-title="News",DW Deutsch
pipe:///usr/bin/env streamlink --stdout --default-stream 720p,best --url https://www.youtube.com/user/deutschewelle/live
#EXTINF:-1 tvg-name="Euronews English" tvg-language="English" tvg-country="FR" tvg-logo="https://yt3.ggpht.com/ytc/AAUvwnja_dPZdy_el5IhBkj9BJUAd29fZzSs4-vaws_uPLw=s176-c-k-c0x00ffffff-no-rj-mo" group-title="News",Euronews English
pipe:///usr/bin/env streamlink --stdout --default-stream 720p,best --url https://www.youtube.com/user/Euronews/live
#EXTINF:-1 tvg-name="Euronews Spanish" tvg-language="Spanish" tvg-country="FR" tvg-logo="https://yt3.ggpht.com/ytc/AAUvwnh8LYxyL6VKfHAGYV0qCJ4hqaWDO5GympC7lRIViw=s176-c-k-c0x00ffffff-no-rj-mo" group-title="News",Euronews Spanish
pipe:///usr/bin/env streamlink --stdout --default-stream 720p,best --url https://www.youtube.com/user/euronewses/live
#EXTINF:-1 tvg-name="Euronews Portuguese" tvg-language="Portuguese" tvg-country="FR" tvg-logo="https://yt3.ggpht.com/ytc/AAUvwngxE0l-vGHBafT-fP7WfCq_Xo7QfDLATRspf0agKA=s176-c-k-c0x00ffffff-no-rj-mo" group-title="News",Euronews Portuguese
pipe:///usr/bin/env streamlink --stdout --default-stream 720p,best --url https://www.youtube.com/user/euronewspt/live
Then, observe that
-
The first row always contains
#EXTM3Uto identify this file as being anm3uplaylist; -
The remaining rows contain two distinct rows, namely (a) one starting with
#EXTINF:that defines properties of a mux, and (b) another immediately below it that contains thepipe://command to request the stream data.
Regarding the #EXTINF: row, the -1 next to it simply indicates that this track has infinite length; the meaning of the other variables is quite intuitive. Of note, however, I’ve ommitted the tvg-id variable that is often found in such files because it has no useful meaning outside the context of EPG data. If you choose to play around with EPG, then you might want to add one that matches the channel’s id in a given EPG data provider, for example.
As long as you follow the structure in the example, you can add as many livestreaming channels as you want. When you are done, you can import your m3u playlist to the TVH server as follows:
-
Save your
m3uplaylist with the nameyoutube.m3uon a dir accessible to your TVH server. In Dockerized installations, I suggest to create a subdir on the container’s appdata (next to its/configdir, for example) and in the container’s settings, add a new volume bind pointing to the new dir you created. Make sure to fix permissions, so that the new dir andm3ufiles match thePUIDandPGIDof the TVH server; - Open your TVH webUI and naviagate to the Networks tab:
# Configuration > DVB Inputs > Networks - Create a new network called
Youtube Auto:# Press AddIn the Add Network window, select the following:
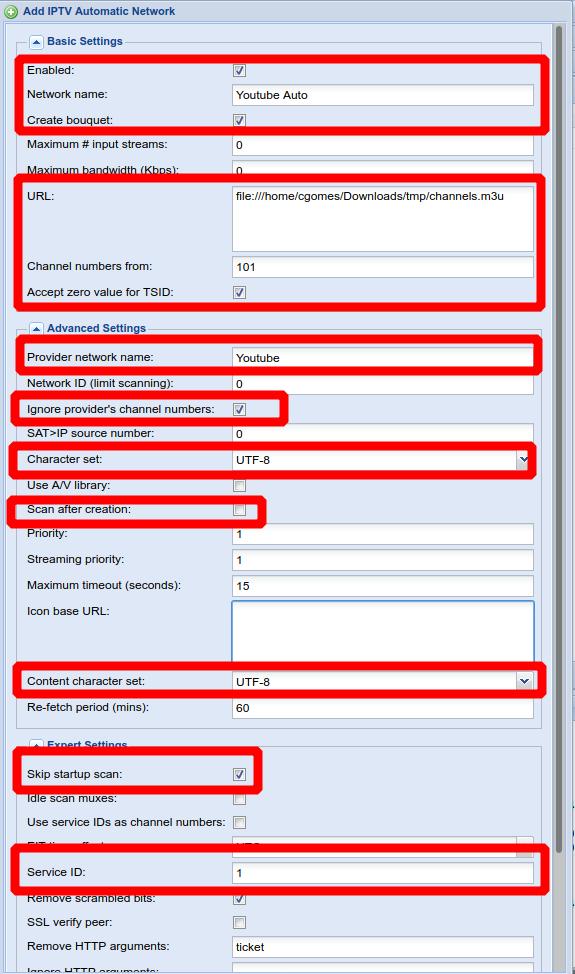
# Type: IPTV Automatic NetworkNow, in the Add IPTV Network window, change the following:
# Enabled: Checked
# Network name: Youtube Auto
# Create bouquet: Checked
# URL: file:///full/path/to/youtube.m3u
# Channel numbers from: 101
# Accept zero value for TSID: Checked
# Provider name: Youtube
# Ignore provider's channel numbers: Checked
# Character set: UTF-8
# Scan after creation: Unchecked
# Content character set: UTF-8
# Skip startup scan: Checked
# Service ID: 1
# Press Create
- Enable the
Youtube Autobouquet, as follows:# Configuration > Channel / EPG > BouquetsScroll down until you find
Youtube Autoand enable it:# Enabled: Checked# Press Savewhich should map all services to channels in the Channels tab:
- To test your new channels using the webUI itself, do the following:
# Electronic Program Guide > Watch TV - That is it! You have learned how to build and import a customized
m3uplaylist of livestreams to your TVH server. If you think this is a lot of work, check the following section then.
Curated m3u playlists
I create a Github repository called tvhlink that contains tools and m3u playlists I personally use for my TVHlink integration. You are all welcome to use my m3u playlists and contribute to keep them up-to-date (fork, make changes, push commits, and submit a PR with a description of what and why).
To add one of my curated m3u playlists to your TVH server, follow the same steps as in the previous section, with the following exceptions:
- You do not need to save any playlist locally, unless you want to edit them before importing to the TVH server. Instead, you can tell your TVH server to automatically fetch from the tvhlink repo, as follows:
-
In the Add IPTV Automatic Network copy and paste the following on the URL option to fetch my
youtube.m3uplaylist:https://raw.githubusercontent.com/cgomesu/tvhlink/master/m3u/youtube.m3uor alternatively, my
direct.m3uplaylist:https://raw.githubusercontent.com/cgomesu/tvhlink/master/m3u/direct.m3u
-
That is it! Your TVH server will automatically check the tvhlink repo every hour for changes and if detected, it will update all your channels accordingly.
TVH clients
Now that there is a TVH server up and running with the TVHlink integration enabled, you should configure at least one TVH client for testing purpose. There are multiple ways to watch the channels on your TVH server, including directly from the TVH webUI itself:
# Electronic Program Guide > Watch TV
The webUI player uses a very specific streaming profile though, and because it requires access to the webUI, it’s not possible to test the client user this way (because it doesn’t have permission to access the webUI).
There are clients (apps) for iOS and Android, for example. They can be clients developed for a TVH server–such as Robert’s TVHClient for Android or Luis’ TvhClient for iOS–or general use IPTV players. The latter works because the TVH server can provide a parsable m3u file to such players–see the section about the VLC player for an example of how to obtain such file.
Here, however, I will show how to configure my two preferred clients. Specifically, the Kodi PVR addon and VLC and other m3u players.
TVH Kodi PVR addon
The TVH HTSP client addon for the Kodi Media Center is by far my favorite client. It uses the proper protocol for streaming (HTSP) and has predictive tuning, which makes the channel transitions very smooth because it loads neighboring channels in advance, threfore reducing the initial livestream request time (but this also greatly incrases bandwidth usage).
You can install Kodi on pretty much any OS. The official Kodi website provides a variety of installation packages to download and you will find a HOW-TO button for each one of them. Choose one of them and follow the installation instructions. When you are done, come back to see how to install the TVH PVR addon.
- To install the PVR addon, open Kodi and try to install via the official repo:
# Addons > Install from repo > PVR clients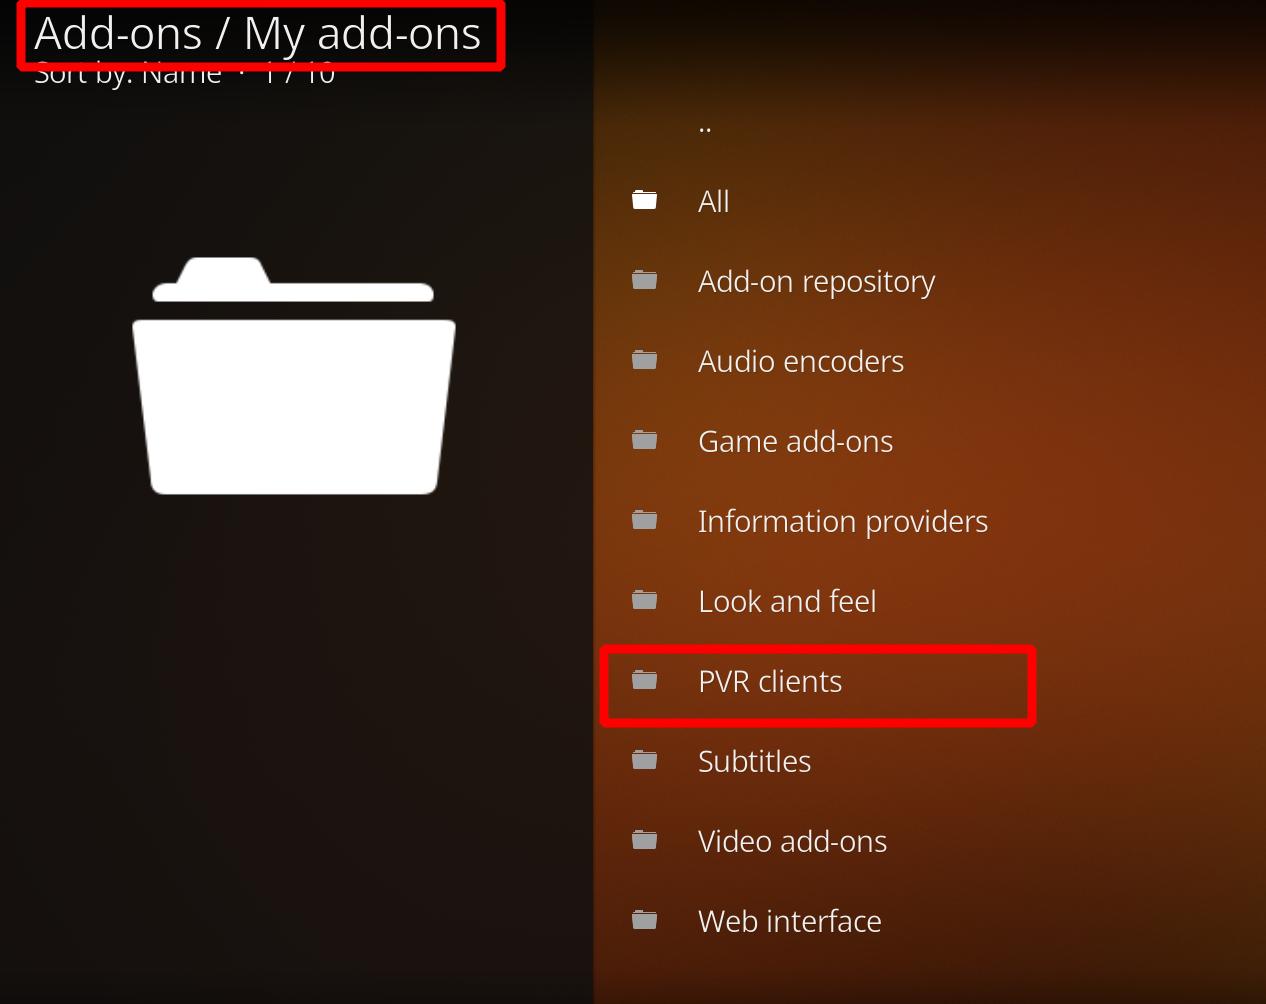
- If you find the
PVR clientsoption, then select it, then selectTvheadend HTSP Clientand install it. However, if you do not find thePVR clientsoption, this means the PVR clients binary was not packaged with your Kodi version, which happens with a fewapt-based distributions. The solution is to manually install the missing addon. Close Kodi and open a terminal, then with asudouser, type the following:sudo apt update && sudo apt install kodi-pvr-htsRestart Kodi and the
PVR clientsoption should be available and will contain theTvheadend HTSP Clientinstalled.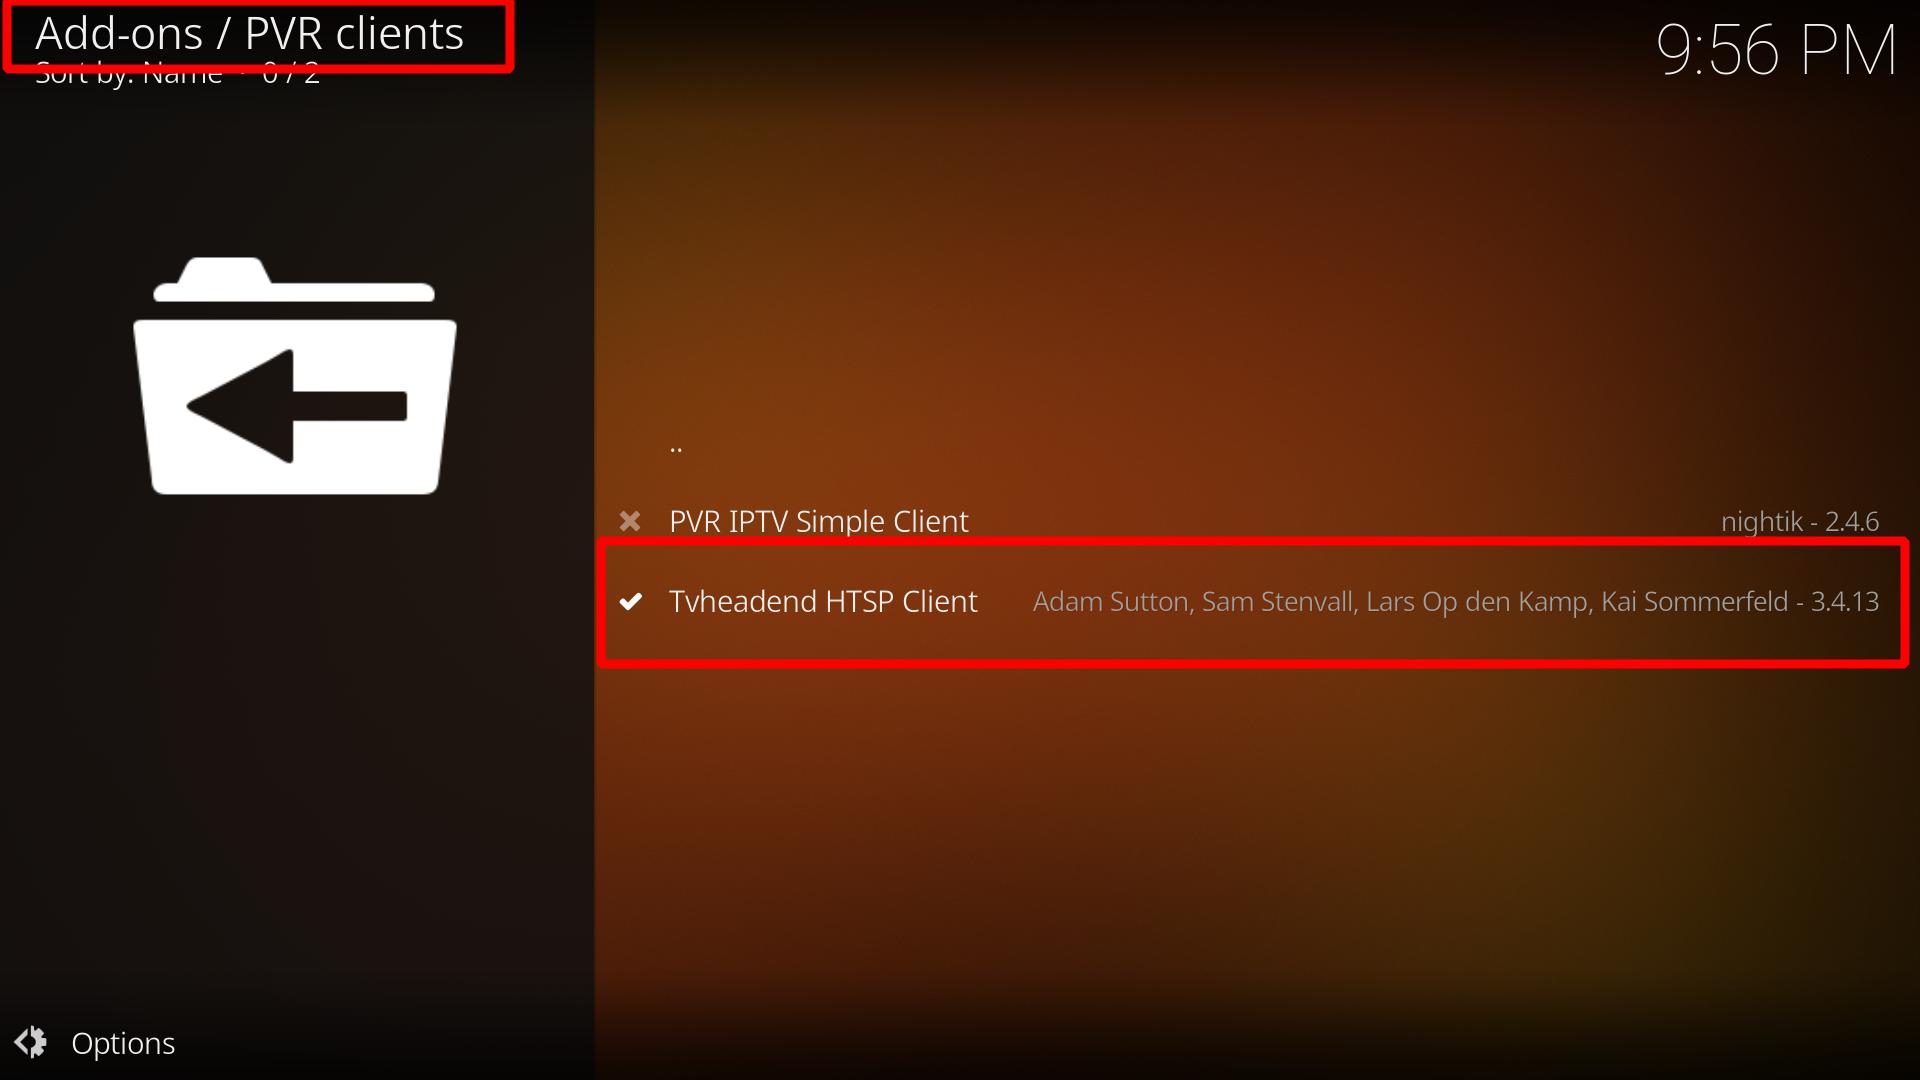
Another option to install a missing addon is to download a
.zipof it from a public website and in the Kodi addons tab, chooseinstall from zip. However, do not go around installing addons from random websites. Do your research first. Unofficial addons can contain all sorts of bad stuff. - Now, to configure the PVR addon, do the following:
# Addons > My addons > PVR clients > Tvheadend HTSP Client > Configureand in the Connection settings tab, change the following:
# IP address: <IP of the machine hosting the TVH server>
# HTTP port: 9981
# HTSP port: 9982
# Username: client
# Password: client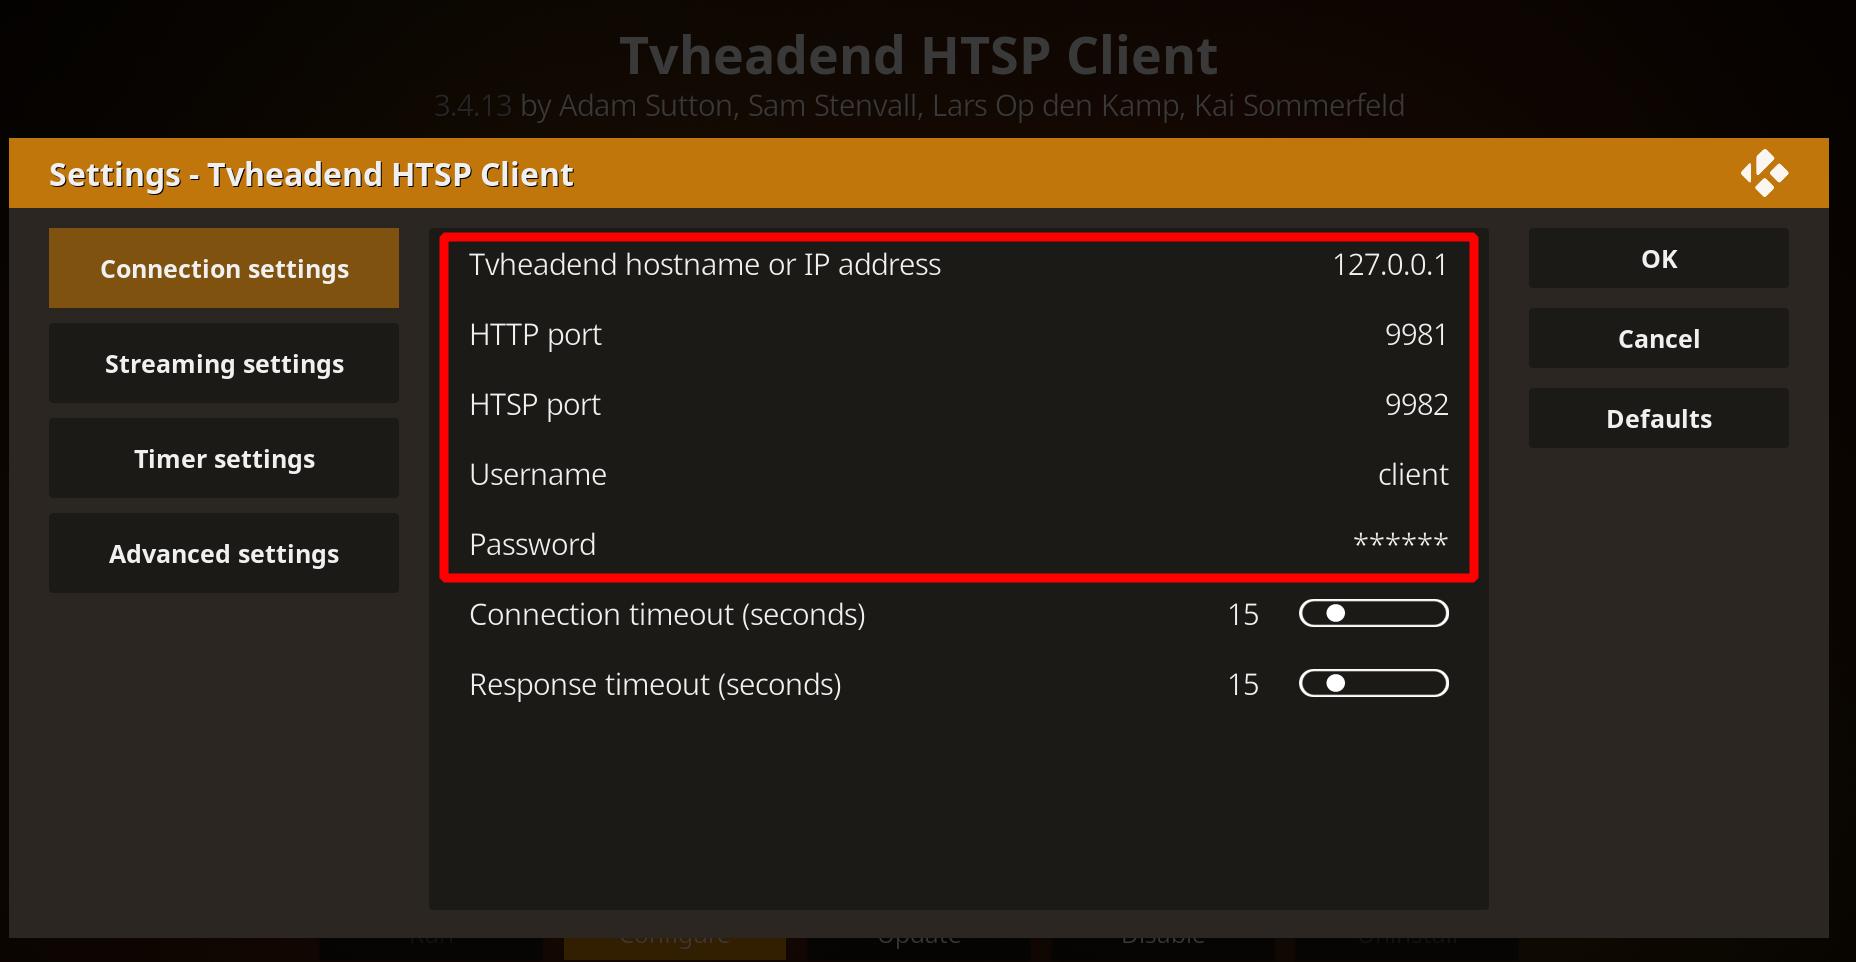
and in the Streaming settings, change the following:
# Profile to use: htsp
# Use predictive tuning: Enabled
# Number of subscriptions: 3
# Unused subscription delay: 50
# Press OK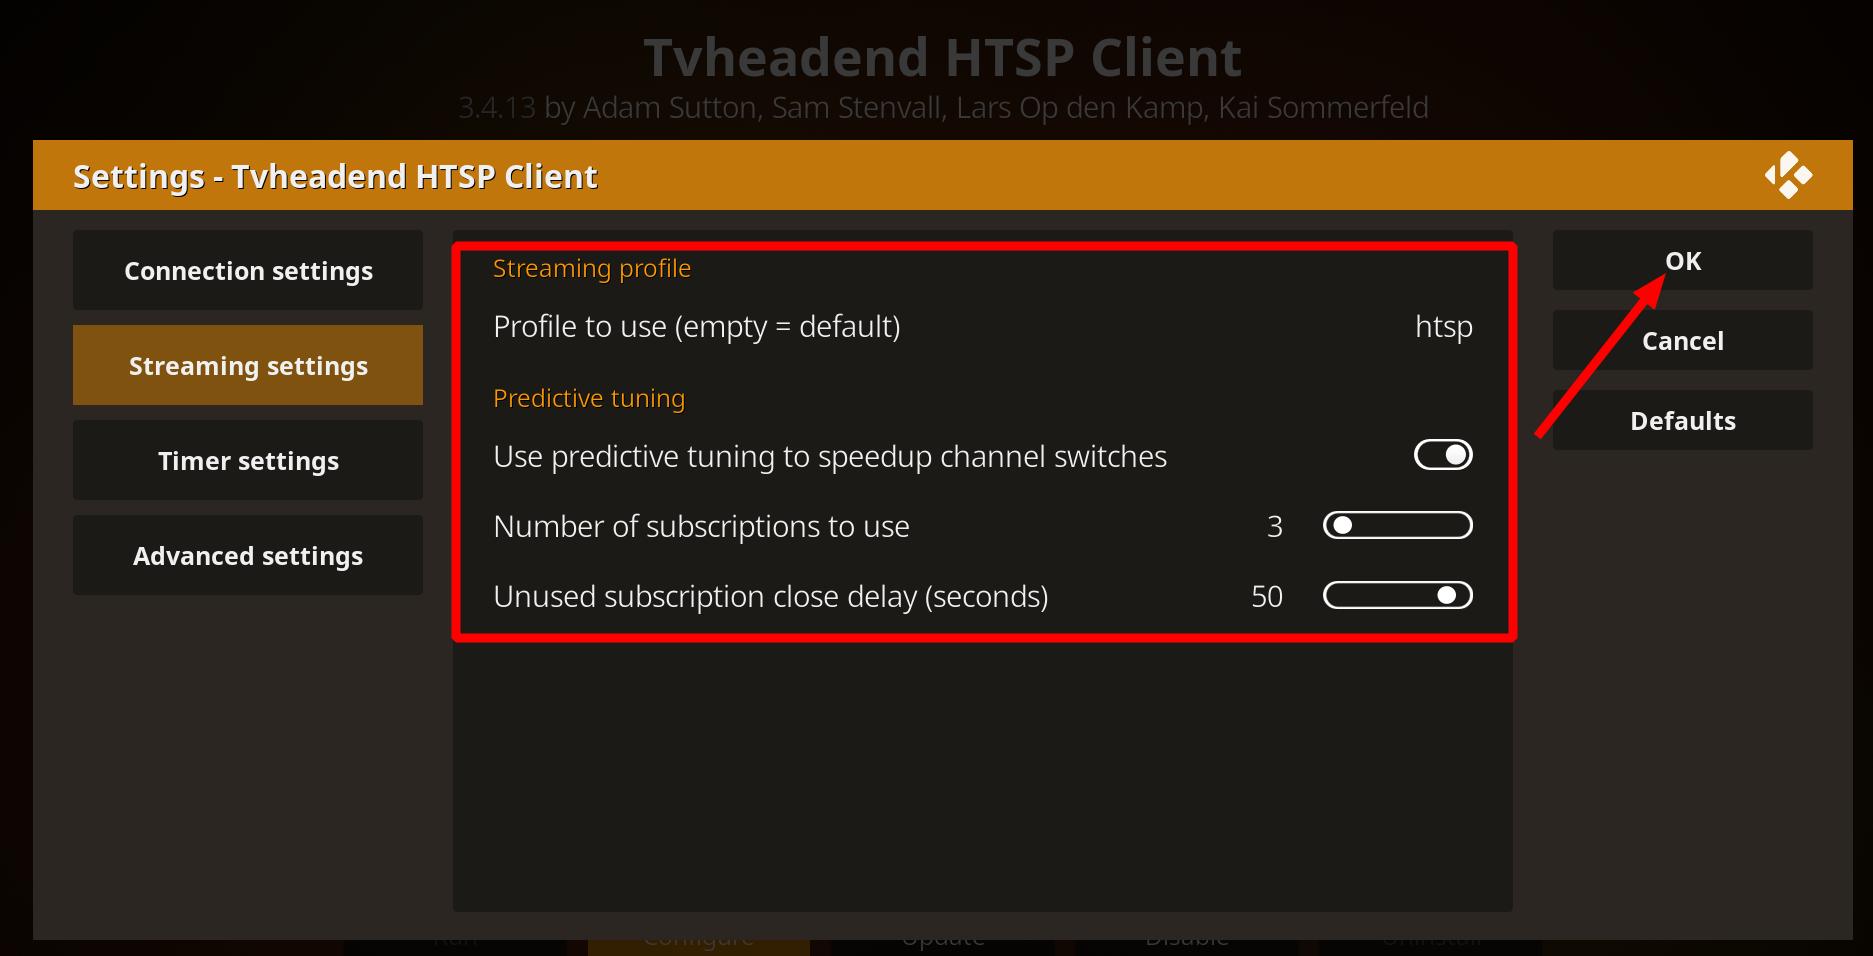
- Every time you change the client configuration, you will be required to restart Kodi to see the changes. So, restart your Kodi now. Once it comes back, all the channels will show up in
# TV > Channels -
Go ahead and test a few of them. If you want to debug the connection, open a web-browser and navigate to your TVH webUI. At the bottom of the webUI, there’s a button to open the TVH log. Press the buttom and see the log updates live.

- Lastly, additional Kodi PVR settings can be changed in
# Settings > PVR & Live TV settings - That is it! Enjoy your TVHlink integration.
VLC and other m3u players
VLC media player (previously the VideoLAN Client and commonly known as simply VLC) is a free and open-source, portable, cross-platform media player software, and streaming media server developed by the VideoLAN project. VLC is available for desktop operating systems, and mobile platforms, such as Android, iOS, iPadOS, Tizen, Windows 10 Mobile, and Windows Phone. VLC is also available on digital distribution platforms such as Apple’s App Store, Google Play, and Microsoft Store.
The VLC player is available to a variety of platforms and can be downloaded from the official website.
There is an unofficial TVH HTSP plugin for VLC but the repository has been archived and according to the author:
I am no longer working on this (..). Also, if you export an m3u playlist of your channels from tvh, and open it in VLC, you have the same set of features this plugin offers, just without all the weird bugs.
Fortunately, it is very easy to export your TVH channels m3u playlist and use it with the VLC player or any other m3u capable player:
-
Open a web-browser and navigate to your TVH webUI;
- Append
/playlistto the TVH webUI address, as follows:http://TVH_HOST_IP:9981/playlist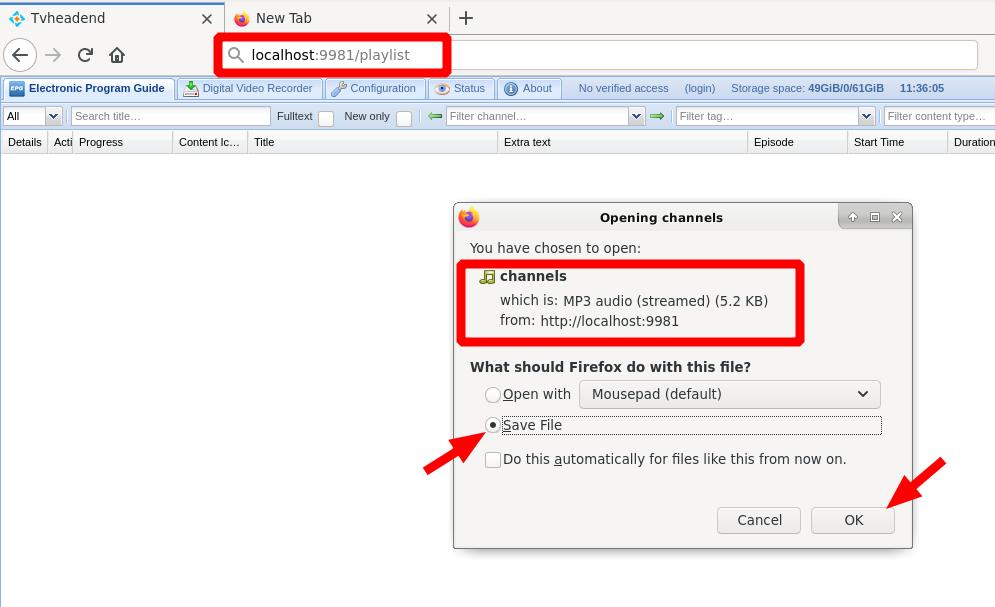
-
This will request an
m3uplaylist from your TVH server calledchannels. It contains all currently configured channels from your server. Save it on a directory accessible to your VLC player or otherm3uplayer.If you open the
m3uplaylist with a text editor, you will see that below each#EXTINF, there is a network address (http://...). If the address does not contain the IP address of your TVH server host, go ahead and replace them. Please do not do this manually; use the editor’s find a replace tool instead. For example, if your client is not running on the same host as the TVH server, then instead ofhttp://localhostorhttp://127.0.0.1, you would want to usehttp://TVH_IP, in whichTVH_IPis the IP address of the TVH server host in your local network. When you’re done making the changes, just save them3ufile. - Open your VLC player and open the
channelsm3uplaylist as follows:# Media > Open filesThen, in the Select on or more files to open window, select All Files type, navigate to where you stored the
channelsplaylist and open it.
-
You should be prompted to authenticate yourself now. Use your
clientcredentials. - That is it! Enjoy your TVHlink integration.
Conclusion
You have reached the end of this tutorial. If you have not started configuring your TVH server, this is the perfect time to do so. I have been using this integration for multiple months now and it has been absolutely great. I strongly recommend it for any cord-cutters out there and in my opinion, it is a must have if you already have a TVH server up and running.
Streamlink v2.0 made the implementation of Youtube channels so much simpler than before and in my experience, Youtube provides the most reliable 24/7 livestream channels (mostly news, webcams, and music). I am not a big fan of gaming streams in general, so I don’t ever watch Twitch streams, for example. But as pointed out previously, Streamlink has plugins able to parse content from many sources other than Youtube and you are welcome to try them out.
Of note, if you are trying to add a Twitch stream to your TVHlink integration, make sure to use the --twitch-disable-ads flag in the pipe:// command, per recommendation from the Twitch plugin maintainers. Otherwise, you will likely see a warning message. It is also suggested to increase your TVH network timeout settings because the filtering of the initial ad might be incorrectly interpreted as lack of signal, thus causing the stream’s termination.
That is it for now. If you enjoyed or have a few suggestions, let me know. Every once in a while, come back and check the changelog for updates.