
Changelog
January 21st, 2021: READ THIS. This tutorial has been deprecated because I wrote a new tutorial about the integration between Tvheadend and Streamlink, called TVHlink: Livestreams as IPTV channels with TVHeadend and Streamlink. The integration has been greatly simplified and is more reliable than before. In addition, the new tutorial is much more comprehensive than this one. The new tutorial is self-contained, so you don’t need to read this one first–just skip it altogether. I will only keep this up for archiving purposes.
September 15th, 2020: There’s a new release of the Youtube4TVH program that does not require the use of API keys. The section about how to create an API key has been updated accordingly.
June 23rd, 2020: Moved content from Blogger to my website and converted to markdown. Fixed typos I found.
May 19th, 2020: Added info about TVH m3u re-fetch period and youtube4tvh cronjob for streams that change very often.
May 14th, 2020: Added more info about streamlink install and outdated versions; fixed a few typos.
Introduction
In this guide, we will learn how to feed Youtube live-streams into a TVHeadend (TVH) server as IPTV channels. This is a fairly advanced guide but I’ll try my best to make it as digestible as possible to any individual with minimal knowledge about selfhosting. You will need a Linux distro (e.g., Debian, Ubuntu) to follow this guide. All the software described here is free and open-source.
I’m not an expert in any of the topics mentioned here. If you have suggestions on how to improve something, please leave a comment below stating what could be changed and why it should be changed.
Youtube4tvh is a utility program I wrote just for this guide. I welcome anyone who wants to improve it or fork into something more abstract. If that sounds like something you want to do, please head to my Github repo and hit me up once you’ve done some coding.
Motivation
There are multiple reasons to watch Youtube live-streams as if they were IPTV channels. Here are a reasons few that come to mind right now:
- It’s free and all programs are open-source;
- There is at least one Youtube 24/7 live-stream that you enjoy. Some of my personal favorites, per category:
- News: ABC News AU, Sky News, DW in English, France 24 in English
- Space: NASA TV, Space Videos, Space & The Universe HD
- Webcam - Nature: Cornell Lab of Ornithology Cams, Monterey Bay Aquarium, Explore Oceans, Explore Nature, Volcanoverse
- Webcam - Other: Virtual Railfan, earthTV, I Love You Venice,
- Radio: BGM channel, Cafe del Mar, Stay See
- You want to make selected Youtube live-streams available as IPTV channels through a TVH server (TVH -> Streamlink pipe -> Youtube);
- You want to keep your streaming services as centralized as possible. That is, instead of multiple apps, you can manage all of them using a single application (TVH);
- You want to take advantage of one of the fastest and most reliable media delivery networks out there (Youtube’s CDN);
- You dislike Youtube ads (Streamlink will get rid of them without the need to install any filtering system);
- You like how it looks for the client:
Objectives
By the end of the guide, you’ll have learned how to do the following:
- Create a customized Youtube live-stream m3u playlist with the help of youtube4tvh;
- Install a TVH server on a Linux machine;
- Install Streamlink to pipe live-stream data into a TVH server;
- Add a Youtube live-stream m3u playlist to a TVH server as an IPTV auto network;
- Configure a TVH server to auto-map muxes to channels using bouquets;
- Create a cronjob to automatically update the Youtube live-stream m3u playlist every day at 6am.
Client-server layout
There are three main components to this setup, namely TVH, Streamlink, and youtube4tvh, which are all open-source and free:
- TVHeadend: Tvheadend is a TV streaming server for Linux supporting DVB-S, DVB-S2, DVB-C, DVB-T, ATSC, IPTV, SAT>IP and other formats through the unix pipe as input sources.
- Streamlink: Streamlink is a CLI utility which pipes video streams from various services into a video player.
- youtube4tvh: Youtube4tvh is a Python CLI program that uses Youtube API to create (or update) m3u playlists of live-streams that are piped into a TVH server via Streamlink.
For this guide, we will assume that such components are related to each other and any clients (any IPTV players, such as VLC, Plex or a Kodi PVR) according to the following layout:
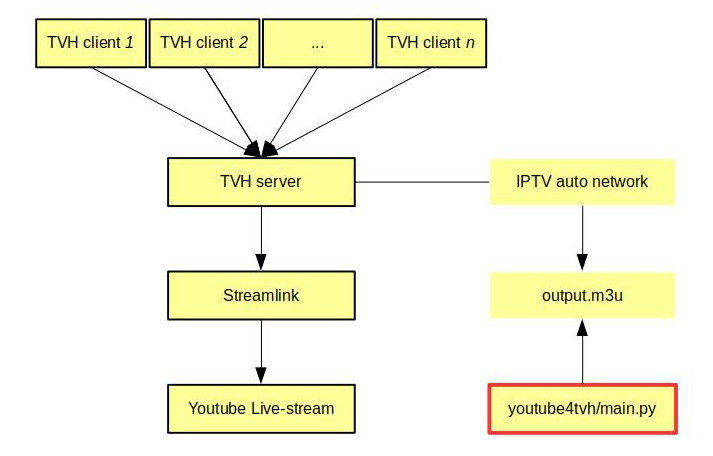
However, once you’re done with the initial configuration, you can try changing it to accomodate your needs. For example, you can multicast a live-stream to a TVH server using VLC. This will let you use a single connection to Youtube be distributed to multiple clients, instead of creating multiple connections to Youtube–definitely take a look at it if you’re serving a large number of clients with your TVH server. Also, you might want to pipe the Streamlink data to FFMPEG before sending to TVH, which will let you set custom AV codecs.
Youtube4tvh
This is a utility program that will let us create and manage m3u playlist of Youtube live-streams. It can extract information directly from Youtube’s frontend (default) or from Youtube’s API (by using a valid API key). Be aware that the API keys have daily quotas that this program will reach fairly quickly. For more info, checkout the github page.
Create a Youtube API v3
Since the release of v0.1.1, youtube4tvh does not require the use of API keys to run. Therefore, the use of API keys is now optional. If you choose to skip this step, simply omit the --apikey argument when running this utility.
You can find instructions on the official page. If you don’t want to head there, here is a streamlined version:
-
Sing up for or Log into your Google account;
-
Go to your API dashboard;
-
Create a project (top left > new project);
-
Give the project a name and create it (this should take a few seconds…);
-
Select the project you just created and in the dashboard, go to ‘+ Enable APIs and Services’;
-
Search for Youtube Data API v3 and enable it;
-
It should redirect you to its dashboard but if doesn’t, select Manage;
-
Select Create Credentials (if you don’t see a button, just go to Credentials in the side menu);
-
It’s going to ask you which API you’re going to use (select Youtube Data API v3), where you’ll be calling it from (Other UI) and what data (Public data). Then select ‘What credentials do I need?’ and it will generate an unrestricted API for the project you created;
-
In the side menu, go to Credentials and Edit the API Key you generated;
-
Under ‘API restrictions’, select Restrict key > Youtube Data API v3 > Save.
That’s it! Your key is that long string with random letters and numbers in the column labeled Key. Whenever you see a field to YOURKEY, use that one. Also, you can repeat this process to generate additional keys. It’s a good idea to do so.
Install youtube4tvh
Open a terminal window and run the following:
sudo apt update
sudo apt install git python-pip
cd /opt
sudo git clone https://github.com/cgomesu/youtube4tvh.git
cd youtube4tvh
Install required packages via pip:
pip install .
Test the program (change YOURKEY for your API key)
cd youtube4tvh
python main.py --apikey=YOURKEY --channelname="DW News"
Now, there should be an output.m3u file on the same folder you are (you can ls to list files).
If you run into permission issues, make sure to use a user with sudo perission. Also, if your user is not allowed to write to /opt, then run the follwing (changing YOURUSER for your sudo username):
sudo chown -R YOURUSER:sudo /opt/youtube4tvh
If everything looks good, go ahead and add permission to execute the streamlink.sh helper script that will pipe data into TVH (if you want to change settings from streamlink, change them in the streamlink.sh file):
sudo chmod +x /opt/youtube4tvh/streamlink.sh
Basic usage
This program has two modes of execution, add and update. The --mode=add is the default mode and it will create an m3u file if you don’t specify one. However, if you do provide an --m3uinput=/path/to/file.m3u, it will instead append channels to output.m3u. (If --m3uinput and --m3uoutput are the same, then it appends to itself.)
The --mode=update will parse an --m3uinput=/path/to/file.m3u and update all URLs to make sure they are the ones currently available (instead of a broken URL). This is useful because even though some Youtube channels stream 24/7, they will at times stop and restart the stream, which will cause Youtube to generate a new URL to their live-stream. The --mode=update will make sure your output.m3u is always using the correct URLs. (Again, if you want to update the same input file, then point both --m3uinput and --m3uoutput to the same m3u file.)
First, we will generate a youtube.m3u file with the channel “DW News”. Afterwards, we will append a couple of additional channels to the youtube.m3u file. Then, we will create a cronjob to keep our youtube.m3u up-to-date.
- Create youtube.m3u file and add the channel “DW News” (change
YOURKEYto your actual API key):
cd /opt/youtube4tvh/youtube4tvh
python main.py --apikey=YOURKEY --m3uoutput=youtube.m3u --channelname="DW News"
- Append the channel “France 24 English” to the youtube.m3u file:
python main.py --apikey=YOURKEY --m3uinput=youtube.m3u --m3uoutput=youtube.m3u --channelname="France 24 English"
- Append the channel “Explore Nature” to the youtube.m3u file:
python main.py --apikey=YOURKEY --m3uinput=youtube.m3u --m3uoutput=youtube.m3u --channelname="Explore Nature"
- Create a cronjob to update the youtube.m3u file everyday at 6am. First, make a backup or your youtube.m3u file:
cp /opt/youtube4tvh/youtube4tvh/youtube.m3u /opt/youtube4tvh/youtube4tvh/youtube.m3u.backup
- Create a cronjob:
crontab -e
- Add the following at the bottom
0 6 * * * /usr/bin/python /opt/youtube4tvh/youtube4tvh/main.py --apikey=YOURKEY --m3uinput=/opt/youtube4tvh/youtube4tvh/youtube.m3u --m3uoutput=/opt/youtube4tvh/youtube4tvh/youtube.m3u --mode=update
- Save and exit (ctrl+x)
That’s all we need to do with this program. If you ever feel like adding a new channel to the playlist, you can just repeat the “Append” examples with the new channel instead.
If you want to remove a channel, you’ll need to manually edit the youtube.m3u file (remove the channel’s #EXTINF row and the one immediately below it, which contains the pipe command). You can also manually edit the m3u file to add a group-title to the channels (see sample/input.m3u, for example), change their order, etc. Just use your favorite text editor to do that and when you’re done, save preserving the .m3u extension.
Recommendations
Theoretically, the m3u playlists can contain as many streams as you want. However, as a general rule of thumb, I find it useful to create one m3u playlist for each type of streaming channel–for example, youtube-webcams.m3u, youtube-news.m3u, youtube-radio.m3u, and etc–and then have a unique API key for each of them. This way, I can run the youtube4tvh cronjob more often, thus reducing the chance of having broken URLs in the m3u file.
Streamlink
Streamlink is an awesome utility program and if you’ve never used it before, make sure to check their documentation. Here, we will only use it to pipe data from Youtube to a TVH server but Streamlink is able to pipe video streams from many other platforms (Twitch, Dailymotion, etc.).
To install Streamlink, please follow the instructions on the official website. Make sure you’re running the latest version afterwards. You can find the installed version by running streamlink --version, which should be the same one as the latest version on their Releases page.
(It looks like multiple repos are distributing a much older version than the 1.4.1, which is the latest when this article was first posted. If that’s the case for your distro, take a look at the PyPi and source installation on their Install page. Uninstall the older version and install via pip and if that doesn’t work, try cloning their git repo and install via setup-tools, very much like the youtube4tvh utility.)
In /opt/youtube4tvh, you’ll notice a file called streamlink.sh. That is a helper script that TVH will use to get the video stream from a Youtube URL. If you open it with a text editor, you’ll see the following:
#!/bin/bash
####################################################
################ Streamlink script #################
####################################################
# The default version writes the data from the best
# stream ($1, the first argument) to stdout using a
# thread pool of size 2 to download HLS segments.
# Everything else follows default values.
#
# Inspired by niwi_niwi's post at
# https://tvheadend.org/boards/5/topics/35658
#
# More info: https://streamlink.github.io/cli.html
#
####################################################
#### Add/modify script according to your needs #####
streamlink \
--stdout \
--hls-segment-threads 4 \
--hls-live-edge 10 \
"$1" best
The actual command to execute streamlink and its options are all at the bottom. If you know what you’re doing and want to play with different configurations, go ahead and change the arguments in the streamlink command. Say, if instead of playing always the ‘best’ stream you want to play the 480p version, then just change it to that (but always leave --stdout or you won’t be able to pipe data to TVH). Once again, check the docs for a comprehensive list of options.
To test the script, you can simply execute the following (change YOUTUBEURL for the URL of a Youtube live-stream):
bash streamlink.sh YOUTUBEURL
You should see a whole bunch random characters as streamlink outputs the video stream to the terminal. Hit ctrl+c to terminate the process. If you have a player, you can run the command above with a pipe to the player. Using VLC, for example:
bash streamlink.sh YOUTUBEURL | vlc -
TVH server
TVH was a game-changer for me. It offers a centralized system to manage multiple IPTV networks and TV tuners. I can fully customize how all channels will show up to all my clients and that’s so much better than using multiple (and sometimes shady) applications developed by each IPTV provider. If a channel is down, I can tell TVH to automatically remove it or remap to another provider. If the EPG is not working, I can tell TVH to fetch from another source. If a client does not support a particular type of codec, I can create a profile that uses the codec that works with it. And all those changes are automatically applied to all clients, without the need to change one by one, because they are all getting data from my TVH server instead of external sources. (It’s the TVH server that should always do that latter.)
Installation
To install a TVH server, please follow the instructions on the official website. I strongly suggest you to install from the repo to make it easy to update with a simple apt update command. Also, make sure you’re running the latest version of it afterwards.
Basic configuration
After installing TVH, head to the webUI on http://localhost:9981. (If you’re not running a desktop environment on the same machine, access it from another machine on the same network and change localhost for the IP of the machine running the TVH server. Also, it goes without saying that the machine hosting the TVH server should have a fixed IP address at the local network because all the clients will be pointing to it.)
If you provided admin credentials for TVH during the installation, it will ask you to identify yourself now.
TVH will start the wizard the first time you access the webUI but you can just skip it (hit Cancel).
Notice that there are several tabs in the webUI but many options will not show up if the “View level” is set to Basic, so let’s change the default to Expert:
# Go to Configuration > General > Base > Server > Set "User interface level" to Expert and hit Save
Now, let’s configure the Stream profiles to restart on error:
# Go to Configuration > Stream > Stream profiles > htsp > Check "restart on error" hit Save
(You can repeat that step to all profiles that you’re going to use. I usually just use htsp for clients and pass for auto-recording.)
While we’re at it, let’s go ahead and customize the Recording settings as well. This is all really up to your own preferences but this is what I use that is different from the default configuration:
# Go to Configuration > Recording > DVR Profiles > Default profile
# DVR file retention: 3 days
# Pre-recording padding: 5 mins
# Post-recording padding: 5 mins
# Recording system path: /path/to/my/NAS/media/iptv/recording
# Maintain free storage space in MiB: 5000
# File permissions: 0777
# Filename character set: UTF-8
# Skip commercials: Unchecked
# Format string: $c/$t - $c - %F - %R$n.$x
# Directory permissions: 0777
# Make subdirectories per channel: Checked
# Include date in filename: Checked
# Include time in filename: Checked
# Remove all unsafe characters from filename: Checked
# Hit Save
We’re done with the basic configuration! Before moving to the next section, notice that at the bottom of the webUI there’s a bar called Tvheadend log and on the opposite side, there is a button. Click on it to open the log. This is very useful to check if there’s any error while you’re making changes to the server. Keep it open as you change the settings and if you see an error, there’s probably something misconfigured that you should fix before moving on.
Create an IPTV auto network
We’re now going to create an IPTV network using the youtube.m3u file we created with youtube4tvh. Open the TVH webUI and do the following:
# Go to Configuration > DVB Inputs > Networks > Add
# Type: IPTV automatic network
This will redirect to IPTV settings. Change the following:
# Network name: youtube
# URL: file:///opt/youtube4tvh/youtube4tvh/youtube.m3u
# Create bouquet: Checked
# Channel numbers start from: 1
# Accept zero value for TSID: Checked
# Provider network name: youtube
# Ignore provider's channel numbers: Checked
# Character set: UTF-8
# Scan after creation: Unchecked
# Content character set: UTF-8
# Service ID: 1
# Hit Create
Before we move on, now is a good time to check if streamlink and the helper script are working. We’re going to force play a few muxes (channels from your youtube.m3u playlist) to make sure that it’s all good before mapping them to actual TV channels. (You gonna need a player for this step; if you don’t have one, skip it or install VLC).
# Go to Configuration > DVB Inputs > Muxes > Choose a random one and Hit the Play button
The selected stream should show up in a few seconds. If it doesn’t, there’s likely an issue with streamlink or the player or both, in which case you should stop and try to solve it before moving on.
Mapping serves to channels
There are two ways of mapping services to channels. The standard way is to go to the Services tab and choose Map Selected > Map all services. This should work very well if your muxes won’t ever change. However, if they do (as in our case), they won’t be automatically remapped to their channel, and you gonna have to do this mapping process manually once again, multiple times. We don’t wanna do that. Fortunately, there’s a second way of mapping services to channels that does so automatically, even if your muxes change, and that’s via Bouquets.
Remember that when we created the youtube IPTV network, we selected “Create a bouquet”. Because of that, there’s now a new entry in Configuration > Channel / EPG > Bouquets > “youtube”. So, let’s go ahead and edit it a little bit:
# Go to Configuration > Channel / EPG > Bouquets > Edit the "youtube" bouquet
# Enabled: Checked
# Auto-map to channels: Checked
# Channel mapping options: Select all
# Create tags: Create provider name tags, Create network name tags
# Hit Save
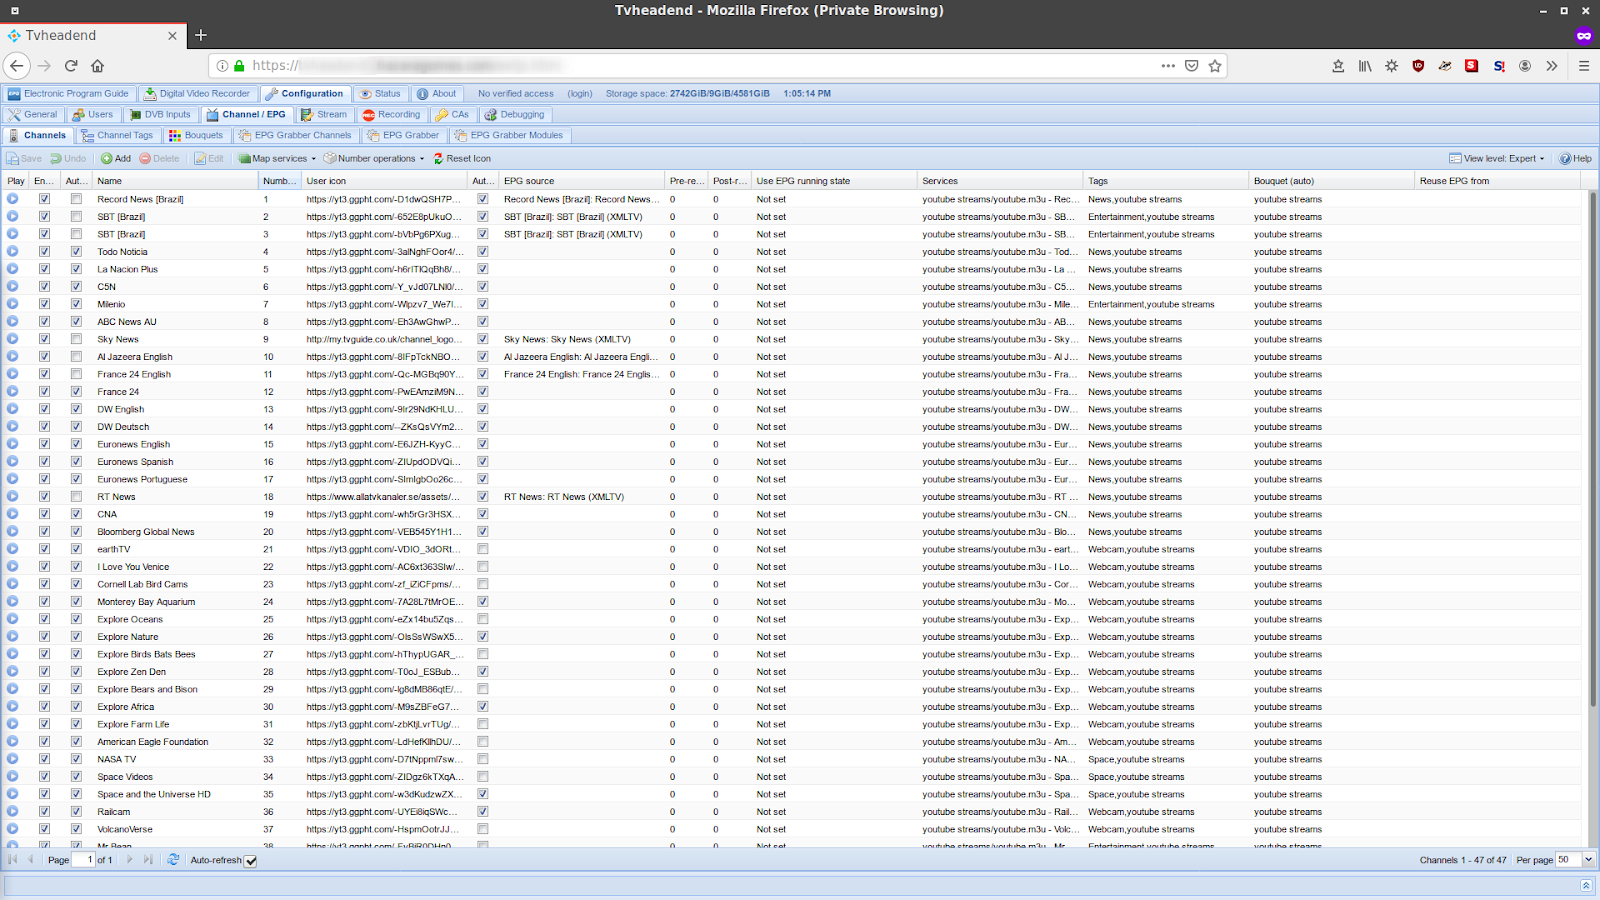
Wait a few seconds and go to the “Channels” tab and you should see all your channels auto-mapped to their services. If you make any changes to the youtube.m3u playlist, the bouquet should automatically detect those changes from now on.
EPG data
Some of the 24/7 news channels on Youtube (e.g., France 24, DW) actually follow the same eletronic program guide (EPG) as their Cable/Satellite broadcast. So, if you want, you can add EPG data to their Youtube live-stream. There’s a fantastic program called WebGrab+Plus that can do that for you for free, but there’s a learning curve to it and how to feed the data to TVH (netcat or curl). I’m planning on writing a guide about it in the near future, as I work on a parser for the site.pack folder as well. But if you don’t feel like diving into that, you can always pay an EPG provider and manually add it to your clients (bad) or try to figure it out how to feed the EPG data to the TVH server (good).
Creating and editing users
Clients can access TVH using the same credentials as you’ve been using to configure the TVH server (admin access). As a general rule of thumb, however, that’s not a good practice. Also, if you have multiple clients, it’s nice to know what each one is trying to access on your TVH server. So, let’s go ahead and create a “client” user:
# Go to Configuration > Users > Access Entries > Add
# Streaming: Select all
# Video recorder: Basic, HTSP, View All
# Hit Create
Now let’s add a password for it:
# Go to Configuration > Users > Passwords > Add
# Enabled: Checked
# Username: client
# Password: password
# Hit Create
That’s it! You can repeat this process as many times as you need and play around with permissions, depending on your use-case.
Re-fetch period and youtube4tvh cronjobs
If you’ve a youtube m3u playlist with channels that are likely to change multiple times during the same day, then it’s a good idea to create a separate playlist for those channels. Then, when you create a youtube4tvh cronjob for the new m3u playlist, make it run more frequently (e.g., every 5 mins would be */5 * * * *) and in the TVH server, add a new IPTV auto network for the new m3u playlist and in its settings, edit the “re-fetch period” to match the cronjob update interval (5); hit save and then restart the TVH server to apply the new settings. If you’ve done it right, the TVH server will now check the m3u playlist at an interval equal to the re-fetch period and update any new/changed mux on it, which will be automatically mapped to a channel in its bouquet.
TVH client
There are multiple ways to watch the channels on your TVH server, including directly from the webUI itself (EPG tab > Watch TV). The one I use is Kodi + TVH client addon because my Kodi clients also access my Plex server.
You can install Kodi on virtually any single-board computer, such as Raspberry Pi and Odroid, and Linux distro. There are hundreds of guides showing how to install Kodi, so I won’t do that. Instead, I’ll talk about the TVH client addon for it.
Install a TVH client addon for Kodi
Open Kodi and try to install via the official repo:
# Go to Add-ons > Install from repo > PVR clients
# Look for Tvheadend HTSP Client and install it
Now, depending on the distribution, you won’t see the “PVR clients” option. In this case, you have to manually install the TVH client. On Debian, for example, you can install it like so:
# Open a terminal
sudo apt update
sudo apt install kodi-pvr-hts
(Another option is to download a .zip of the addon but please do your research first. Don’t download and install addons from random repos.) If you didn’t see any error, it means the PVR client is now available on Kodi, so open it (restart it, if it was already open) and then do the following (changing the values to the appropriate ones for your TVH server and client credentials):
# Go to Add-ons > My add-ons > PVR clients > Tvheadend HTSP Client > Configure
# > Connection Settings
# IP address: The IP address of the machine hosting your TVH server
# HTTP port: 9981
# HTSP port: 9982
# Username: client
# Password: password
# > Streaming settings
# Profile to use: htsp
# (If your connection is pretty good, you might want to try enabling predictive tuning
# but I've had mixed results with it.)
# Hit OK
# Restart Kodi
If you want to play around, you can create a video profile just for this client and then set the Profile to use it. This could be a profile that transcodes to a particular AV codec that best fits the client hardware, for example. Be mindful that whenever you make a change to the addon, you’ll need to restart Kodi to see the changes take effect.
Test the Kodi client:
# Go to TV > Channels > Play random one
If everything is working as it should, you should now be able to watch the stream from your Kodi client. Play around with it and try recording something, too. Now it’s time to fine-tune your TVH server to best serve your clients.
You can make further client-side changes in Kodi’s PVR & Live TV settings menu, such as mapping channels to specific numbers, behavior of changing channels, etc.
Conclusion
Congratulations for reaching the end of this guide. As I said before, one of my future projects is to work on a parser for the Webgrab+Plus EPG data and then write a guide on how to implement it using the current setup.
If you found this useful or have suggestions on how to improve this guide, please leave a comment and I’ll try to reply asap.