
Changelog
September 25th, 2021, Update #2: Changed the instructions in the Webserver Configuration section from BusyBox HTTPD to the more reliable Apache2 alternative. This is motivated by unreliable results when using BusyBox.
September 25th, 2021, Update #1: Updated the curl commands to escape double quotation marks (") in the -d (HTTP POST data) argument. I also made other minor changes to improve command execution (e.g., setting up environmental variables for IP_SONOFF and IP_HOST), fix typos, and improve readability.
February 1st, 2021: Publication of the original article
Introduction
Sonoff devices are very popular home-automation devices developed by a Chinese company called ITEAD. By default, they are controlled by a closed-source application developed by ITEAD–called EWeLink–that can be installed onto iOS and Android cellphones, for example, making use of cloud services. However, this makes it hard to integrate with existing home-automation servers, such as Home Assistant and OpenHAB, or to simply control the devices locally–that is, without access to the Internet.
Fortunately, there are alternatives that require flashing a different firmware onto Sonoff devices. The Tasmota firmware, for example, is a well-known alternative that provides easy integration with existing home-automation servers and let users control devices via multiple methods, such as webUI, HTTP requests, and MQTT, all of which can be accessed either locally or remotely or both. On top of that, it is free and open-source. Traditionally, flashing a Tasmota firmware onto a Sonoff device involves finding a serial connection, soldering a few cables/pins, and connecting the device to a serial-to-USB adapter. However, more often than not, this takes time, knowledge about electronics, and soldering very small components.
ITEAD is aware that many users do not user their app or even their firmware for Sonoff devices. Instead of forcing the use of their own software, recently, they have taken the much smarter path of making it easier for users to control Sonoff devices independently of their software via the release of a DIY mode in the latest firmware versions. In DIY mode, it is possible to use the device’s RESTful API to monitor and control a variety of attributes, such as toggle a relay ON/OFF, checking the wireless signal quality, and more importantly for any Tasmota enthusiast, flashing custom firmware over-the-air (OTA).
In this tutorial, I will describe how to flash the tasmota-lite.bin binary onto Sonoff Mini relays and any other Sonoff device that can operate in DIY mode. This will be done OTA (wirelessly) using only curl to send POST requests and then either the BusyBox HTTP Daemon (busybox httpd) or a common webserver application (e.g., Apache, Nginx) to create a simple webserver to serve the Tasmota binary to the local network. There is no need to install and run any other application, executable, or whatever. Software-wise, we just need a terminal and web-browser.
DISCLAIMER.The procedure described in this tutorial is one-way. That is, once flashed the Tasmota firmware, it is not possible to go back to the original ITEAD firmware.
ATTENTION. From this part and on, the tutorial describes procedures that involve working with mains power. If you have not taken the necessary time to learn how to work with it safely, stop right now and ask for someone knowledgeable to assist and teach you. Do not take this warning lightly. Mains power can kill you or set your house on fire or both (or worse). Be safe.
Requirements
Only follow this tutorial if your Sonoff device satisfies all of the following criteria:
- Device
- ITEAD firmware
-
Version
3.5or higherIf running version
3.3or3.4, you can try the protocol v1.4documentation instead. The procedure does not require soldering but you need to open the device to connect the OTA jumper manually. The interaction with the RESTful API is the same as described here, so come back to follow the procedure for flashing Tasmota OTA withcurl.Alternatively, if running an outdated version, install the EWeLink app, create a bogus acount, update the firmware to latest, uninstall the app, come back and follow this guide.
-
That said, it’s possible that this tutorial is partially or completely applicable to other Sonoff devices that can operate in DIY mode. The ones listed here are the ones that ITEAD listed as supported.
Additional hardware requirements
You won’t need to do any soldering and won’t even need to open the device. However, we will need to power the device using mains (110-220v AC) power. For the Sonoff Mini, for example, you need to wire it as follows:
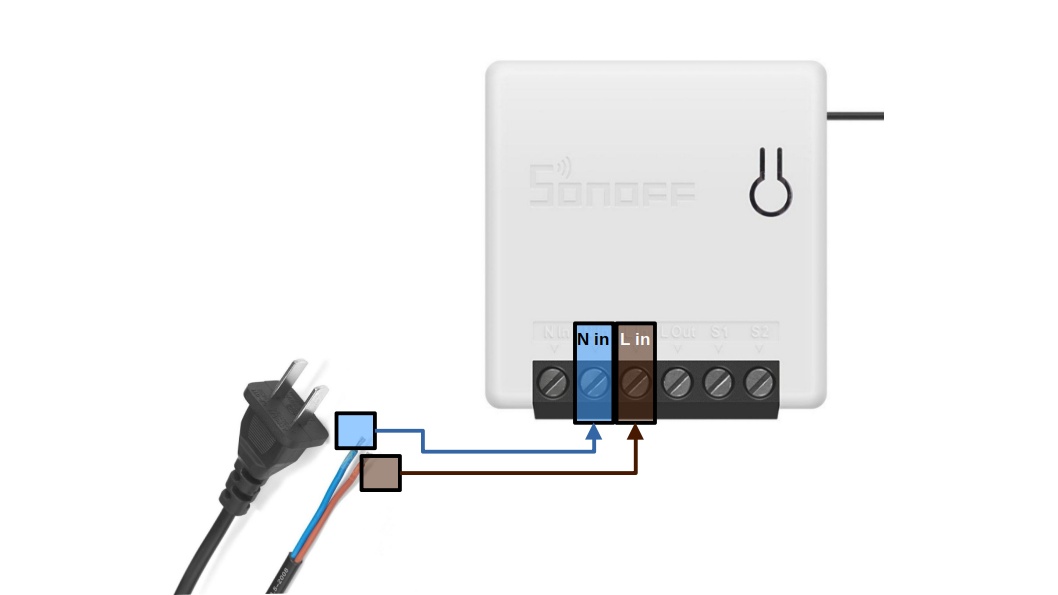
Please note that color conventions, outlet format, etc., are not always the same accross countries. Check (and double check) the ones in your country and property before wiring the Sonoff device to mains.
For other Sonoff devices, check their manual. At this point, you just need to provide power to the device itself–there is no need to connect it to whatever the relay is going to control, for example, or any switches.
Therefore, the only additional hardware requirements are the following:
- Stripped mains power cable with live (L) and neutral (N) wires;
- A wifi capable laptop or PC.
Additional software requirements
I wrote this tutorial for GNU/Linux users. That is, unless otherwise specified, the instructions assume that you are running a Linux distribution on your PC/laptop that will be used to interact with (and serve files to) the Sonoff device. If running iOS, you might be able to adapt the procedure more easily than if you were running Windows or other OS.
Therefore, the only additional software requirement is the following:
- GNU/Linux distro installed on the host machine, preferrably apt-based distros, such as Debian or Ubuntu.
Installation
This section describes how to flash the Tasmota firmware onto a Sonoff device OTA. In brief, the procedure consists of (a) putting the Sonoff device in DIY mode, (b) configuring it to access your existing wireless network, (c) using a set of GNU/Linux utilities to interact with the device’s RESTful API, (d) creating a simple webserver to serve the Tasmota firmware locally, and finally, (e) flashing the Tasmota firmware OTA. Each of those steps is explained in more detail next.
Preparing the Sonoff device
-
Turn ON your Sonoff device by connecting it to the mains power;
-
Enable the DIY mode by pressing its button for at least 5 seconds;
- Once the DIY mode is enabled, the device will create a wireless access point (WAP) with the following credentials:
SSID: ITEAD-X
Password: 12345678
Using your laptop/PC, find the SSID and enter the credentials to join the ITEAD WAP;
- The Sonoff device will assign an IP to your laptop/PC in the
10.10.7.0/24network, which you can check withip a. If it does, then open a web-browser and type the following IP:10.10.7.1:80If your laptop/PC was assigned to a different IP pool than
10.10.7.0/24, then simply try the first address of whichever pool it was assigned to (e.g., if10.10.1.0/24, then10.10.1.1); -
Follow the inscructions on the screen to let the Sonoff device join your local network via an existing WAP. Save and let it reboot.
In the meantime, tell your laptop/PC to join the same local network you configured in the Sonoff device webUI;
-
Go to your DHCP server and find out which IP address it assigned to the Sonoff device on the local network. Open a terminal and assign the IP address to the environmental variable
IP_SONOFF. For example, if your Sonoff device was assigned IPv4 address192.168.10.150, then enter the following:IP_SONOFF='192.168.10.150'and check that it was corretly assigned by
echoing the environmental variable$IP_SONOFF, as follows:echo $IP_SONOFFPlease notice that this only works if you continue to use the same shell in which
IP_SONOFFwas defined. If you log off or even close the current terminal, you will have to redefineIP_SONOFFto keep using it.Alternatively, simply change every instance of
$IP_SONOFFin the commands below for the actual IP assigned to your Sonoff device.
Interacting with the RESTful API
-
Now, we will start using
curlto sendPOSTrequests and pipe the output tojqto parse thejsonoutput. Later on, we will usewgetto download the Tasmota binary from its latest release. To make sure all utlities are installed on your distro and you are running their latest version, run the following command:sudo apt update && sudo apt install curl jq wget -yIf not using an
aptbased distro, simply adapt the code to use your package manager instead. - Let’s check that the Sonoff device’s API is working and get information about it, as follows:
curl -v -H "Content-Type: application/json" -d "{\"data\":{}}" $IP_SONOFF:8081/zeroconf/info | jq '.'which should output something like this:
{
 "seq": 1,
 "error": 0,
 "data": {
     "switch": "off",
     "startup": "off",
     "pulse": "off",
     "pulseWidth": 2000,
     "ssid": "SSID_WAP",
     "otaUnlock": false,
     "fwVersion": "3.5.0",
     "deviceid": "ID_DEVICE",
     "bssid": "BSSID_WAP",
     "signalStrength": -48
     }
}
Please notice that this and the other
curlcommands may take a few seconds to finish executing. -
Of note, check that
otaUnlockisfalse, which means that currently, it is not possible to flash a custom firmware OTA. To enable it, we need to setotaUnlocktotrue, as follows:curl -v -H "Content-Type: application/json" -d "{\"data\":{}}" $IP_SONOFF:8081/zeroconf/ota_unlock | jq '.'and we can now verify that OTA is unlocked by getting the device’s info once again, as follows:
curl -v -H "Content-Type: application/json" -d "{\"data\":{}}" $IP_SONOFF:8081/zeroconf/info | jq '.'which should indicate that
otaUnlockis nowtrue:{ "seq": 3, "error": 0, "data": { "switch": "off", "startup": "off", "pulse": "off", "pulseWidth": 2000, "ssid": "SSID_WAP", "otaUnlock": true, "fwVersion": "3.5.0", "deviceid": "ID_DEVICE", "bssid": "BSSID_WAP", "signalStrength": -48 } }If you are not seeing this, review your steps until now. You can still reset the device powering it OFF and back ON, and the device should come back in DIY mode once again (test with the first
curlcommand, for example). -
Download the latest
tasmota-lite.binbinary from the Tasmota Github repository to your user’sDownloads/tasmotadirectory, as follows:mkdir /home/${USER}/Downloads/tasmota wget -P /home/${USER}/Downloads/tasmota $(curl -s https://api.github.com/repos/arendst/Tasmota/releases/latest | grep '\"browser_download_url.*tasmota-lite.bin\"' | cut -d '"' -f 4)This should write a
tasmota-lite.binfile onto your user’sDownloads/tasmota/directory. If it does not, please let me know about it and in the meantime, try downloading the file manually from the Tasmota Github repo. -
Check the
tasmota-lite.binSHA256 signature and save it to filetasmota-lite-sha256.txt, as follows:sha256sum "/home/${USER}/Downloads/tasmota/tasmota-lite.bin" > "/home/${USER}/Downloads/tasmota/tasmota-lite-sha256.txt"This signature is used to check the firmware integrity after the Sonoff device is done downloading it from a webserver. This is done to prevent the device from flashing a corrupted firmware, for example, because a corrupted file will likely yield a different SHA256 signature.
To make it easier later on, let’s create an environmental variable called
BIN_SHA256that contains the signature, as follows:BIN_SHA256=$(cat "/home/${USER}/Downloads/tasmota/tasmota-lite-sha256.txt" | cut -d ' ' -f 1)and make sure it’s correctly set up by
echoing it:echo $BIN_SHA256
Webserver configuration
The webserver has a few peculiar requirements (e.g., needs to accept the Ranges header, run in http instead of https) that does not allow us to point to Tasmota’s OTA website, Github releases, or any other official source of the Tasmota firmware binary. Fortunately, we can run a webserver on the local network that satisfies all requirements by the ITEAD firmware and in my experience, the easiest way to do that is to either use the BusyBox HTTP Daemon or run an Apache webserver–or lighttp or Nginx, for instance, but do not try Python’s http.server or PHP because they do not accept partial content.
(Updated in September 25th, 2021.) When I first published this tutorial, I included instructions for BusyBox. Since then, however, I have had mixed results with it and switched to using Apache instead. More specifically, to create a minimal webserver using Apache to serve the tasmota-lite.bin firmware file to the Sonoff device, follow these steps:
-
First, make sure you have
apache2installed:sudo apt update && sudo apt install apache2 -yIf not using an
aptbased distro, simply adapt the code to use your package manager instead. -
By default, Apache should automatically create, enable, and start a default webserver at your device’s port
80. To make sure this is the case, checksystemctlfor the status of theapache2service:systemctl status apache2which should show the following if the service is running without issues:
● apache2.service - The Apache HTTP Server
Loaded: loaded (/lib/systemd/system/apache2.service; enabled; vendor preset: enabled)
Active: active (running) since Sat 2021-09-25 12:00:10 -03; 3h 23min ago
  Docs: https://httpd.apache.org/docs/2.4/
 Main PID: 9393 (apache2)
 Tasks: 55 (limit: 4915)
Memory: 22.1M
CGroup: /system.slice/apache2.service
        ├─9393 /usr/sbin/apache2 -k start
        ├─9394 /usr/sbin/apache2 -k start
        └─9395 /usr/sbin/apache2 -k start
You can also type
sudo service apache2 statusto check for the status of the apache2 service.If the service is not running, try starting it manually via
sudo systemctl start apache2. If you run into issues, it is possible that there is another service already using the default port80. Stop the other service and startapache2.If you are running a firewall on your laptop/PC, make sure to allow incoming TCP/UDP to port
80as well. Otherwise, other devices on your local network won’t be able to access the webserver. -
If the webserver is running without issues, then copy the contents of your
/home/${USER}/Downloads/tasmota/directory to the root of the Apache webserver, as follows:sudo cp /home/${USER}/Downloads/tasmota/* /var/www/html/ -
Find the local IP address of your laptop/PC with
ip a(e.g.,192.168.10.100). The address should be reachable by the Sonoff device (e.g., it is on the same subnet). Then, assign its IP address to the environmental variable$IP_HOST, just like we did withIP_SONOFF, as follows (use your host’s actual IP address instead of the one in this example, of course):IP_HOST='192.168.10.100'and check that it was corretly assigned by
echoing it:echo $IP_HOSTAlternatively, simply change every instance of
$IP_HOSTin the commands below for the actual IP assigned to your host device. -
Optional. Using another wifi capable device, test that the
tasmota-lite-binfile is available to the local network by typing the output of the following command on a web-browser:echo "http://$IP_HOST/tasmota-lite.bin"If correctly configured, the device should be able to download the binary. Otherwise, review your steps.
-
Optional. By default, Apache creates log files in the
/var/log/apache2/dir that keep track of various messages that are relevant for managing the webserver. Theaccess.logfile is particularly useful for keeping track of HTTP requests to the webserver, which allow us to tell when the Sonoff device starts and stops requesting thetasmota-lite.binfile. To monitor such a file, open another terminal and then enter the following command:sudo tail -f /var/log/apache2/access.logMinimize this terminal and come back to check it after sending the
curlPOSTcommand to flash the firmware over the air. This will tell you whether the Sonoff device was correctly configured and is trying to download the firmware file from your local Apache webserver.
If you would like to use another common webserver, such as Lighttpd or Nginx, install any one of them using your system’s package manager and then copy the files in your user’s Downloads/tasmota dir to the webserver’s root, which by default is usually on /var/www/html but might change depending on the application used and Linux distribution.
Flashing the Tasmota firmware
-
Flash the
tasmota-lite.binbinary onto the Sonoff device via acurlPOST. (If you did not create environmental variables forIP_HOST,BIN_SHA256, andIP_SONOFF, make sure to change them in the command below before running it. Double check everything to make sure there are no errors–for example, you canechothe entirecurlcommand before executing it by wrapping it around double quotation marks (") to make sure your shell environment is making the appropriate substitutions.)curl -v -H "Content-Type: application/json" -d "{\"data\":{\"downloadUrl\":\"http://$IP_HOST/tasmota-lite.bin\",\"sha256sum\":\"$BIN_SHA256\"}}" $IP_SONOFF:8081/zeroconf/ota_flash | jq '.'You should get an HTTP
OKresponse (200) fairly quickly. If you do not, the following codes indicate that there was an error and you should review your steps until now:- 403: The operation failed and the OTA function was not unlocked.
- 408: The operation failed and the pre-download firmware timed out.
- 413: The operation failed and the request body size is too large. Make sure the tasmota firmware is the right size for your device. You should try the
tasmota-lite.binbefore anything else. - 424: The operation failed and the firmware could not be downloaded. Check that your webserver and firmware file are both reachable by other devices on the same local network; check for typos in the URL.
- 471: The operation failed and the firmware integrity check failed.
-
Optional. Once the
curlconnection is closed, monitor Apache’saccess.logforGETrequests coming from the Sonoff device, as follows:sudo tail -f /var/log/apache2/access.logwhich should show messages similar to the following if your Sonoff device has successfully managed to reach and request the
tasmota-lite.binfrom the Apache webserver:... 192.168.10.150 - - [25/Sep/2021:12:51:30 -0300] "GET /tasmota-lite.bin?deviceid=10011b78f7&ts=5748438&sign=e177370169c2051e73f82c2cd3874da6d333e46ef597da91dc543cc573586b04 HTTP/1.1" 206 4399 "-" "itead-device" 192.168.10.150 - - [25/Sep/2021:12:51:30 -0300] "GET /tasmota-lite.bin?deviceid=10011b78f7&ts=1576460931&sign=c2029fdd9d52ed2272c085ba79ffd5a88f11e94c8385f41bb68630de3c7b39b5 HTTP/1.1" 206 4399 "-" "itead-device" 192.168.10.150 - - [25/Sep/2021:12:51:30 -0300] "GET /tasmota-lite.bin?deviceid=10011b78f7&ts=1267998018&sign=3489ad84677930d5f8a1b398582afe8e702b2e77e57eee189254571d6968e619 HTTP/1.1" 206 4399 "-" "itead-device" 192.168.10.150 - - [25/Sep/2021:12:51:30 -0300] "GET /tasmota-lite.bin?deviceid=10011b78f7&ts=1287998487&sign=10bba3c35c1ba79c49282cddb38dddfb75fc633810a4eec9f7612b76e0ddcbb2 HTTP/1.1" 206 4399 "-" "itead-device" 192.168.10.150 - - [25/Sep/2021:12:51:30 -0300] "GET /tasmota-lite.bin?deviceid=10011b78f7&ts=1883570151&sign=459b191580a1d9a2312dee51350592c5255d2cda9b0b96f26b9357dff0ab102f HTTP/1.1" 206 4399 "-" "itead-device" ...and once the webserver stops receiving
GETrequests, you know that it will then start flashing the firmware onto the device’s memory. -
Wait for at least 2 minutes. When done, the Tasmota firmware should create a public wireless access point (WAP) with SSID called
tasmota_*. Use a wifi-capable device and connect to the WAP. -
Once connected, Tasmota will give your device an IP address, which you can check via
ip a. Usually, the device’s IP address is in the192.168.4.0/24pool, which means the Tasmota webUI is athttp://192.168.4.1:80. (Otherwise, the webUI will be at the first address in whichever pool your device connected to after joining the WAP created by the Tasmota firmware.) -
Open a web browser of your choice and navigate to the Tasmota webUI. You should be prompted to change the wifi settings to allow your Tasmota to connect to your local wifi network. Change the settings, save it, and wait for the Tasmota to reboot.
-
After reboot, reconnect to your local network, open a web browser, and try reaching the Tasmota webUI at the output of the following command:
echo "http://$IP_SONOFF:80"If corretcly installed, you will be greeted by the following Tasmota webUI:
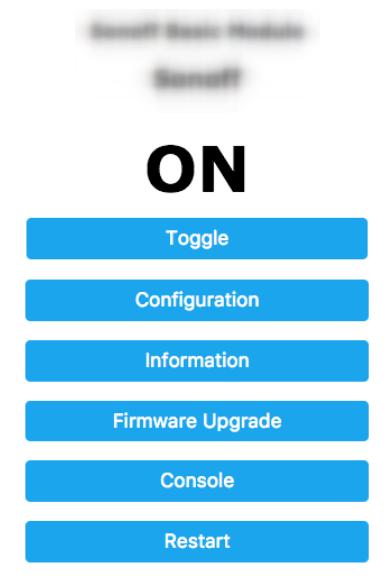
and then, see the next section for the basic settings; Otherwise, review your steps and try reflashing the firmware.
-
If everything looks fine with your new Tasmota device, go ahead and stop and disable the local Apache webserver:
sudo systemctl stop apache2 && sudo systemctl disable apache2and remove the
tasmota*files from the root of the/var/www/html/directory:sudo rm /var/www/html/tasmota*
Basic Tasmota configuration
Before wiring your device to anything else, you should first configure and test it. Configuration-wise, there is a lot of possibilities with a Tasmota firmware. If you’ve never used Tasmota before, check Robbert’s (The Hook Up) introduction video:
At the very least, you should update the firmware Template to use the one appropriate for your device. Templates are device-specific definitions of how their GPIO pins are assigned.
- Copy the template for your Sonoff device:
-
{"NAME":"Sonoff Basic","GPIO":[17,255,255,255,255,0,0,0,21,56,255,0,0],"FLAG":0,"BASE":1} -
{"NAME":"Sonoff RF","GPIO":[17,255,255,255,255,0,0,0,21,56,255,0,0],"FLAG":0,"BASE":2} -
{"NAME":"Sonoff Mini","GPIO":[17,0,0,0,9,0,0,0,21,56,0,0,255],"FLAG":0,"BASE":1}
-
Open a web-browser and navigate to the Tasmota webUI.
-
On the webUI, go to Configuration > Configure other and then paste the tempalte into the Template field, check the Activate box and hit Save. The device will then reboot.
-
Once the device is back up, check that its name is now the same as in the
NAMEproperty value. For the Sonoff mini template, for example, it should beSonoff Mini. You can further configure your template at Configuration > Configure Template to assign new components, if at all possible. (The Mini does have an exposed GPIO available that was previously used by the ITEAD firmware for flashing mode, which is not going to be used anymore.)
Fixing the timezone
If you installed a pre-compilled firmware, there’s a chance your device is using the incorrect timezone. To check the current timezone, go to the webUI main page and then Console. Now, type the following:
timezone
and if that is incorrect, to change it, enter the same timezone command with a value equal to your region’s standardized time zone timezone. For America/Sao_Paulo, for example, that would be -3, which can be set in your Tasmota device as follows
timezone -3
Final remarks
Tasmota is a featureful firmware and it is worth taking a look at the official documentation to learn about the possibilities. If you run into issues, go to their Github repository, search their open and closed issues, and if you do not find an answer to your problem, open a new one.
Come back to this website every once in a while to check for changes in the changelog. I try to keep all my guides up-to-date as much as possible because I actually use them myself.