This article is about my mini network-attached storage (NAS) project based on FriendlyARM’s NanoPi M4 and its SATA hat. If you’re looking for a cheap, low-profile, low-power NAS solution for your home–or if you just like single-board computers (SBC)–then this article is for you.
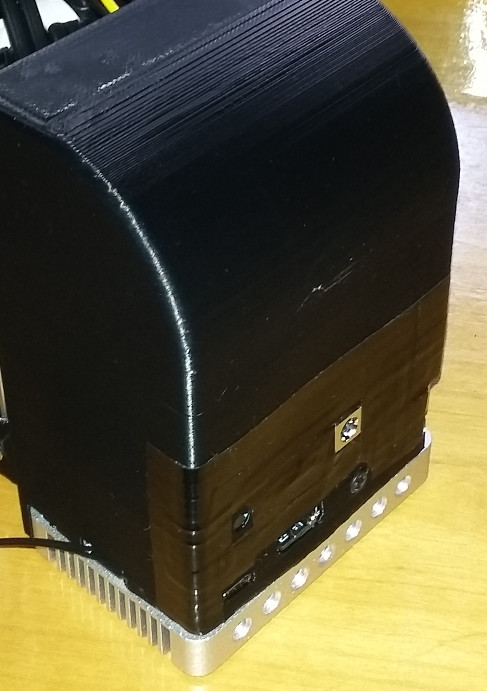
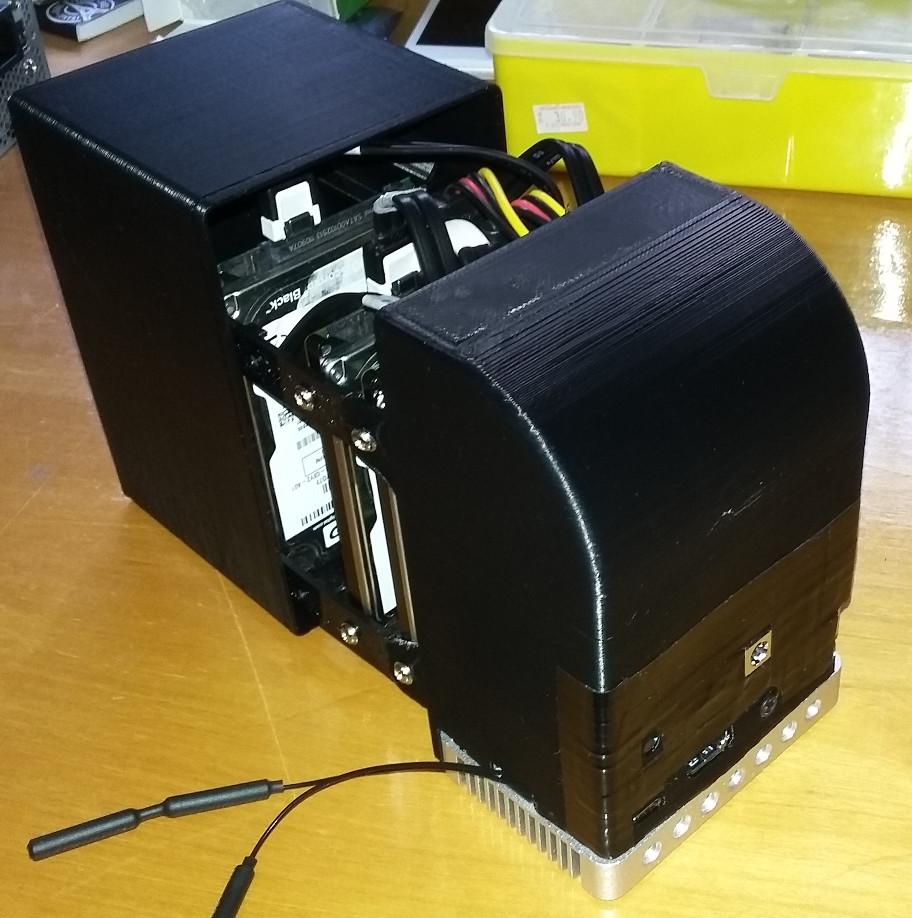
Here’s a preview of how my NanoPi M4 mini-NAS looks like:

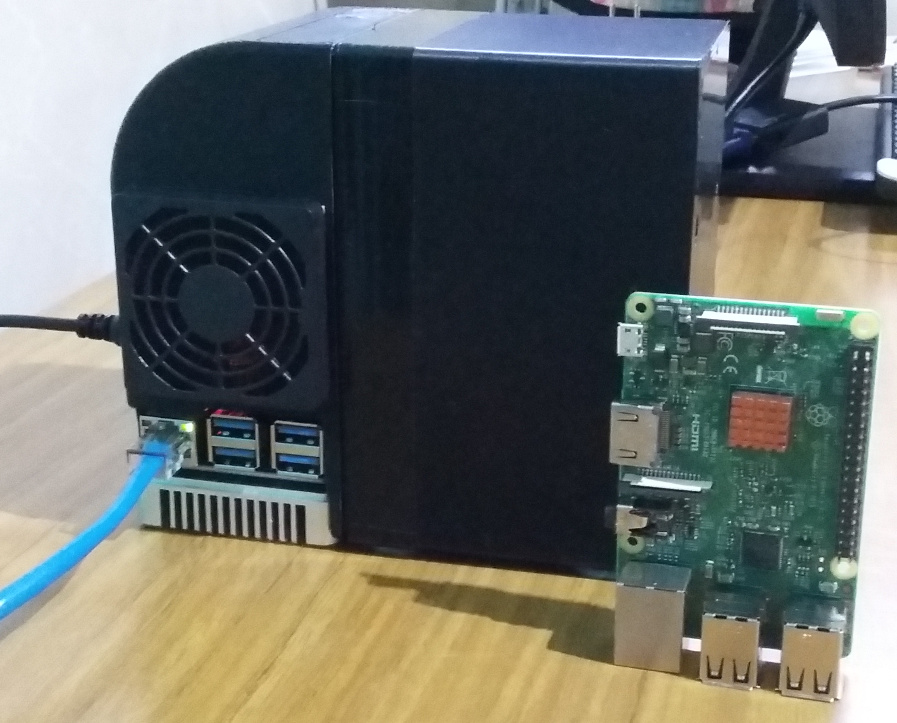
And for comparison, here’s the unit next to a Raspberry Pi 3B:
This article should give you a fairly good idea about the following:
- What to buy;
- What to install at the operating system (OS) and NAS management level;
- How to put everything together and get it up and running.
After that, you’re free to do whatever you want for your own use-case (disk partitions, storage systems, file sharing method, applications, etc.).
Changelog
April 7th, 2022: I updated a note about the issue that caused my NanoPi M4-v2 board to stop working after an apt upgrade. More specifically, according to gilarelli’s post, it looks like the culprit is linux-dtb-legacy-rk3399, which does not include a device tree file for the board in its latest version, namely rk3399-nanopi-m4v2.dtb was not included in linux-dtb-legacy-rk3399=22.02.01.
March 20th, 2022: I’ve had to deal with a software issue that broke my NanoPi-M4 v2 and thought that this would be a nice opportunity to document a couple of procedures that allow you to recover from such scenarios. (Of note, if you are on Armbian Buster and using the legacy kernel, do not upgrade from version 21.08 to 22.02.) The result of this documentation is the addition of three new sections to this guide, namely Backing up the entire mini-NAS OS disk, Emergency micro-SD, and Recovery procedures, all of which were added under the Bonus Content section.
October 16th, 2020, (#1 of 2): I’ve re-written the pwm-fan script for the NanoPi-M4 and updated the section about it accordingly.
October 16th, 2020, (#2 of 2): Despite the CPU tuning improvements I mentioned in my previous update, I’ve continued to have a few stability issues with Kernel 5.x. After a while, I’ve decided to reinstall Armbian Buster with Kernel 4.4.213-rk3399 (legacy) and it has been smooth sailing ever since. I updated the section about OS installation accordingly.
July 14th, 2020: Added information about CPU tuning to improve system stability.
July 8th, 2020: Added a cautionary note about SATA power cables; Added a table with the cost of all hardware components of this build; I also got a hold of a DC jack adapter that will let me measure the actual current draw from my final mini-NAS and will make it available here as soon as I’m done testing it. If you’ve additional suggestions, please reach out.
Introduction
The NanoPi M4 is a SBC made by FriendlyARM (a.k.a. FriendlyElec), a Chinese company based in Guandong. They have their own online store that you can use to buy a few of the boards and components they develop but chances are you can also buy from pretty much any of the large retail stores out there (e.g., AliExpress, Amazon, Newegg). [I bought all components from AliExpress, for example, from the folks at RealQvol.] FriendlyARM also has a fairly good wiki that documents the main aspects of their boards.
For a general review of the board, check these two videos:
You can also find a CPU performance comparison between the NanoPi M4 v2 and the Raspberry Pi 4 at this blog post, which suggests that the NanoPi M4 is superior and will be able to run tasks more efficiently than the RPi 4.
In the following sections, I talked about the hardware (board, hat, case, drive choices and power supply), then the software (OS + NAS management interface) and finally, assembly and board/hat testing. The article ends with a very brief presentation of my current configuration for the mini-NAS.
Hardware
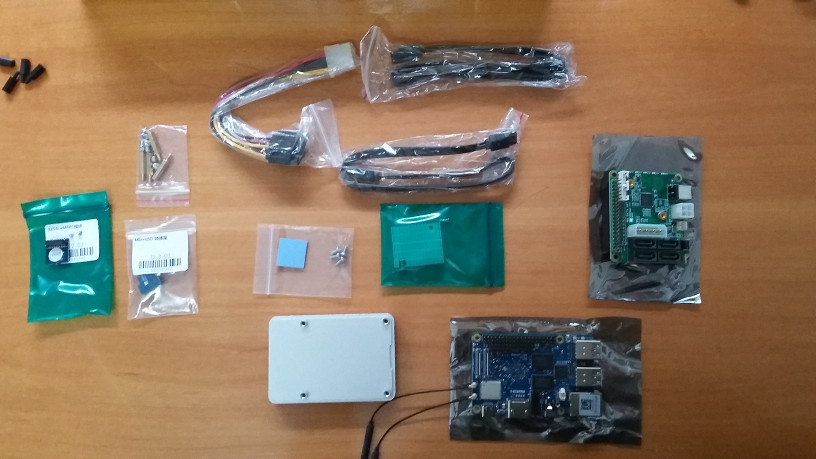
For this project, I’m using the following hardware:
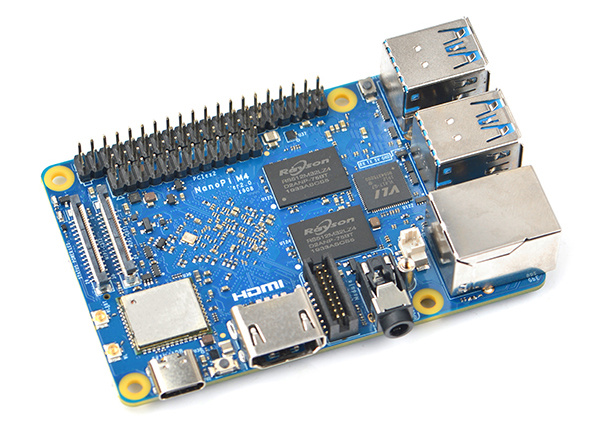
NanoPi M4 v2
I’m using the 2nd version (v2) of this board but everything should apply to v1. I think the major differences between the two is that the v2 has LPDDR4 RAM, instead of LPDDR3, a power button, the eMMC is connected the opposite way and screwed to the board, and the v2 looks slightly cleaner than the v1. Other than that, when buying one, you’ll have the option to buy with 2GB or 4GB of RAM. I’m using the one with 4GB of RAM and I recommend it if you’re going to use it as a NAS, even if you’re not going to use a RAM intensive filesystem like ZFS. (For reference, ext4 uses very little RAM and a 2GB version won’t have any issues sharing files at all. The problem in those cases is when you start adding applications to your NAS.)
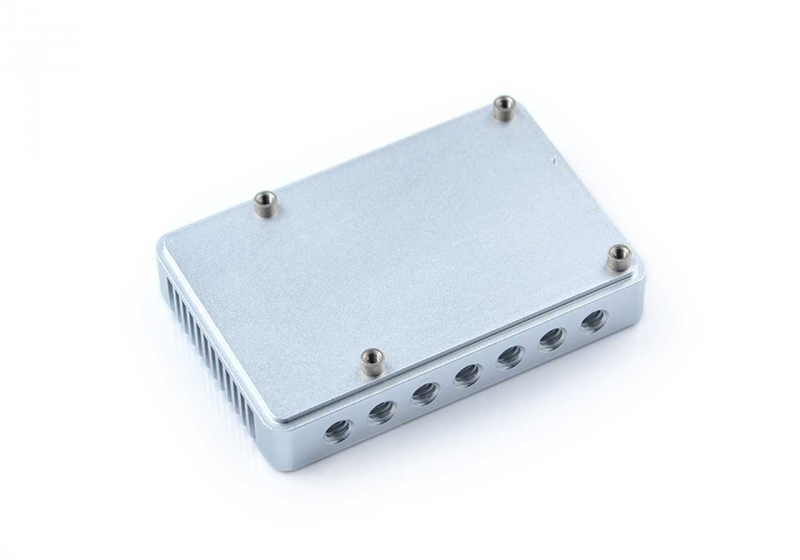
NanoPi M4 heatsink
This little fella gets pretty hot but fortunately, this massive heatsink does a decent job at keeping it cool. For even better performance, try adding a fan, use thermal paste instead of a pad, or use a copper heatsink with a large surface area.
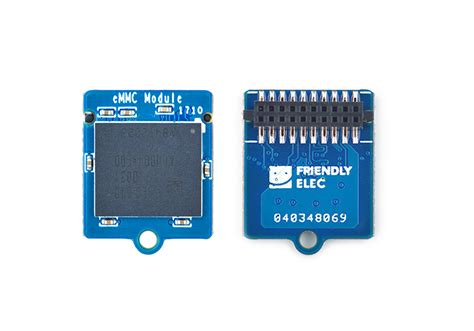
NanoPi M4 16-32gb eMMC (+ micro-SD adapter)
The adapter makes it easy to flash an OS image directly onto the eMMC, so make sure to buy one. As far as I know, you don’t need to use an eMMC with the NanoPi M4. A micro-SD will do the trick but of course, it’s slower than an eMMC. However, an eMMC is slower than a solid state drive (SSD), so if you know how to run the OS from a SSD, let me know. Either way, the OS and NAS program we’re going to use is already configured to reduce the amount of writes to the eMMC/micro-SD/SSD (it comes configured to not use a swap partition, for example), which is good news if you’re worried about wearing it out.
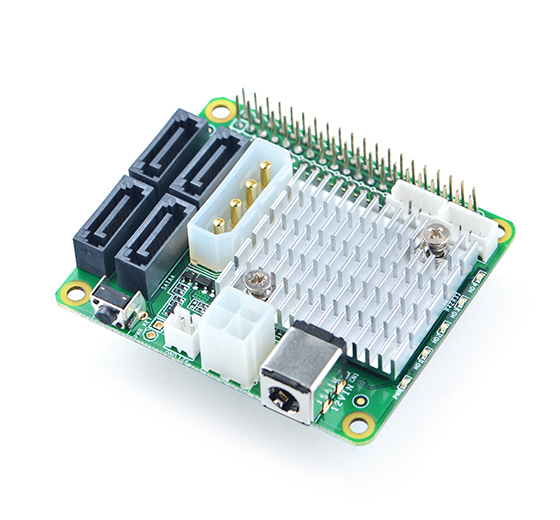
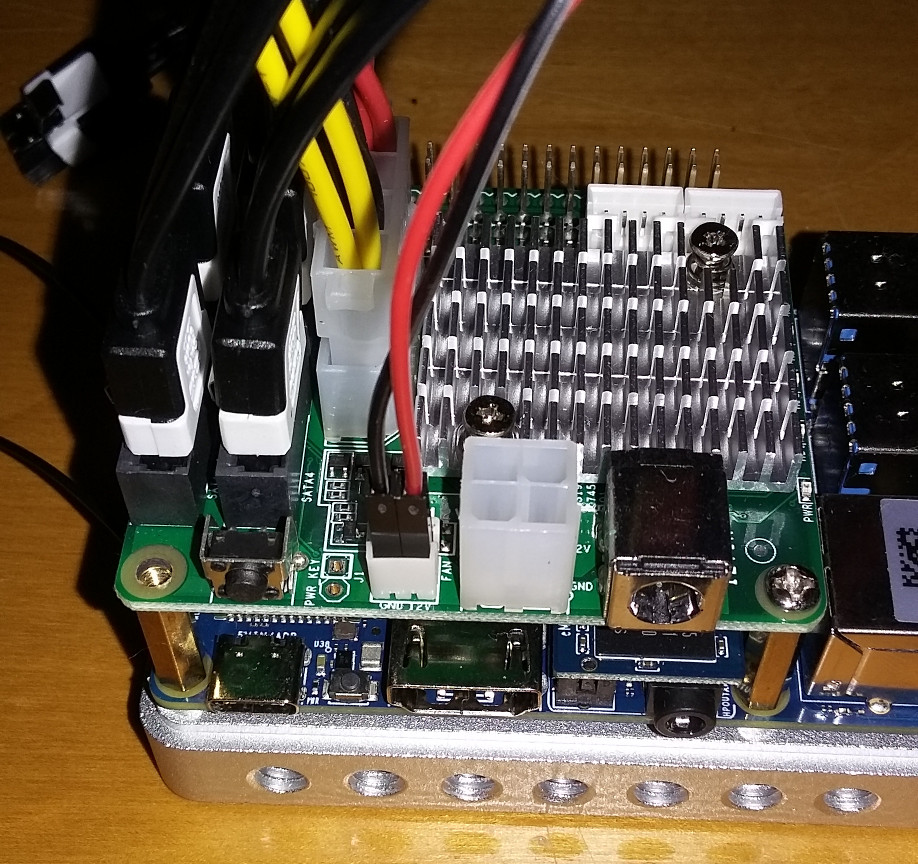
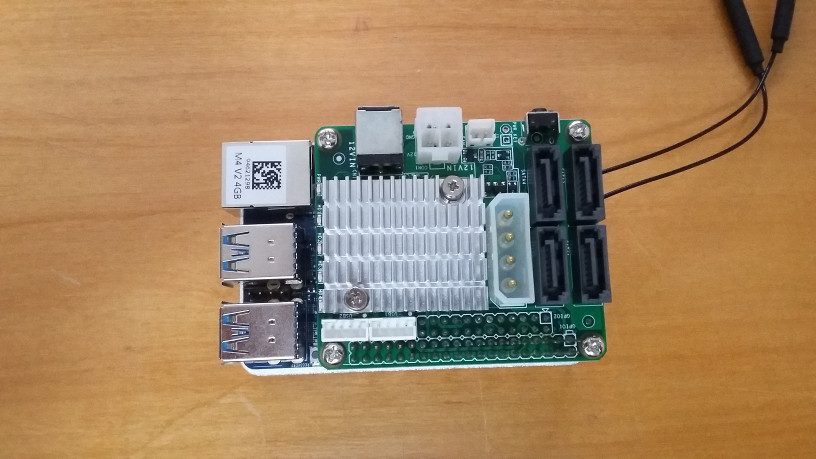
NanoPi M4 SATA hat (+ passive cooler + cables)
This little hat has a Marvell 88SE9215 Four-Port 6 Gbps SATA I/O Controller. It usually comes with two SATA interface cables and one SATA power cable able to power two drives. If you’re going to use more than two drives, like me, make sure to buy additional SATA interface cables and an extension/splitter for the SATA power cable (e.g., StarTech splitter).
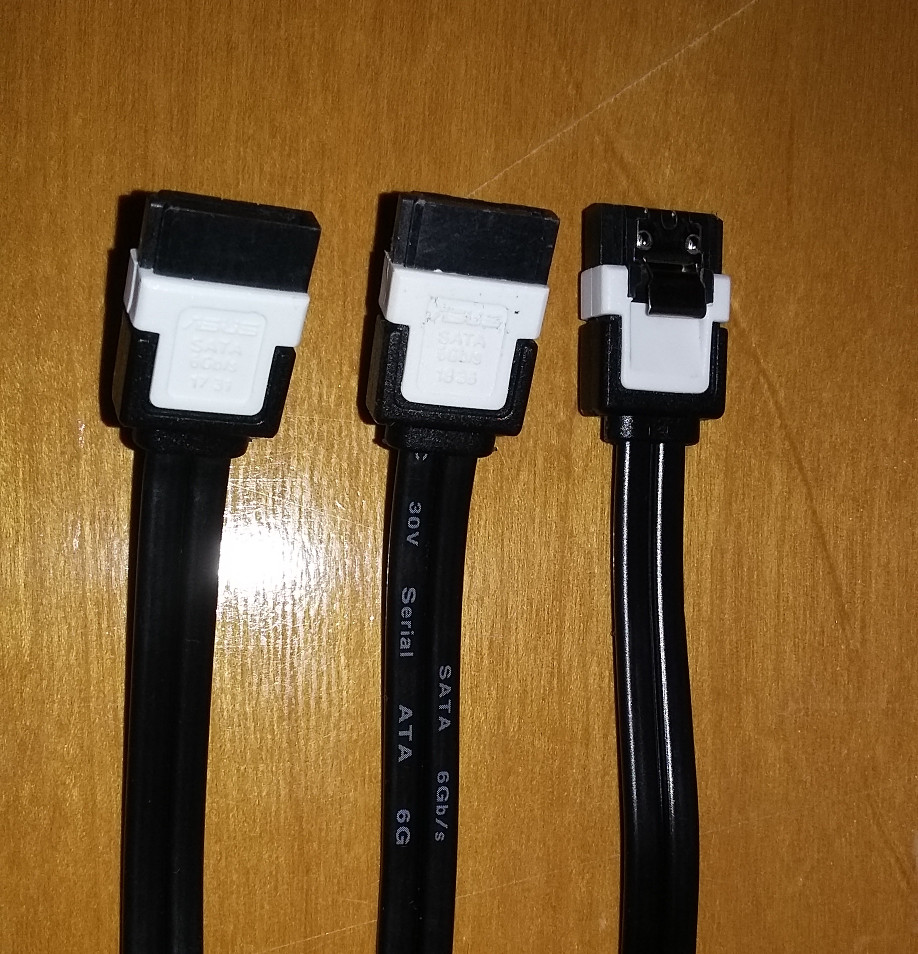
When buying your SATA power cables, make sure the terminals are crimped (use blade connectors) instead of molded. In brief, molded terminals are not faulty by design but they are error prone, owning to the method that the cables are terminated (molding plastic), and such errors might lead to catastrophic events. The ones in my original pictures were all molded and you should not use them. Thanks to /u/Fuck_Birches and /u/WordBoxLLC for pointing that out. I have changed them for crimped ones now. Here’s an instructive video about the issue:
If you plan on using the same 3d printed case I’m using (see kirkdis’ 3D printed case), make sure to buy SATA cables with a straight/horizontal connector on both ends of the cable. That case is very tight, so you might want to consider buying at least two shorter than usual SATA cables for the HDDs closer to the base.
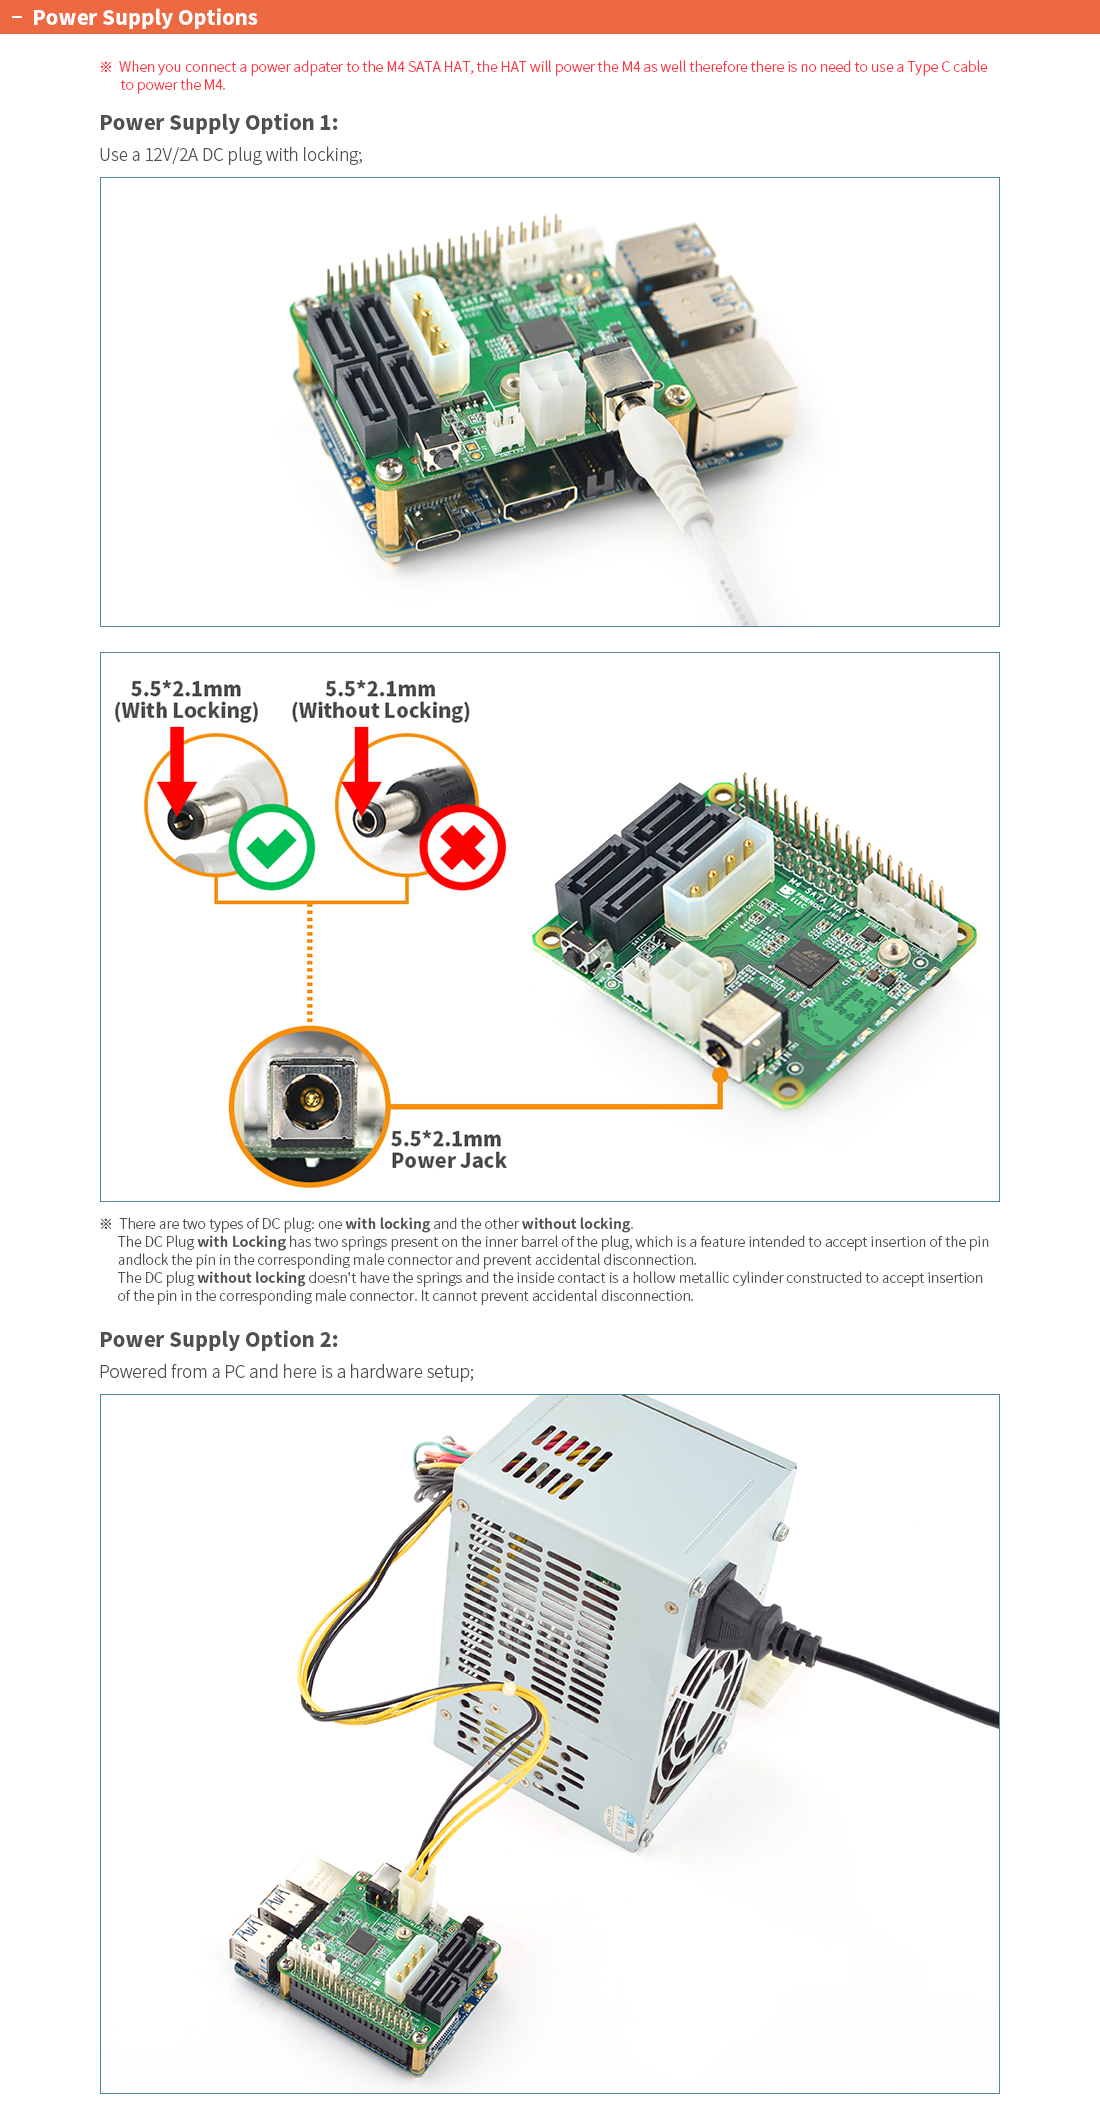
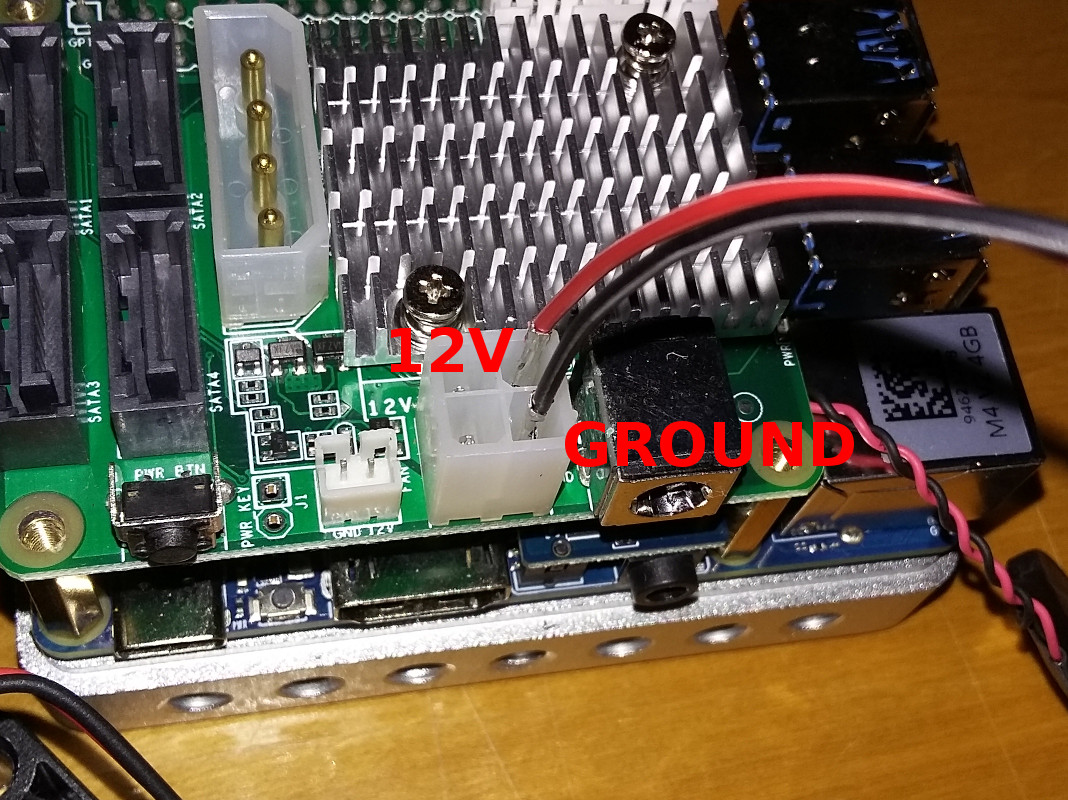
12v (8A) power supply unit (PSU)
If you’re using the SATA hat, you only need a single PSU to provide power to everything, and there are even two different options to do that: (a) via the DC 5.5x2.1mm jack on the SATA hat, using an external PSU (e.g., Alitove); or (b) via the 4-pin 12v connector, also on the SATA hat, using a low power (< 200W) PC PSU. If you’re going to use four low revolutions per minute (RPM) 2.5” HDDs (e.g., 5400 RPM), or four SSDs, a 12v PSU that is able to deliver up to 3A should be enough. However, if you’re driving high-RPM 2.5” HDDs (e.g., 7200RPM) or 3.5” HDDs, then do the math before powering the components. If you want to be safe, just get a 12v PSU that is able to deliver up to 8A.
Please note that if you’re planning on using a PC PSU, you’ll need to “hack it” in order to use the PSU without plugging it into a mobo.
If you’re not 100% sure about tinkering with anything related to electricity, do not attempt to modify any PSU you might have lying around and just buy a 12v (8A) external PSU. You can die even if the PSU is not connected to an outlet, owing to the presence of massive capacitors inside the PSU. I cannot emphasize this enough. Also, don’t go around cutting its cables to just make it look cute. You might need them later.
Alright, if you really want to use a PC PSU, follow the instructions in this video (but use a proper cable to connect the pins and make sure it’s well secured):
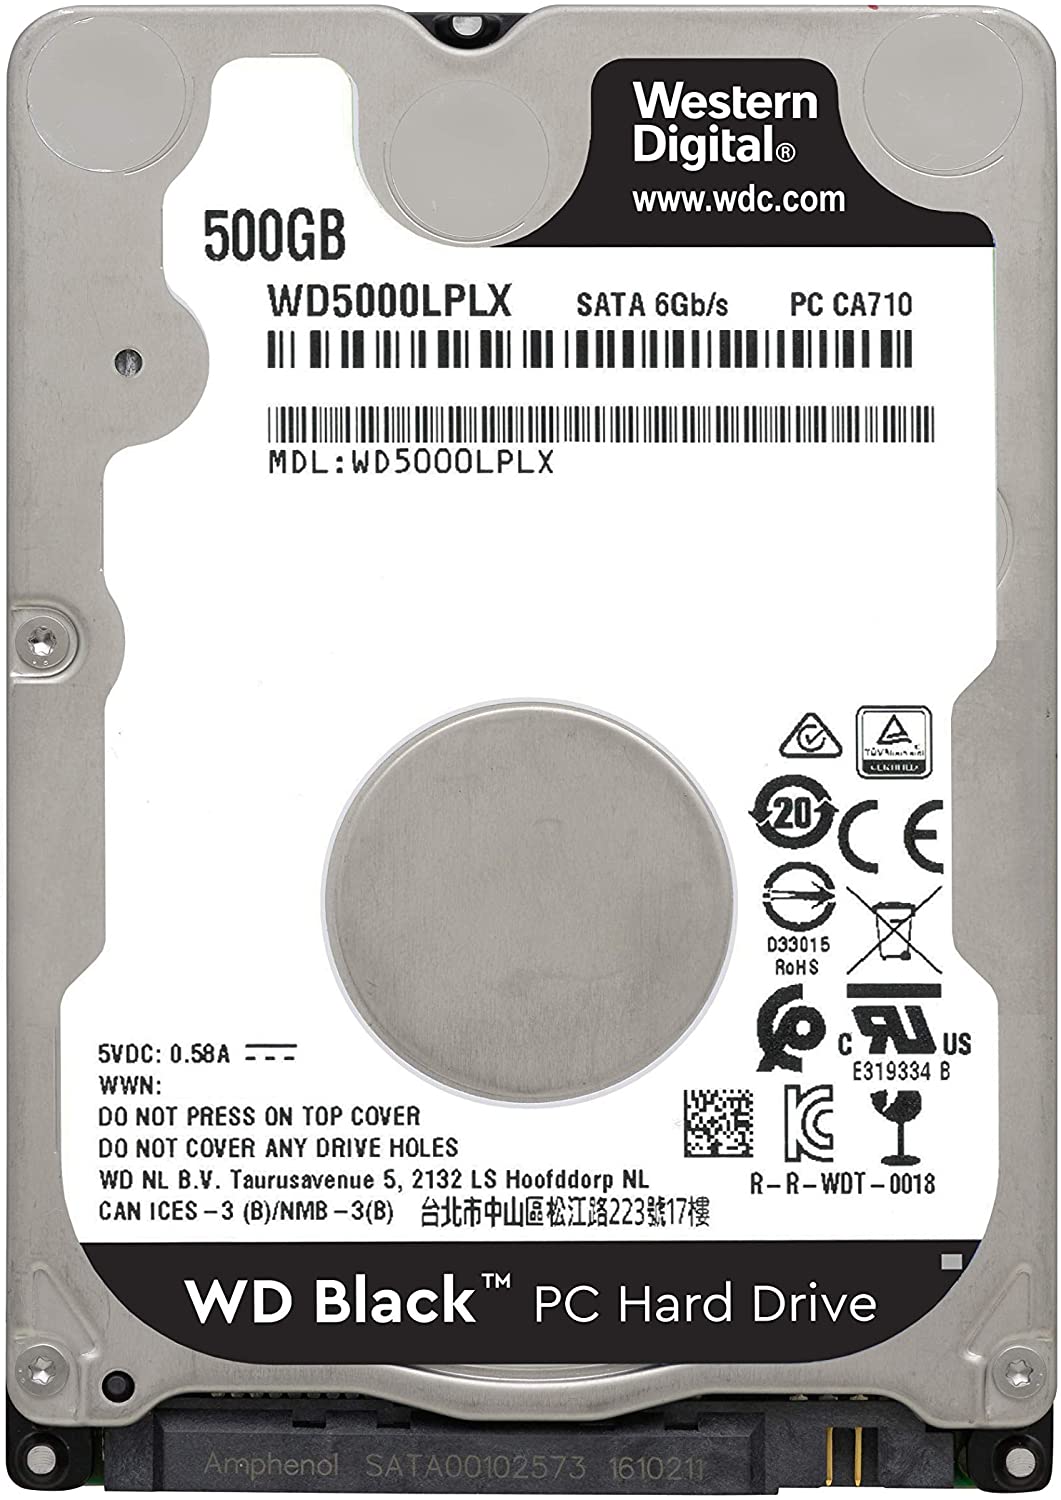
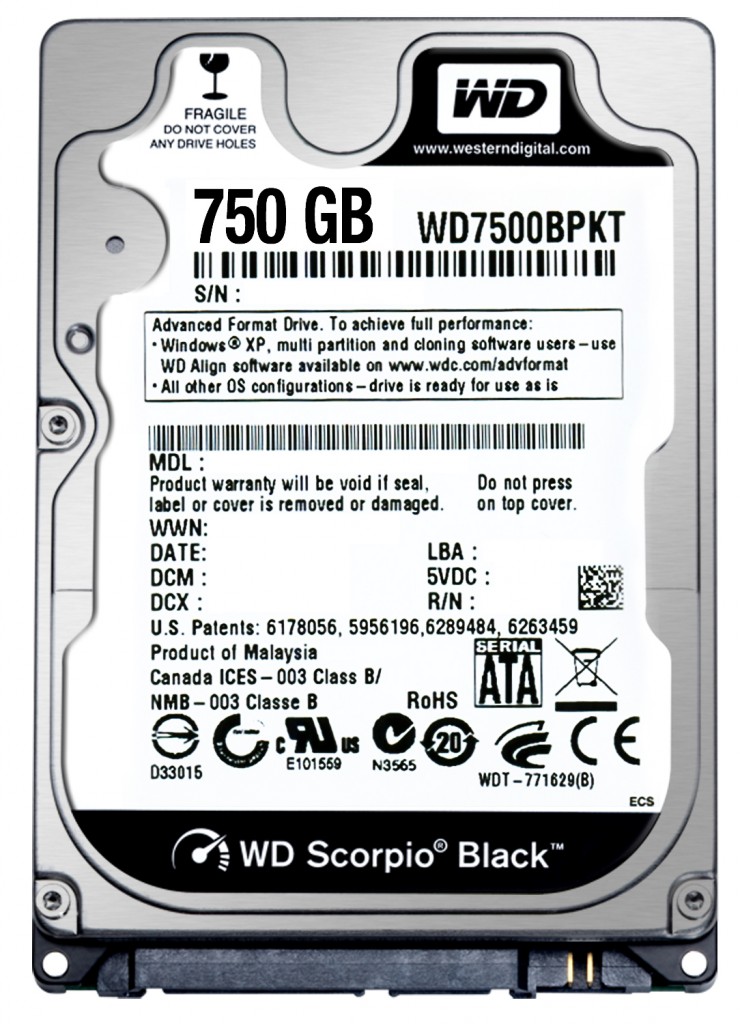
2.5” hard disk drive (HDD)
You can run 3.5” drives as well but if you plan to keep power consumption at a minimum, I suggest running 2.5” drives instead or better yet, SSDs. Here, I’m going to use four 2.5” WD Black HDD because they are fast (7200rpm as opposed to the traditional 5400rpm for 2.5” drives) and I don’t have a need for a large local storage space. (Just be careful that the 1TB 2.5” WD Black model WD10SPSX is actually SMR.) In general, my preference order is the following: SSD > 2.5” CMR HDD > 3.5” NAS HDD > 3.5” other CMR HDD > 2.5” whatever HDD > 3.5” whatever HDD. Of course, you don’t need to use all four SATA ports if there’s no demand for it.
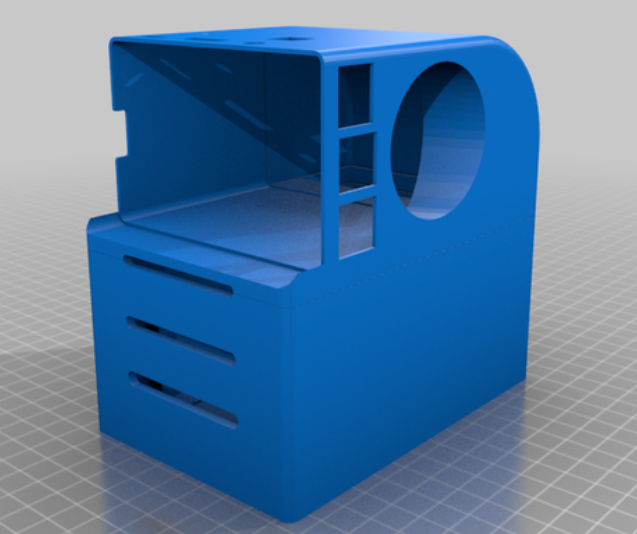
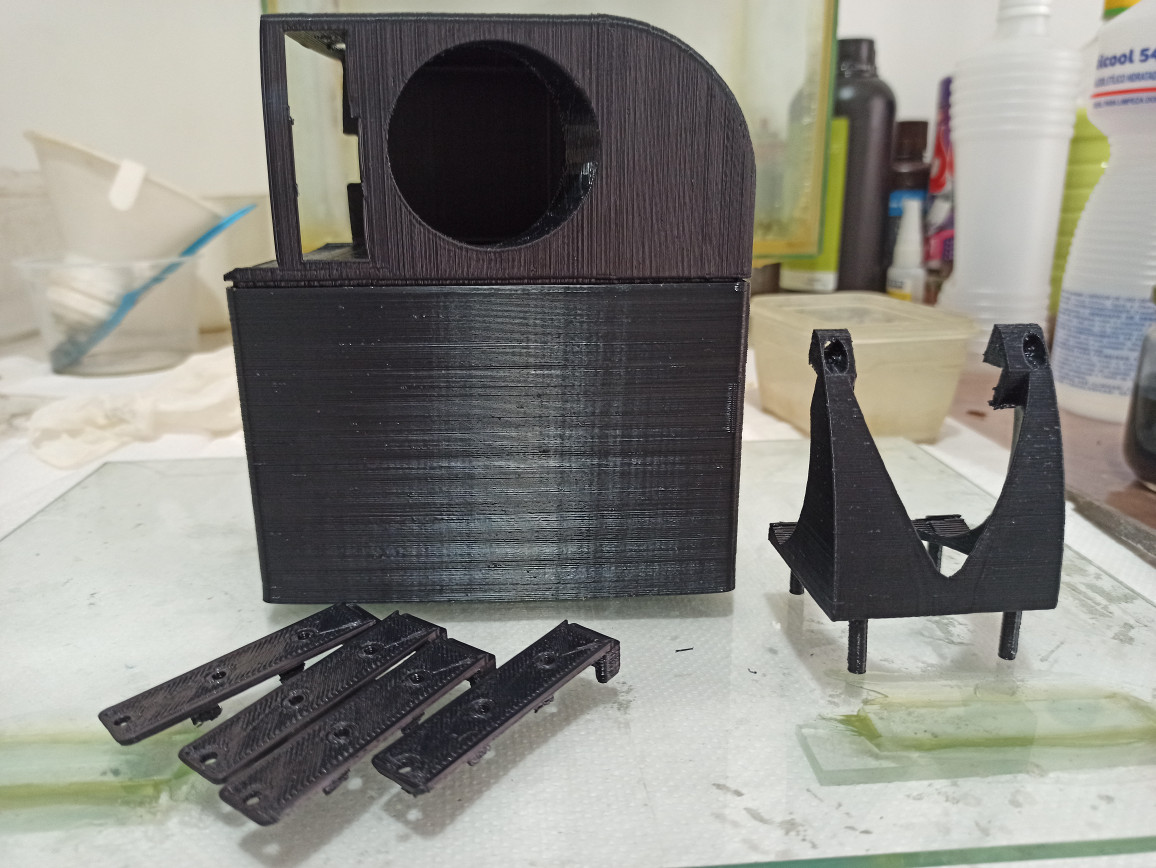
kirkdis’ 3D printed case
There are other 3D printed cases out there but I like kirkdis’ take on a minimal case for the NanoPi M4 and 2.5” drives. Notice that there are 3- and 4-bay versions of the HDD case and mounts. More specifically, for this project, I printed the following pieces:
- 01 x
topcase_all_versions.stl - 01 x
fanmount_all_versions.stl - 04 x
4bay_discmount.stl - 01 x
4bay_hddbase.stl
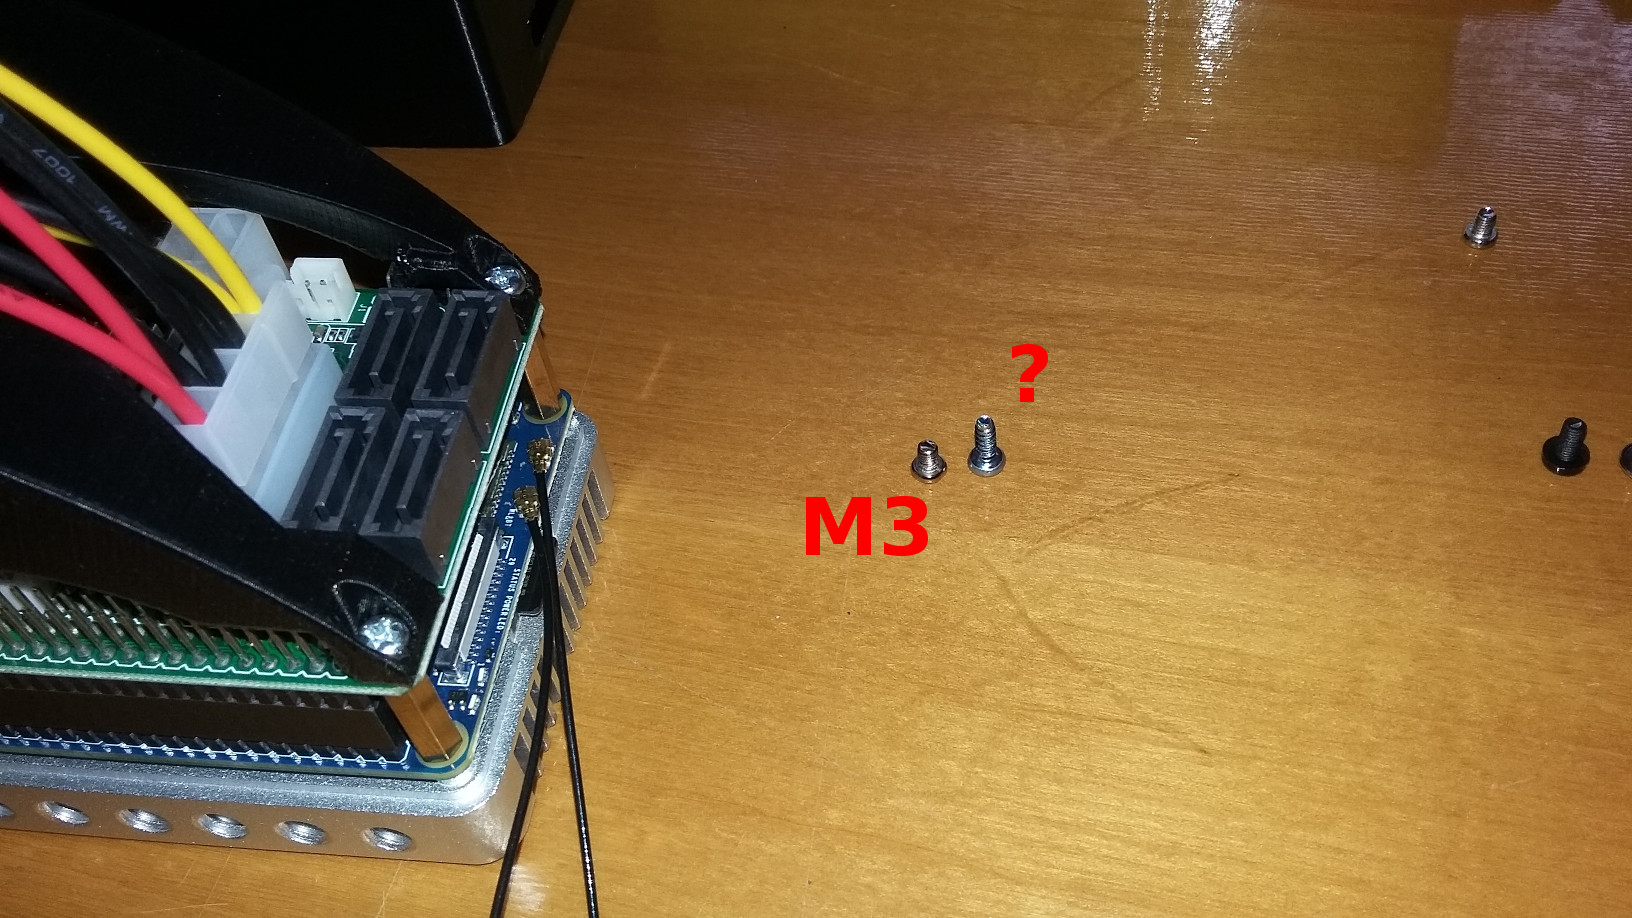
If you don’t have a 3D printer, don’t worry about it! Just Google 3d printing service and you’ll find plenty of options to choose from. You shouldn’t have to pay more than $100 for this case, for reference. Also, remember to buy screws for your HDDs, if you don’t have a bunch a lying around. You’ll need 08 for the bottom and top HDDs (16) + 04 for each in between (08), for a total of 24 screws for four drives.
Another option is to buy a 4-bay enclosure for your drives and use some sort of stackable case for your NanoPi M4. If you go with this solution, remember to buy extra spacers to make room for the SATA hat and cables (and you might need longer cables). Alternatively, you can always use a standard computer case (or rack mounted) that has support for 4 drives. Get rid of the mobo and you’re probably all set (see my note on modifying a PC PSU).
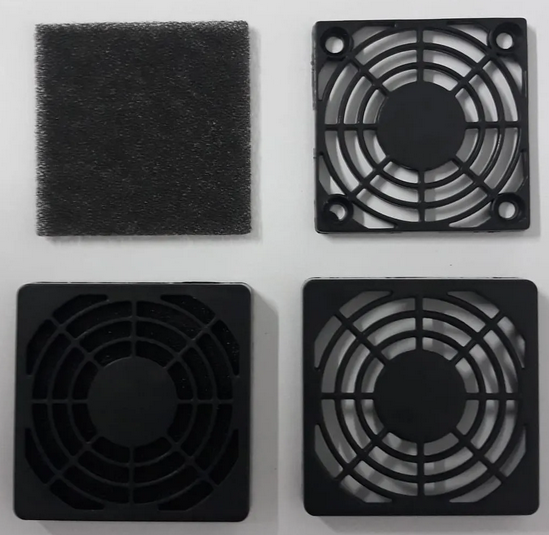
Fan 50x50x15mm 12v (.08A)
(This fan size is for kirkdis’ 3D printed case. You’d want something different if you’re using another case.) You can probably find a .2A fan with the same dimensions, which will move more air but will be louder. (If you’re going to use the PWM connector, take a look at PWM Fan controller to learn how to use it.)
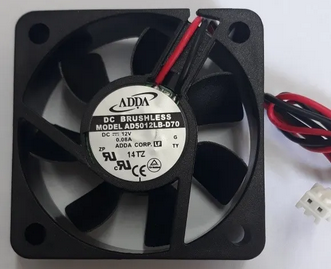
Additionally, you might want to buy a filter for the fan. However, notice that there’s no space for the filter inside the 3d printed case but you can glue/attach it to the outside (that’s what I’ve done with the one I bought).
Cost estimate
For reference, here’s how much each hardware component cost me in Brazilian Real (BRL$) and US Dollar (USD$), except for the HDDs. Values were the total for all units, instead of per unit. When appropriate, values were converted using the exchange rate from July 8th, 2020. Shipping costs were not included. Notice that all values are likely overestimating the actual cost because many products include Brazilian taxes and were bought multiple months ago.
| component | quantity | BRL$ | USD$ |
|---|---|---|---|
| NanoPi M4 v2 4GB RAM | 01 | 477.25 | 89.04 |
| Heatsink | 01 | 37.41 | 6.98 |
| 32gb eMMC + mSD adapter | 01 | 144.61 | 26.98 |
| SATA hat | 01 | 149.97 | 27.98 |
| SATA III cable | 10 | 35.9 | 6.7 |
| RTC battery | 01 | 23.52 | 4.39 |
| SATA power Y splitter | 02 | 37.3 | 5.96 |
| 3d printed case | 01 | 155 | 28.92 |
| PSU 12v 10A | 01 | 53.9 | 10.06 |
| 50mm Fan 12v .08A | 01 | 18.8 | 3.51 |
| 50mm Fan filter | 01 | 19.5 | 3.64 |
| TOTAL | - | 1153.16 | 214.16 |
Software
For the OS, I’m using the server edition of the Armbian Buster with Kernell 4.4 (legacy). (Of note, this section has been updated since the original article. In the previous version of the article, I suggested installing the latest Kernel 5.x instead of the legacy 4.4.x. The reason is that I’ve had multiple stability issues with Kernel 5.x and after switching to legacy, it’s been solid as a rock. That said, I’ve also read that many users have been running the latest Kernel without any issues, which makes me suspicious that there was somthing corrupted with my previous installation. So, my suggestion is the following: if you can afford testing for a few days, do try the latest Kernel 5.x first, and if you run into issues, reinstall the OS with legacy Kernel; otherwise, if you want it ready and solid right away, go straight to legacy Kernel.) You can download the image from the official Armbian website. Don’t skip the integrity check. On Linux, just open a terminal and run sha1sum /path/to/file.img.xz and check the output against the SHA file from the Armbian website. This ensures your downloaded file has the same hash as the true file. If you’ve ever used Debian or derivatives before (e.g., Ubuntu, Raspbian), Armbian will feel like home.
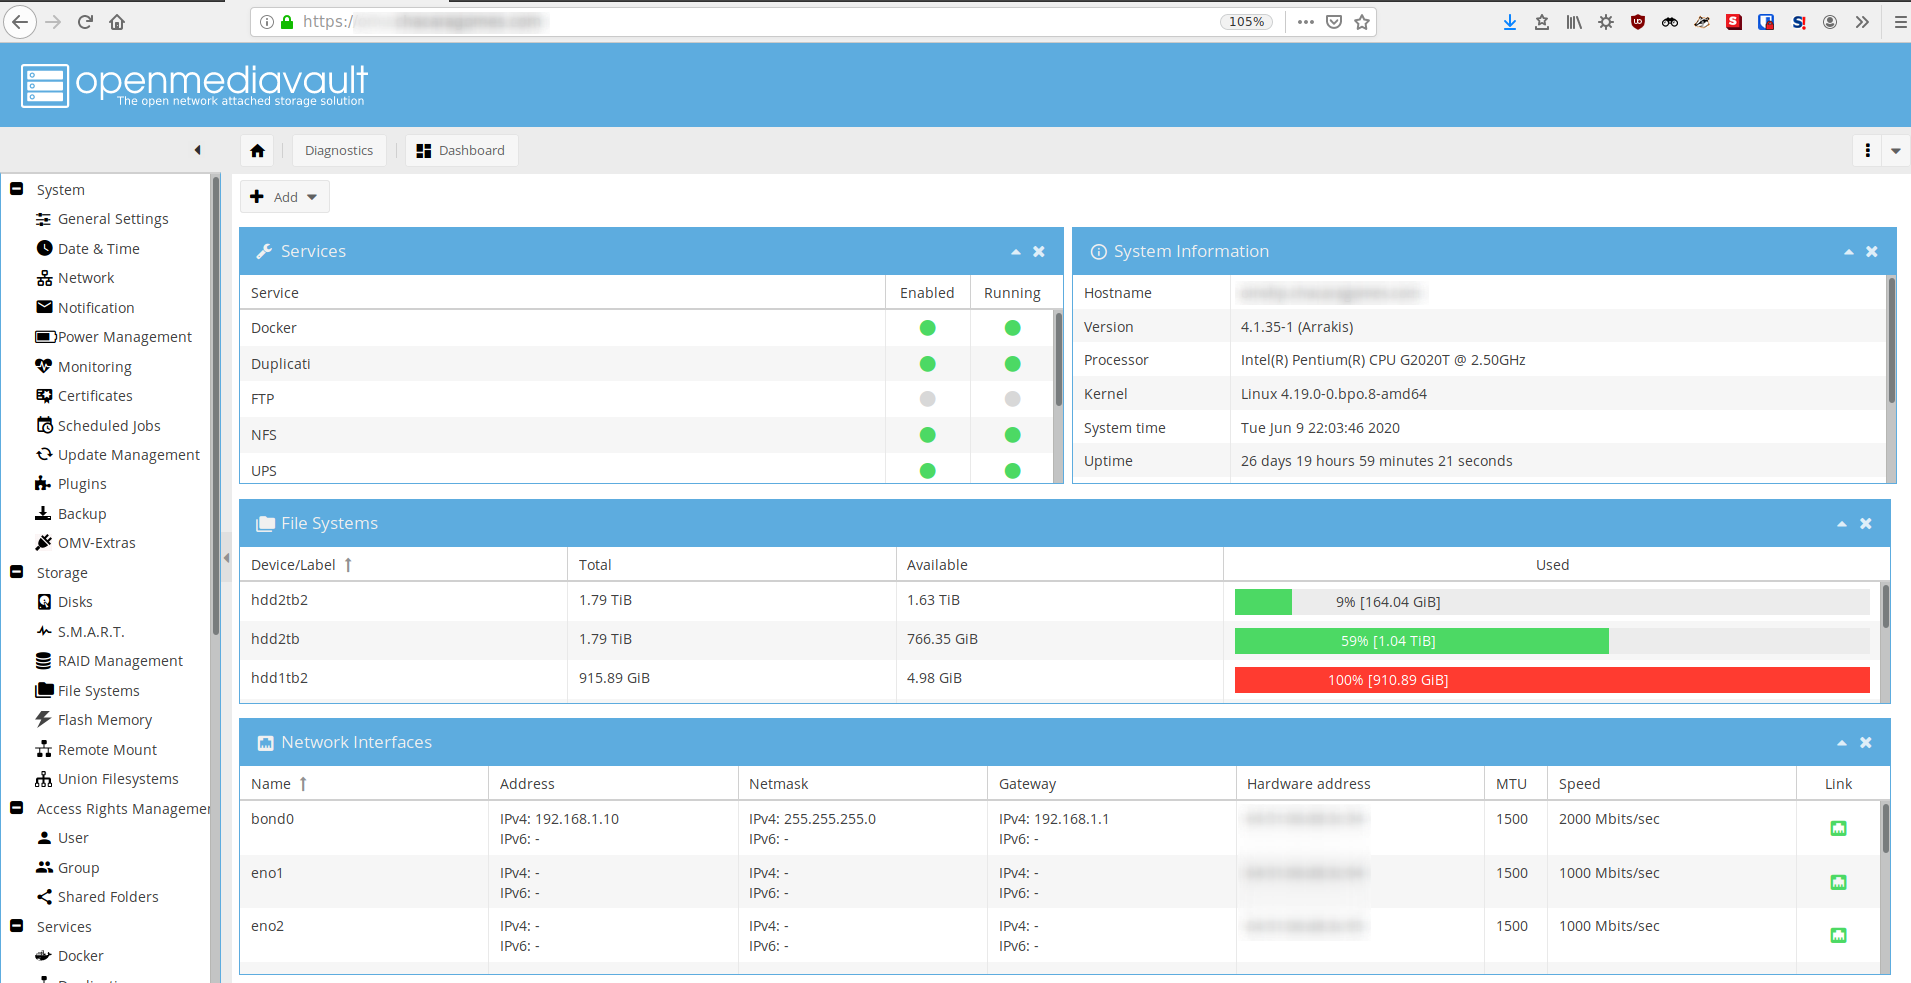
If you don’t like terminals, don’t worry. You pretty much don’t need to ever see it again because we’ll be managing everything from Openmediavault 5 (OMV5). I’ve been using OMV since the 3rd edition as my go-to NAS solution and it has never let me down. It’s not super fancy, like freeNAS and unraid, but it will get the job done for most home-users. Plus, it’s free and open-source and this matters to me. It also comes with a bunch of packages that facilitate file sharing, monitoring resources, manage users, plug-ins, etc., and it has a very clean graphical user interface accessible via web-browser (webUI):
In addition, the folks at OMV put together a guide on their Github repo that tells exactly how to install OMV on Armbian. Download their PDF and follow it step-by-step, with the following exceptions:
- Instead of flashing the OS image onto a micro-SD, plug your eMMC into the micro-SD adapter and then flash the OS image onto the eMMC.
- Before turning the NanoPi M4 on with the eMMC installed for the first time, remove any drives connected to the SATA hat. This is more of a cautionary move than anything else. We want to minimize the risk of corrupting the eMMC at these initial configuration steps and there’s no need for additional drives at this point. We’ll add them after we’re done installing OMV5. The same applies to any other device connected to the NanoPi M4, like USB devices. Keep it simple right now.
As you’ll learn, the OMV installation script will take some time to finish. We’re talking about more than 10min. Be patient! Afterwards, open a web browser and log into OMV’s WebUI and do your thing or read the Getting Started Guide that the OMV team wrote.
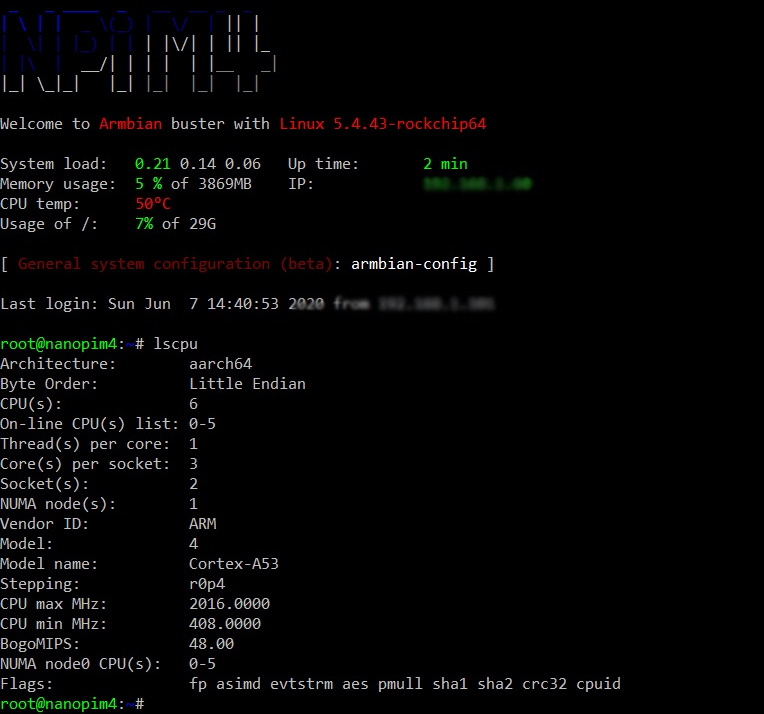
CPU tuning
The Rockchip RK3399 is a fairly new and nichey system on a chip and therefore, its implementation is not widely stable. On Armbian with Kernel 5.4, for example, I’ve noticed a few CPU-related Kernel panics that cause the board to freeze/reboot. Upon further investigation, it seems this issue can be fixed by changing the default CPU governor from ondemand to conservative, and setting the minimum CPU frequency to 1.4GhZ and the maximum to 1.8GhZ.
Be extra careful when tuning your CPU because things can go wrong if you set the board to operate in a condition that it was not meant to. Move slowly and keep an eye on related statistics afterwards to make sure you’re not going to fry the board.
There are two ways to change the CPU frequency and governor. The first and recommended one is via the armbian-config configuration utility:
# Run the configuration utility
armbian-config
# Navitage to CPU options: System / CPU
# Set min frequency to 1416000 Hz
# Set max frequency to 1800000 Hz
# Set the governor to conservative
# Confirm
# Exit the configuration utility
# Reboot
The second method is by making direct changes to the cpufrequtils file, as follows:
# Edit the cpufrequtils file
echo -e 'ENABLE="true"\nGOVERNOR=conservative\nMAX_SPEED=1800000\nMIN_SPEED=1416000' > /etc/default/cpufrequtils
# Reboot
My board has been running rock solid after making such changes, so I recommend it. Of course, you can try to use other configurations. My understanding from what I read about the Kernel panics is that it’s likely a power issue caused by the rapid switching of CPU frequencies that the ondemand governor makes. The conservative governor also scales the CPU frequency dynamically but much more gradually than the ondemand governor. By this logic, setting the governor to either performance or powersaving will likely improve stability as well because those governors do not change the CPU frequency at all.
PWM Fan controller
The 2-PIN PH2.0 connector on the SATA hat is a power width modulated (PWM) connector for a 12v fan.
However, this connector is not enabled by default and furthermore, the Armbian OS does not come with a service that allows you to control the fan speed according to the CPU temperature. Fortunately, other users have reported this issue before and a few of them have even written scripts to fix this issue. I’ve made several changes to previous scripts (e.g., mar0ni’s script) and wrote a highly configurable fan controller that uses a bounded model to set the fan speed dynamically. To make it easier for me (and everyone else), I’ve created a Github repo (cgomesu/nanopim4-satahat-fan) for the fan controller. For more detailed and updated info about the controller, please refer to the repo (and if you’ve any issues or suggestions, open an issue there).
Briefly, to install and run the script, read the README.md or follow these instructions:
# Install git, clone the repo, and test the script

apt update
apt install git
cd /opt

# From now on, if you're not running as root, append 'sudo' if you run into permission issues
git clone https://github.com/cgomesu/nanopim4-satahat-fan.git
cd nanopim4-satahat-fan

# Allow the script to be executed
chmod +x pwm-fan.sh

# Test the script
./pwm-fan.sh

# Check for any error messages
# When done, press Ctrl+C after to send a SIGINT and stop the script
If everything looks good, then run the fan controller in the background (as a systemd service), as follows:
# Copy the pwm-fan.service file to your systemd folder
cp /opt/nanopim4-satahat-fan/pwm-fan.service /lib/systemd/system/

# Enable the service and start it
systemctl enable pwm-fan.service
systemctl start pwm-fan.service

# Check the service status to make sure it's running without issues
systemctl status pwm-fan.service
Alternatively, if you don’t want to play around with PWM stuff and are okay with having your fan at 100%, 24/7, then you can just connect it to the board as follows:
Of note, you can also do the latter using the fan controller by running the script in full speed mode, as follows:
./pwm-fan.sh -f
Assembly
If you’re like me, you’ll not receive all parts at the same time and you’ll only print the case after making sure that the board and hat are both working.
The first thing you’ll want to do is to flash the OS onto the eMMC. That’s because the eMMC will not be as accessible as a micro-SD card and HDDs once the SATA hat is installed–it is screwed to the board itself, above the audio jack (in v2, and above the HDMI in v1).
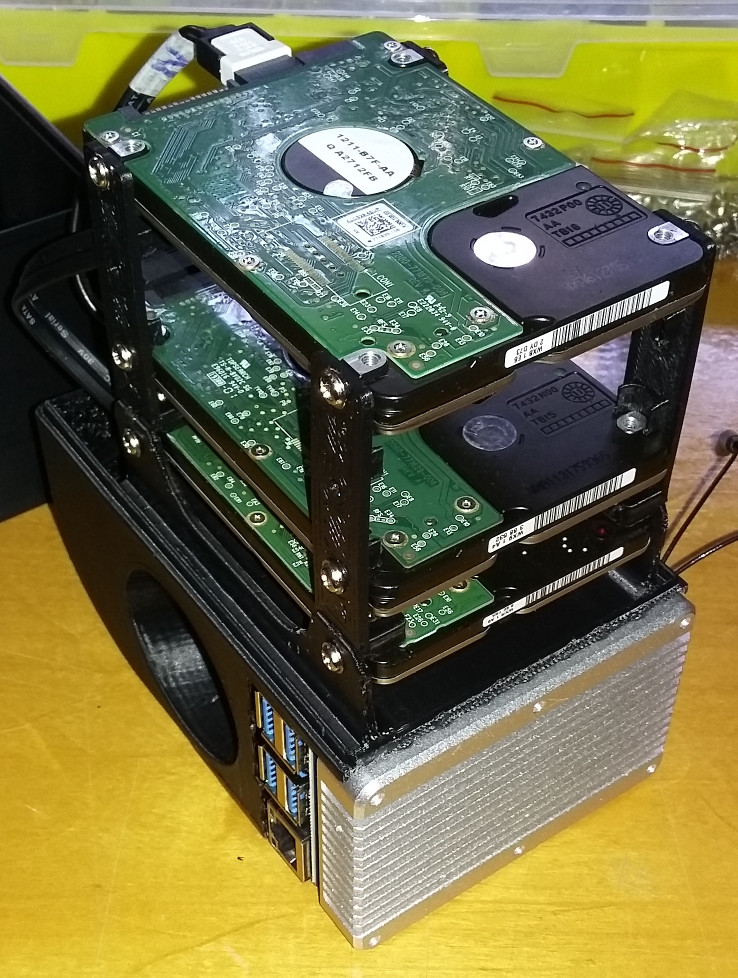
After that, install the eMMC and the SATA hat. Your SBC should look something like this right now:
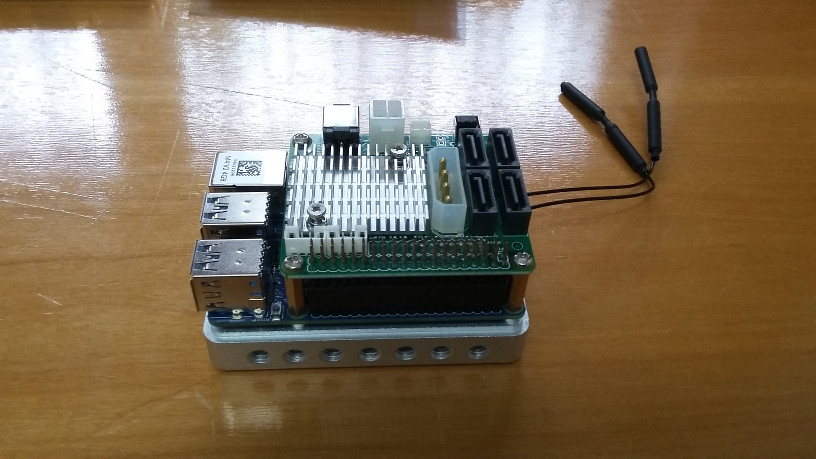
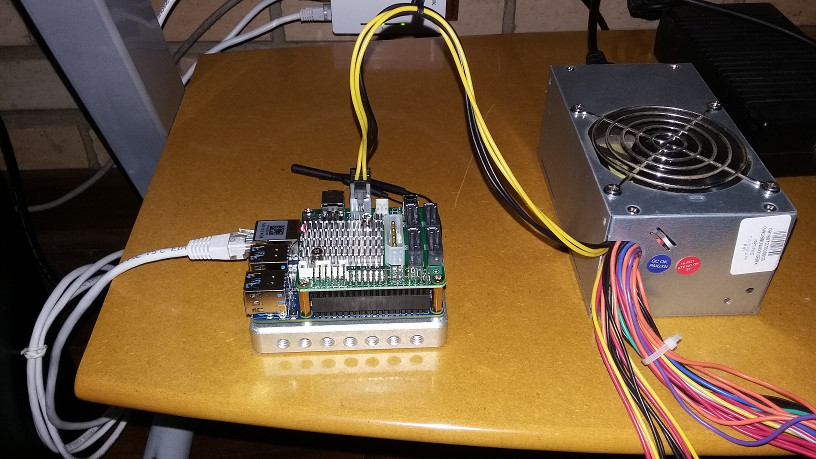
Now, it’s time to test the board and the SATA hat. Connect the board to an Ethernet cable and plug it into your 12v PSU. Observe the red and green LEDs as it turns on and starts running the OS for the first time.
Go ahead and find out which IP address your DHCP server gave to your NanoPi M4 (you might also be able to find it via the hostname nanopim4) and ping it to check it’s up and running. If it’s replying, then SSH into it with root (default pass is 1234). When logging in for the first time, Armbian will ask to change password and to create a new sudo user. Go ahead and do that. (I’ll assume that from this point on, you’ll still be using root instead of the sudo user. If you’re using the latter though, then add a sudo prefix to each of the commands below.)
Afterwards, run the armbian configuration utility to make sure your NAS has the correct time, date, UTC offset, apt mirrors, etc., by running the command
armbian-config
(Depending on what you chose to change here, Armbian will need to reboot. That’s fine. Just SSH into it again afterwards.) Now, let’s make sure all packages that came with the OS are up-to-date by running
apt update && apt upgrade -y
Go back to your router/firewall and assign a static IP address to your NanoPi M4 and then reboot the NanoPi
reboot now
After reboot, wait a few seconds and try to SSH into the static IP address you gave to the NanoPi and if everything looks good, it’s time to run the OMV installation script (see software). Again, this will take some time. Be patient! When it’s done, open a web-browser and type the static IP address of your NanoPi M4. At this point, it’s a good idea to do at least the following in System (remember to Apply changed settings every time it asks you to):
- Change your default admin password in General Settings. This will only affect access to OMV’s webUI. It has nothing to do with your Linux user credentials;
- Check Date/Time settings to make sure they are right;
- Enable System Monitoring;
- Enable and configure Notification;
- In Power Management, enable Monitoring and select the Shutdown action for the power button;
- Reboot via the webUI (arrow at the top right corner / reboot).
After rebooting, check your Storage and Diagnostics tabs. In Storage / Disks, there should be a single device for the OS eMMC. Later on, we will come back to see if the drives plugged into the SATA hat are showing up here.
In Diagnostics / Sys Info, check all tabs to make sure they are displaying things correctly. Your OMV should be collecting Performance Stats at this point, so there should be graphs available.
(If you’re new to OMV, take your time here and explore it a little bit. This is a good time to read the Getting Started guide and get yourself familiarized with the webUI.)
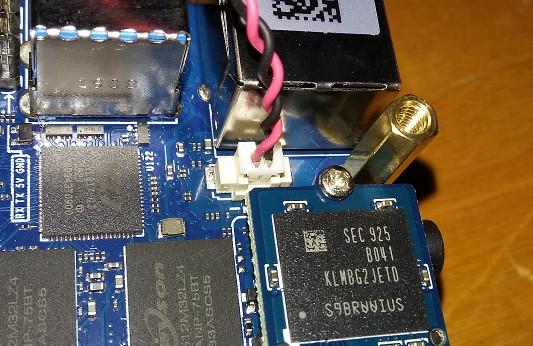
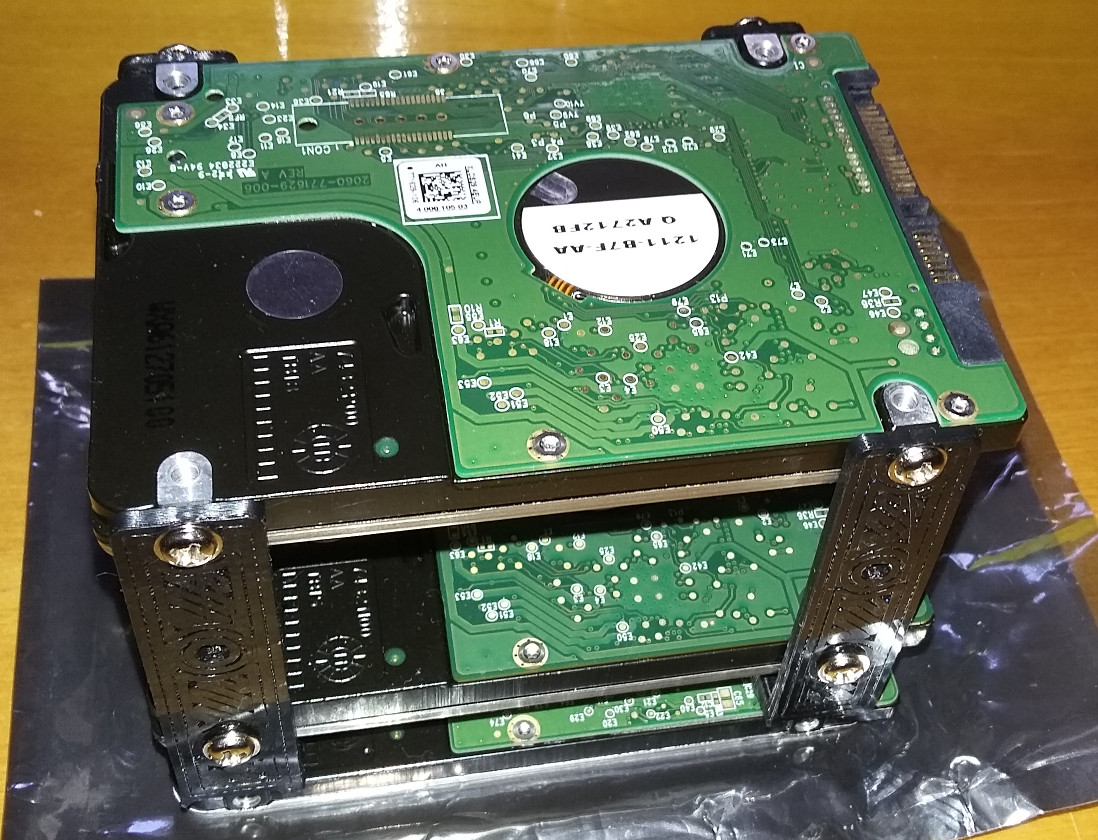
If everything is good, shutdown the NanoPi via the webUI. With everything off (none of the LEDs should be red), plug one or more HDDs to the SATA hat, as follows (I’m using an old 500GB Toshiba 2.5” HDD in the pictures below just for testing):
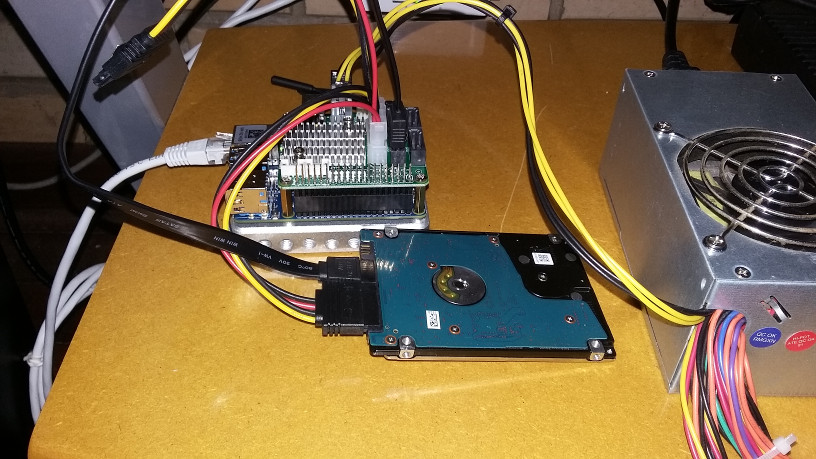
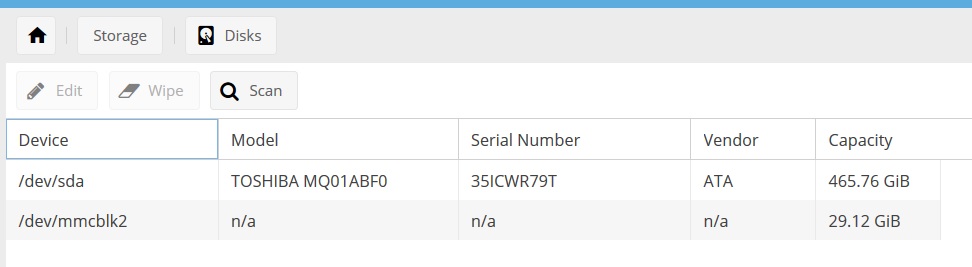
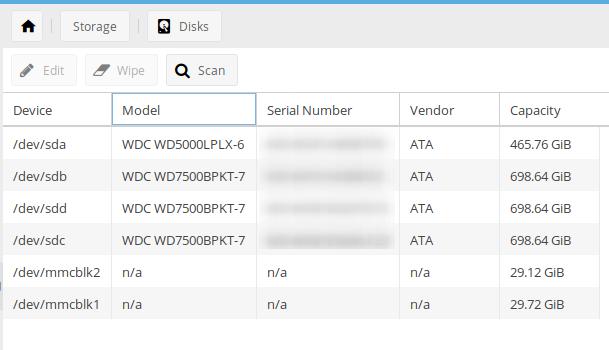
Now, turn on the board. You should notice a new LED on the other side of the SATA hat lighting up right away. (The hat has LEDs for each SATA port. If it’s not lighting up for a connected drive, you already know there’s a problem, like insufficient power or a bad connection.) Go to the OMV webUI and in Storage / Disks, see if the NanoPi was able to detect your HDD connected to the SATA hat correctly. If not, press the ‘Scan’ button and check again. You can repeat this process for each SATA interface if you want.
At this point, if it looks like the board and SATA hat are working as they should, then it’s time to put everything inside the case.
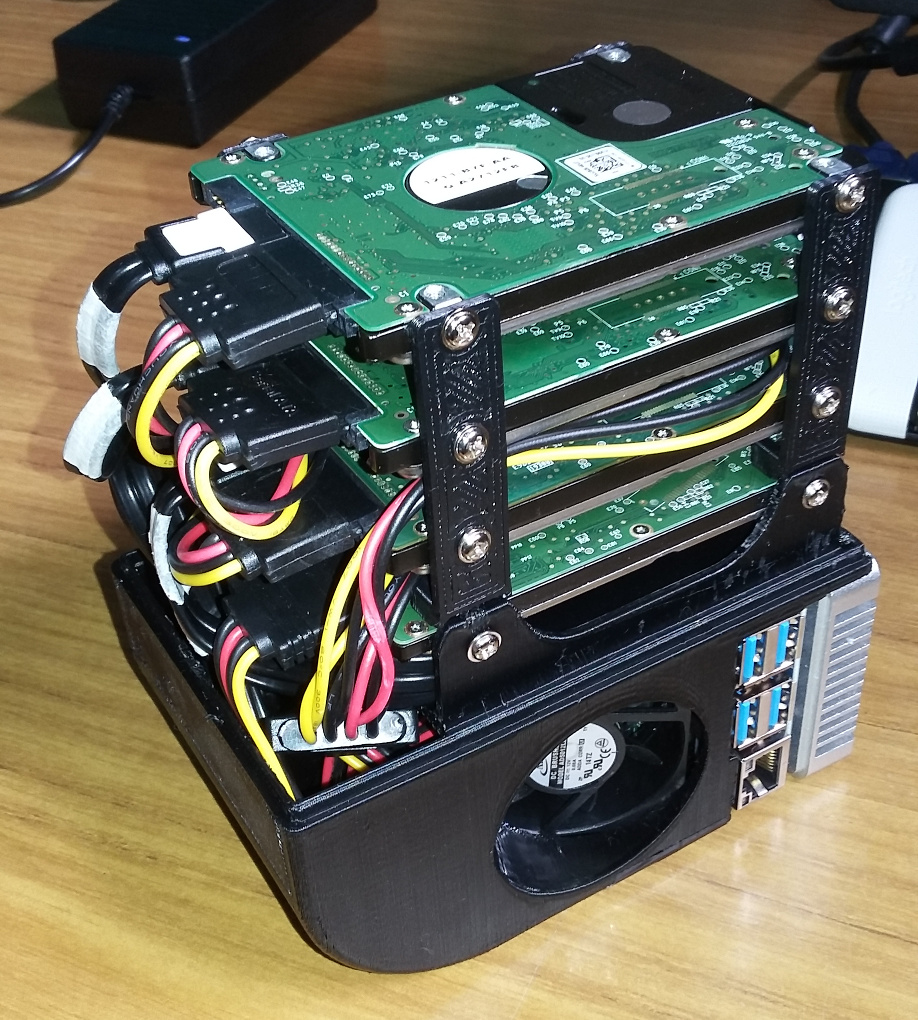
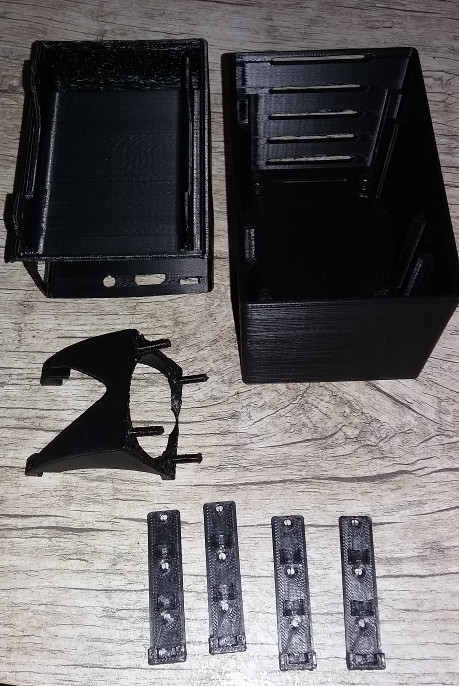
My printed cases
As I’ve mentioned before, I’m using kirkdis’ 3D printed case. I printed two cases for this project. This is the first one:
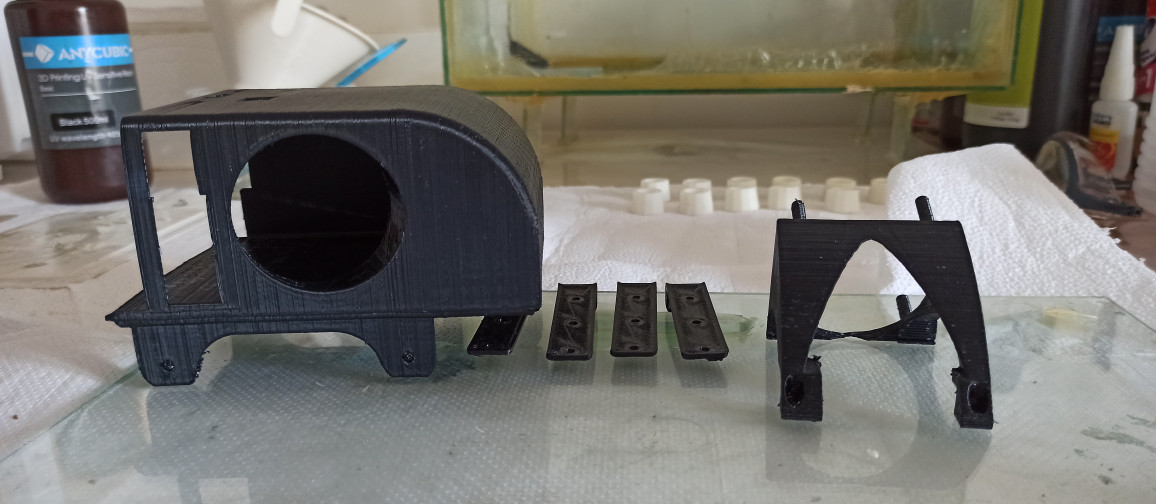
And here’s the second (backup) case:
In kirkdis’ last post, he mentioned
“… to be careful when you put the upper case over the external ports as this is the most fragile part. Designwise I didn´t found a workaround for this area as result it can happen if you push too much that the connections between the ports break off but with a liztle bit patience you can set iz in place as one piece.”
I think I read his comment a bit too late:
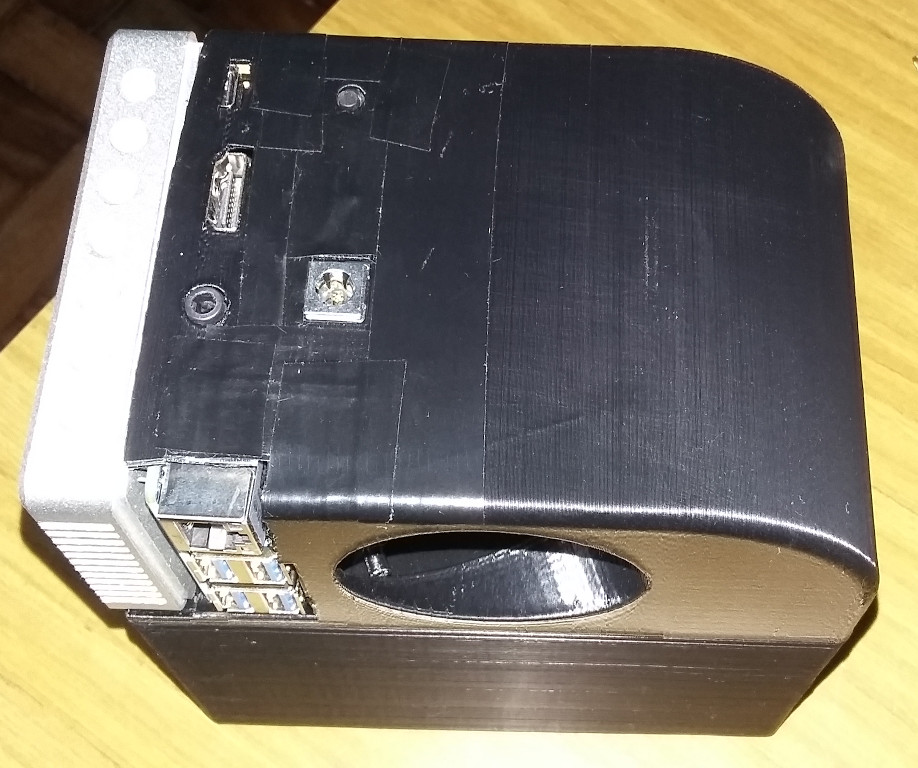
but I managed to fix it a little bit by the end:
My opinion about the case
The HDD case and disk mounts feel very sturdy in comparison to the board case (a.k.a. upper case). I feel the board case could be improved in the following way:
- Add thicker walls, especially where the USB ports and the DC jack are;
- Add a way of screwing the board to the case;
- Make the base of the fan mount thinner, so we can use the screws that come along with the board, instead of having to find longer screws just for that.
Regarding the whole case:
- It could be a bit larger to make room for the cables and improve air flow. Right now, it’s an extremelly tight fit if you’re using four HDDs and some cables get bent in ways that are probably not good for them in the long run;
- Because all printed pieces are so tightly connected to each other, there’s very little room for error when printing them. I feel that both the HDD case and board case should be a little looser and rely more on screws to secure the printed pieces to the hardware. Honestly, it was kind of a pain to attach and remove the board to the board case, and similarly, the HDD stack to the HDD case. It felt too tight with both cases I printed.
Honestly, I don’t know shit about 3d printing. This is just my opinion on how the case could be improved. If something I said doesn’t make sense, let me know.
Procedure
If you don’t want to figure out how to put all pieces together on your own, take a look at kirkdis’ video and notice how he disassembled his unit:
My advice is to do the following:
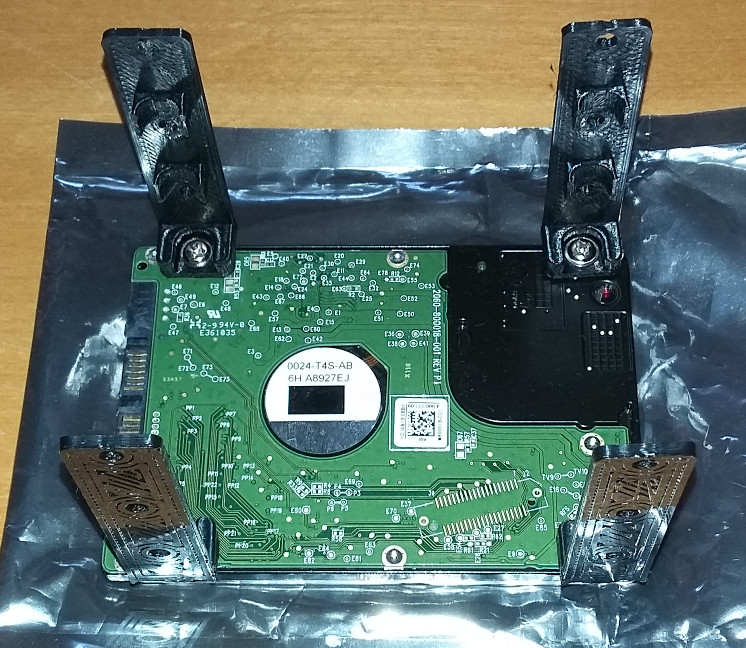
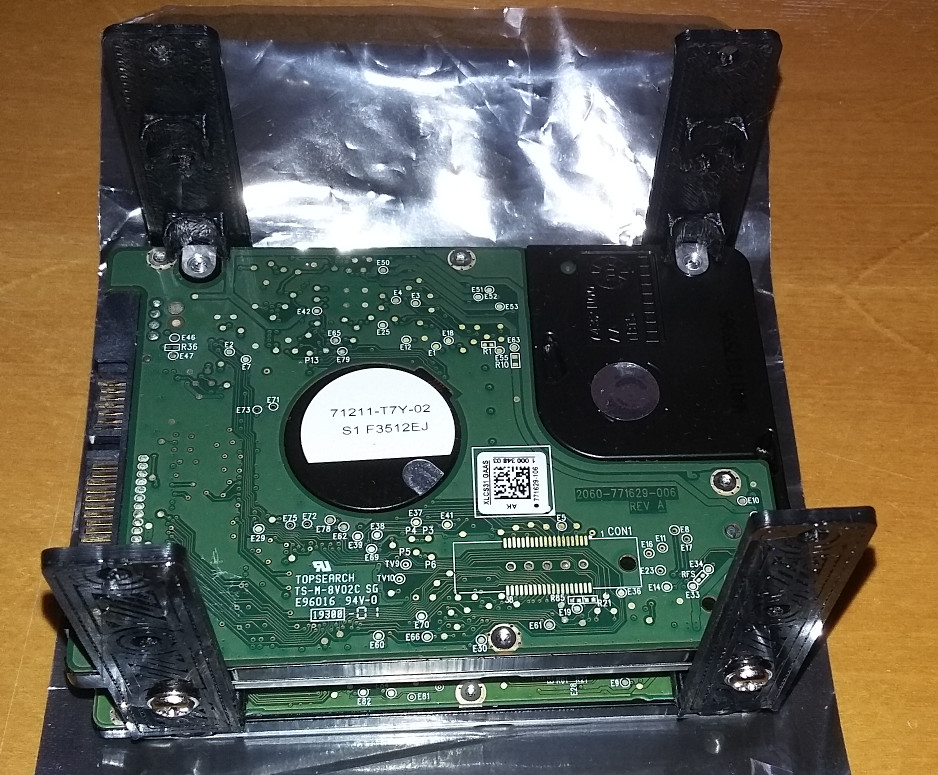
- Start by attaching the HDDs to the four disk mount pieces, so that you have a nice stack by the end of this step;
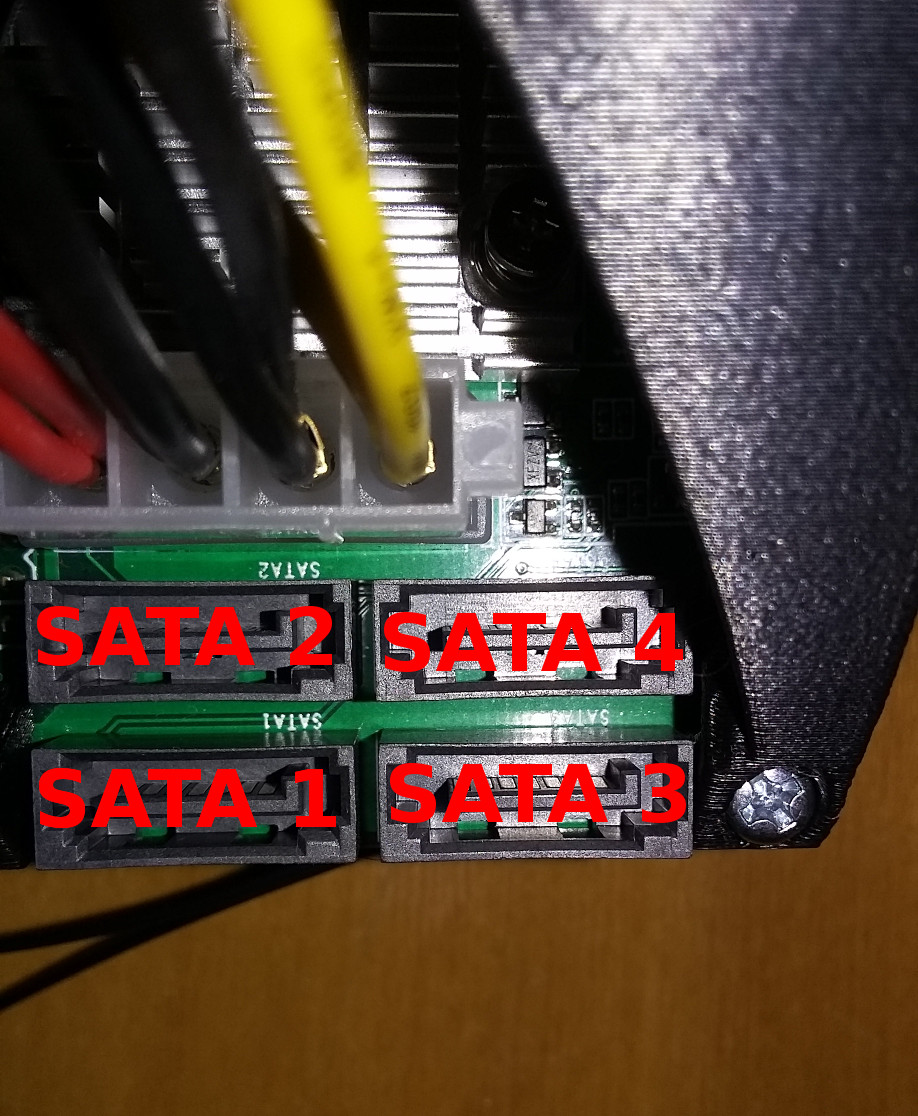
- Connect all the SATA data and SATA power cables to the SATA hat;
-
Attach the fan to the mount and the mount to the SATA hat and plug it to the board;
-
Put the board with the fan mount inside its case, making sure all the SATA cables are accessible from the other side of the case, where the HDDs will be;
-
Attach the HDD stack to the base of the board case and connect the SATA cables;
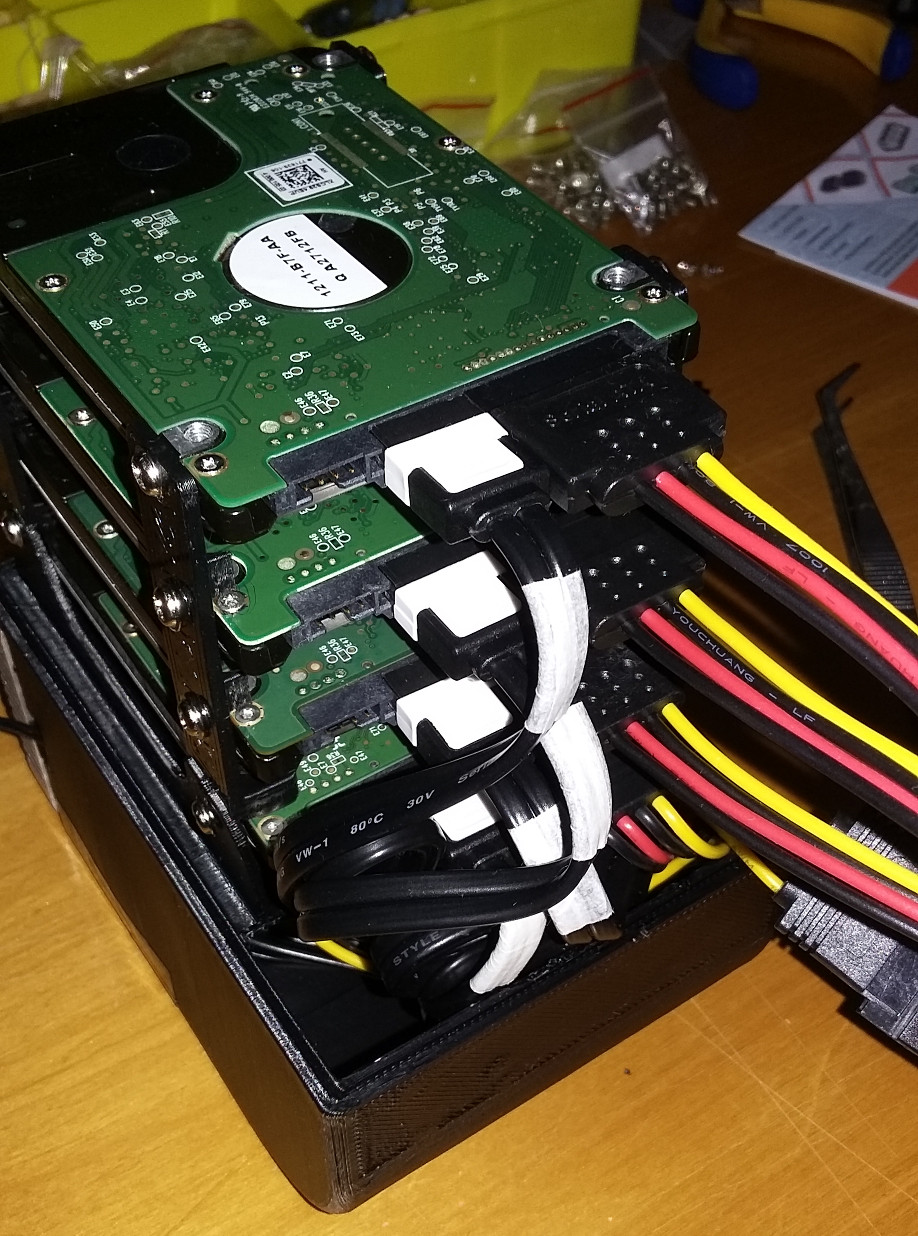
- Now, cover the HDD stack with its case and screw the bottom of the case to the last HDD;
-
Connect your PSU to the DC power jack on the SATA hat;
-
Turn it on.
Voilà! Check your OMV webUI to make sure it detected all connected disks and then start mounting them and adding your file sharing configurations, installing applications, adding users, etc.
Final Remarks
I’m very happy with this mini-NAS. It’s arguably not as powerful as my previous HP Proliant Gen8 that I turned into a NAS but it is more energy efficient, smaller, quieter and cheaper.
Regarding applications, I strongly suggest you to take a look at Docker and Portainer. You can install both Docker and Portainer from within the OMV webUI (System / OMV-Extras / Docker - Docker Install; Portainer Install). They make installing and managing applications so much easier. Just be mindful that you’re running docker within an ARM architecture, so any image must have a compatible arm release to be able to run with the NanoPi M4.
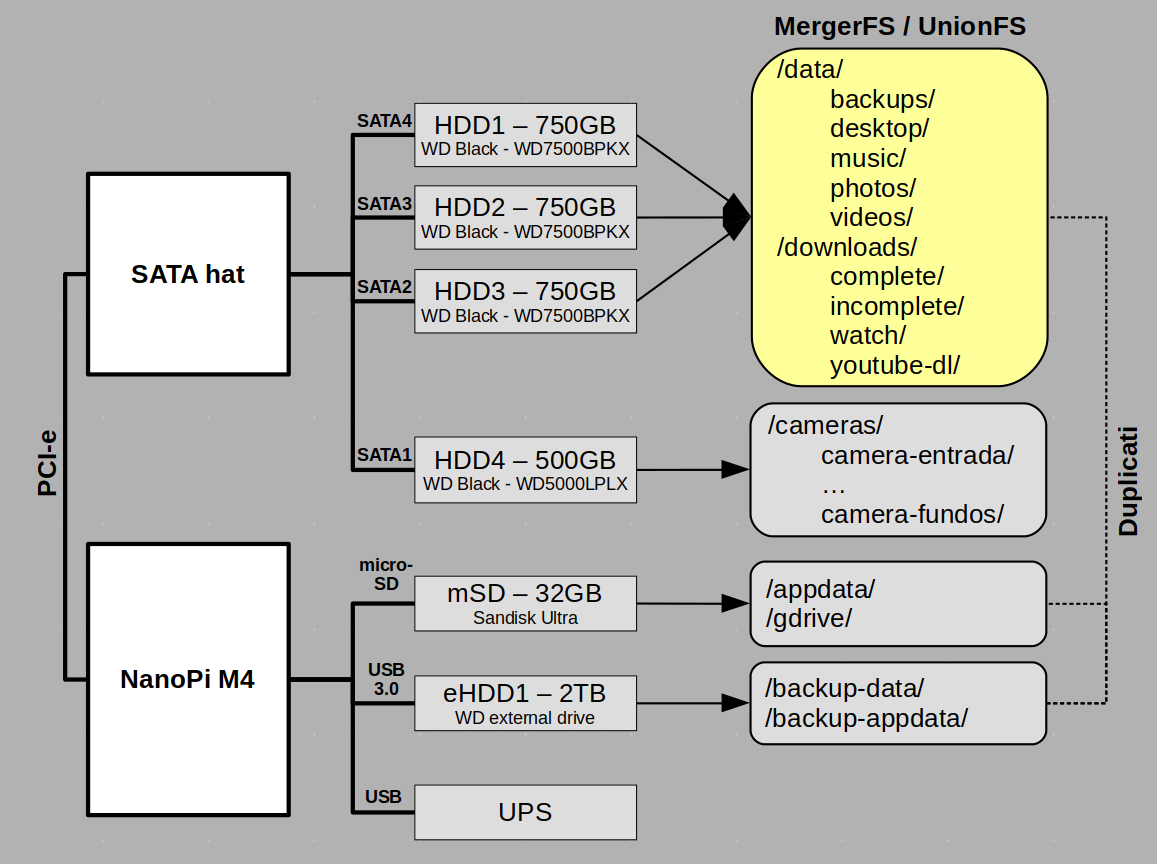
I don’t use any sort of RAID solution for this NAS. Instead, I use unionFS/mergerFS to pool multiple drives/folders into individual folders and then have various applications running periodic local backups and overnight remote backups. (The SATA hat does not support hardware RAID but if you’re into redundancy, then it’s possible to create a software RAID from within the OMV webUI.)
Here’s an overview of how I’m currently organizing my mini-NAS:
According to kirkdis, a NanoPi M4 mini-NAS with three 2.5” HDDs consumes between 7W (idle) and 20W (heavy load). I cannot measure the actual power consumption of my build but I think it’s safe to assume that it consumes a bit more power than kirkdis’, especially under heavy load. I estimate that mine consumes between 9W (idle) and 25W (heavy load), owing to the fact that my HDDs have a higher RPM and I’m using an additional 2.5” HDD. For comparison, a Synology Diskstation DS918+ with four 3.5” HDDs consumes between 27W (idle) and 44W (heavy load).
Well, this concludes my NanoPi M4 mini-NAS project. I hope you enjoyed this article and that it will inspire you to create something for your own use-case. As usual, let me know if you have any questions or suggestions.
Bonus Content
Backing up the OS disk
Once you have your system up and running smoothly, it’s a good idea to have a backup plan for cases in which your Armbian OS stops working altogether and you are unable to recover using traditional procedures (see Recovery procedures). There are many such strategies but in my opinion, the most straightforward one is to simply clone the entire mini-NAS OS disk every once in a while, which can be done with the dd GNU/Linux utility. This allows you to re-flash the image to the existing (or new) microSD/eMMC/HDD/SSD in case something really bad happens. (For more advanced users, this allows to even make changes to the OS without even having it attached to the NanoPi-M4, which can be done by mounting it locally and then chrooting into it. However, this latter procedure does require that you’re running the same architecture as your NanoPi-M4.)
Suppose you installed Armbian OS on an eMMC, as suggested in the Software section of this guide. Then to backup the entire OS disk, which at the end will create an .img file of it that you can mount or flash onto other disks, follow the steps described next:
For this procedure, you will need access to another computer running a GNU/Linux distribution, such as Armbian, Raspberry Pi OS, Debian, etc. Of course, you can use the NanoPi-M4 itself for this purpose, but this requires a second (independent) disk to boot another Armbian OS, for example. In addition, you will need access to a storage space (e.g., HDD) that has more space available than the size of the entire disk that we will backup. For example, if the mini-NAS OS is on a 32GB eMMC, then at first, the backup destination needs to have at least that much space available. (Afterwards, we can compress the .img file to greatly reduce its size.)
-
Shutdown your mini-NAS, turn it off, and then remove its eMMC;
-
Use a microSD adapter to connect the eMMC to another computer running a GNU/Linux distribution;
- Find the name of the eMMC in
/dev/. This can be done withlsblk, for example:lsblkNAME MAJ:MIN RM SIZE RO TYPE MOUNTPOINT sda 8:0 0 29.8G 0 disk ├─sda1 8:1 0 300M 0 part └─sda2 8:2 0 29.5G 0 part sdb 8:16 0 447.1G 0 disk ├─sdb1 8:17 0 512M 0 part /boot/efi ├─sdb2 8:18 0 445.7G 0 part / └─sdb3 8:19 0 977M 0 part [SWAP] sdc 8:32 1 1.9G 0 disk └─sdc1 8:33 1 1.8G 0 part sr0 11:0 1 1024M 0 romIn this example, let’s assume that
sdcis the eMMC;sdcis likely not the name of the eMMC in your case. Before continuing, make sure to properly identify the actual disk name of your eMMC on your system.A few distributions might auto-mount disk partitions and if this has happened to you (i.e.,
MOUNTPOINTis not empty for the eMMC partitions), make sure to unmount any mounted partition of the eMMC before the next step. You can unmount usingsudo unmount /full/path/to/mountpoint. - Using
dd, which requiressudopermission, clone the entire eMMC to an.imgfile on your local disk. For this example, the.imgfile will be under your current user’s home directory (~/Backups/mini-nas/) and for future reference, its name will contain both the OS name (e.g., Armbian Buster) and the current date (date +%Y-%m-%d):mkdir -p ~/Backups/mini-nas/ sudo dd if=/dev/sdc of=~/Backups/mini-nas/emmc-armbian-buster-$(date +%Y-%m-%d).img bs=1k conv=noerror status=progressThis will take a long time. Be patient and do not play with the eMMC at all.
- When done, compress the
imgfile into.img.tar.gzusing thetarutility to greatly reduce its size:tar -czvf ~/Backups/mini-nas/emmc-armbian-buster-$(date +%Y-%m-%d).img.tar.gz ~/Backups/mini-nas/emmc-armbian-buster-$(date +%Y-%m-%d).imgThis also might take a long time. Be patient.
- Finally, now that you have a compressed version of the
.imgfile, you can delete the original one to save space on your local disk:rm ~/Backups/mini-nas/emmc-armbian-buster-$(date +%Y-%m-%d).img
Emergency micro-SD
In addition to backing up your existing OS, I suggest having a tiny microSD (e.g., 2GB) that contains a trimmed down version of the same Armbian as your mini-NAS. This trimmed down version is just the base Armbian image that you used to build your mini-NAS, per the instructions in the Software section, except that it does not need to have OMV installed. Optionally, you could install additional utilities to the micro-SD that will help you troubleshooting issues with the eMMC and the OS installed on it (e.g., eMMC tools).
Why, though?
One reason to have an emergency micro-SD is that it can take a lot of time to remove the eMMC from a NanoPi-M4 mini-NAS. Remember that the eMMC module is under the SATA hat, which means you’ll need to disassemble the whole thing to finally have access to it if you ever need to. On the other hand, the micro-SD slot is easily accessible and if for some reason your board stops working, you can attach the emergency micro-SD to quickly rule out major hardware issues, such as a bad PSU or a broken critical board component–that is, if the board does not boot from the eMMC but it does from the micro-SD, then the issue ought to be related to either the eMMC itself (hardware-wise) or the software installed on it. On top of that, the emergency micro-SD can provide an environment to troubleshoot your eMMC and its partitions (e.g., check integrity of the filesystem on the eMMC via fsck) and worst case scenario, re-flash your backup image onto the still attached eMMC.
Recovery procedures
If for any reason you find yourself in a situation in which your mini-NAS won’t boot anymore or you experience instability, your board might be having either a hardware issue (e.g., bad PSU) or software issue (e.g., an update that breaks one ore more boot configuration files). The folks at Armbian have documented guides to help users in such scenarios, namely:
- the hardware troubleshooting guide;
- and basic recovery procedures.
In this section, I will mention an additional procedure. More specifically, I’ll describe how to use the GNU/Linux chroot (change root) tool to debug and fix issues on a broken OS disk partition. Most users will find this procedure fairly complicated because it requires a little bit of preparation but the gist of it is very simple. In brief, chroot allows us to (temporarily) move our current root directory (/) to another (e.g., /mnt/emmc)–that is, the mountpoint /mnt/emmc is interpreted as / in the chroot environment. There are many use cases for chroot but in our case, we will use this to make changes to the eMMC as if we were running it. For example, once we’ve chrooted into the eMMC, we can run things like apt update and apt install to install new packages or upgrade/downgrade old ones onto the eMMC.
This approach was motivated by an issue I had with my NanoPi-M4 that broke it–it refused to boot after an apt upgrade–and the solution to it, as originally described by the Armbian forum user gilarelli. In this section, I used my issue as example but of course, the procedure outlined next can be adapted for any other cases that would benefit from a chroot environment (e.g., building images from source). More specifically, I described the issue first, pointed out the (likely) culprits, and then used chroot to implement the fix.
-
The issue: After an
apt upgrade, the Armbian21.08OS (buster,legacy kernel 4.4.213-rk3399) stopped working altogether with my NanoPi-M4 v2. (Of note, I used it as NAS with Openmediavault. This matters because OMV makes changes to many files, including/etc/resolv.conf, which in turn affect the procedures in thechrootenvironment later on.) - The culprit(s):
apt upgradeinstalled four new22.02packages over their respective21.08versions, namely:linux-dtb-legacy-rk3399linux-headers-legacy-rk3399linux-image-legacy-rk3399linux-libc-dev
Per gilarelli’s new post, it looks like the culprit is
linux-dtb-legacy-rk3399, which does not include a device tree file for thenanopi-m4v2. -
The solution: Use
aptto downgrade all four culprit packages. This can be done by mounting the eMMC partition onto anotherarm64machine, such as the NanoPi-M4 v2 itself (or Raspberry Pi 4, or Odroid N2/+, and so on), thenchrooting into it, and usingapt installto downgrade the packages.Alternatively, as gilarelli pointed out, we can manually download the
.debfiles viawgetand then install withdpkg. The advantage of this procedure is that in the last step of the implementation of the solution, we can download the packages using our host OS and just copy (cp) them to the eMMC, which can be done without having to enable/configure network connectivity inside thechrootenvironment.
To implement the solution, you will need the following:
- A micro-SD to boot a clean Armbian OS using the NanoPi-M4 itself;
- (Optional but strongly recommended.) A backup image of the entire eMMC in case something goes terribly wrong;
- WAN connectivity to download and install packages via
apt. That is, your NanoPi-M4 needs access to the Internet, so make sure it is connected to a network with access to the WAN. - (Optional.) Monitor and keyboard. Alternatively, you can connect to it remotely via SSH using the credentials and configuration from the micro-SD OS.
Once you get those things sorted out, follow the steps outlined next:
-
Turn off your NanoPi-M4, remove any unnecessary USB peripherals, then connect it to a monitor and a simple USB keyboard. (Alternatively, you could use a serial connection or SSH for the next steps, too;)
-
Attach the emergency micro-SD and turn the board on. If it boots successfully, then continue;
- Identify the disk name of the eMMC on your system (
lsblk) and run a filesystem integrity check on it:fsck /dev/mmcblkXpY -fin which
mmcblkXpYis the primary partition of your eMMC. Continue if no errors are found; - Create a new directory called
emmcon/mnt(/mnt/emmc) and mount the eMMC primary partition on it:mkdir /mnt/emmc mount /dev/mmcblkXpY /mnt/emmc - Prepare the chroot environment as follows:
- mount the current
proc,sys,dev, andrunon the eMMC mounted partition:mount -t proc /proc /mnt/emmc/proc/ mount -t sysfs /sys /mnt/emmc/sys/ mount --rbind /dev /mnt/emmc/dev/ mount --rbind /run /mnt/emmc/run/ - test that you can connect to the WAN via
ping google.com. if successful, backup theresolv.confon the eMMC and copy the one from your micro-SD to theeMMC, which should ensure WAN connectivity in the chroot environment as well:mv /mnt/emmc/etc/resolv.conf /mnt/emmc/etc/resolv.conf.backup cp /etc/resolv.conf /mnt/emmc/etc/resolv.conf
- mount the current
chrootthe mounted eMMC primary partition:chroot /mnt/emmcwhich should move your terminal to
/(root), that is, the chroot environment. If at any point you want to exit, just typeexit;- Test WAN connectivity inside the chroot environment (
ping google.com) and if it looks good, then useaptto downgrade the culprit packages, as follows:apt updateIf you have issues with
aptat this point (e.g., stuck atWaiting for headers), try cleaning old cached files and rebuilding the lists:apt clean && mv /var/lib/apt/lists /var/lib/apt/lists.old && mkdir -p /var/lib/apt/lists/partial && apt clean && apt update.apt install linux-dtb-legacy-rk3399=21.08.1 linux-headers-legacy-rk3399=21.08.1 linux-image-legacy-rk3399=21.08.1 linux-libc-dev=21.08.1 - Add a
holdmark to the culprit packages to preventaptfrom installing/removing/purging/upgrading them until the mark is removed:apt-mark hold linux-dtb-legacy-rk3399 linux-headers-legacy-rk3399 linux-image-legacy-rk3399 linux-libc-devOnce you learn that a fix has been added to a new release of each package marked with
hold, you can remove the mark viaapt-mark unhold PKG_NAME. - Exit the chroot environment:
exit - Restore the original
/etc/resolv.confon the eMMC:mv /mnt/emmc/etc/resolv.conf.backup /mnt/emmc/etc/resolv.conf -
Shutdown (
shutdown now), turn off the NanoPi-M4, and then remove the micro-SD from it; - Turn the board back on to check if it boots successfully from the eMMC. If it doesn’t, go back to the first step and review the procedure and make additional changes in the chroot environment.
Finally, remember that the same issue can have different causes. Make sure to inspect closely the error messages related to yours and search the official Armbian Forum for posts related to an identical or similar issue if you are having trouble fixing yours.
Real time clock
The NanoPi M4 comes with a built-in real time clock (RTC) module and to use it, all that you need is a compatible RTC battery with a Molex 53398-0271 connector:

As the name suggests, its main purpose is to keep track of time, regardless of the board’s power state. However, it also supports waking up the NanoPi from various power states. On Linux, you can access and configure all such options with a package called rtcwake, which comes pre-installed on Armbian (and pretty much any other Linux distro, by the way, because it’s part of the util-linux core package). (If the package is not accessible from within your user’s $PATH, try whereis rtcwake and type the entire /path/to/rtcwake.) You can find info about its usage with the standard --help argument. For more detailed info, read man rtcwake. An RTC battery is really cheap (less than $10) and worthy of your attention for such a key component of a home network. You definitely don’t want your mini-NAS time travelling to 1970…