
Changelog
June 23rd, 2020: Moved this guide from Blogger to my website and converted to markdown. Fixed typos I found.
June 21st, 2020: This guide stills works with pfsense version 2.4.5-RELEASE-p1.
May 1st, 2020: This guide still works with pfsense version 2.4.5-RELEASE and the haproxy packaged version 0.60_4.
Introduction
This is a rough guide on how to create and configure user lists and stick-tables using pfsense’s HAproxy package to protect access to a backend and limit the number of failed login attempts. The guide is divided into two main sections. In the first one, we’ll create a user list and add encrypted (SHA512) passwords for each of them. Then, in the second section, we’ll create and configure stick-tables to limit the number of failed login attempts.
Now, it’s fairly simple to accomplish all those things by manually changing HAproxy’s config file (e.g., https://gist.github.com/Iristyle/5005653, https://www.haproxy.com/blog/introduction-to-haproxy-stick-tables/). However, I found it difficult to find any sort of documentation on how to accomplish the same thing using only pfsense’s graphical user interface (GUI). The GUI makes it very easy to implement and configure the core aspects of HAproxy (e.g., reverse proxy and load balancing) but at the same time, it seems to lack support for other features, such as adding basic authentication requests and using stick-tables to mitigate attempts to brute-force users’ credentials. If that’s what you’d like to do, then read on.
Pre-requisites
The pre-requisites are the following:
- You’re running pfsense version 2.4.4-RELEASE-p3 or similar;
- You’ve installed the HAproxy package version 0.59_19 or similar;
- You’ve already added backends and frontends with HAproxy using subdomains (e.g., https://blog.devita.co/pfsense-to-proxy-traffic-for-websites-using-pfsense/).
Recommended:
- Configure ACME SSL with HAproxy. For example:
Basic user authentication
This part of the tutorial is largely based on Joerg Hocwald’s guide. In HAproxy, it’s pretty simple to create a user list with encrypted passwords. There is basically three steps involved: (a) user and password list creation, (b) adding those to the global settings, and (c) creating an access control list (ACL) and action for each backend.
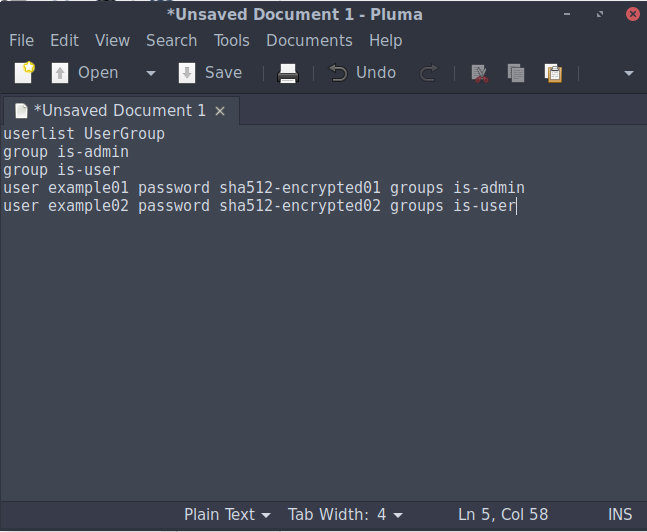
- Create a .txt file and write the following:
userlist UserGroup
group is-admin
group is-user
user example01 password sha512-encrypted01 groups is-admin
user example02 password sha512-encrypted02 groups is-user
...
The argument
userlistdefines the name of your user list, which in this case we’re going to callUserGroup. Next,groupdefines the group that eachuserbelongs to, which will be either a standard user (is-user) or admin (is-admin). (You don’t need to define groups but it’s a nice way of restricting access to critical services.) Below groups, we have the list of all users, their (SHA-512 encrypted) passwords and the group they belong to. You can add as many users as you want this way.
- For each user, create a SHA-512 encrypted password. There are many ways of doing that. If you’re running Debian (or any Linux distro), run
apt install whoisin a terminal window, which has themkpasswdcommand that we’re going to user, and then run each of the followin commands, changingsha512-encrypted01andsha512-encrypted02for the actual, plain text password string of those respective users:printf "sha512-encrypted01" | mkpasswd --stdin --method=sha-512 printf "sha512-encrypted02" | mkpasswd --stdin --method=sha-512 ...

- Now copy each encrypted password and paste them over the respective
sha512-encryptedXXstring in the user list .txt file.

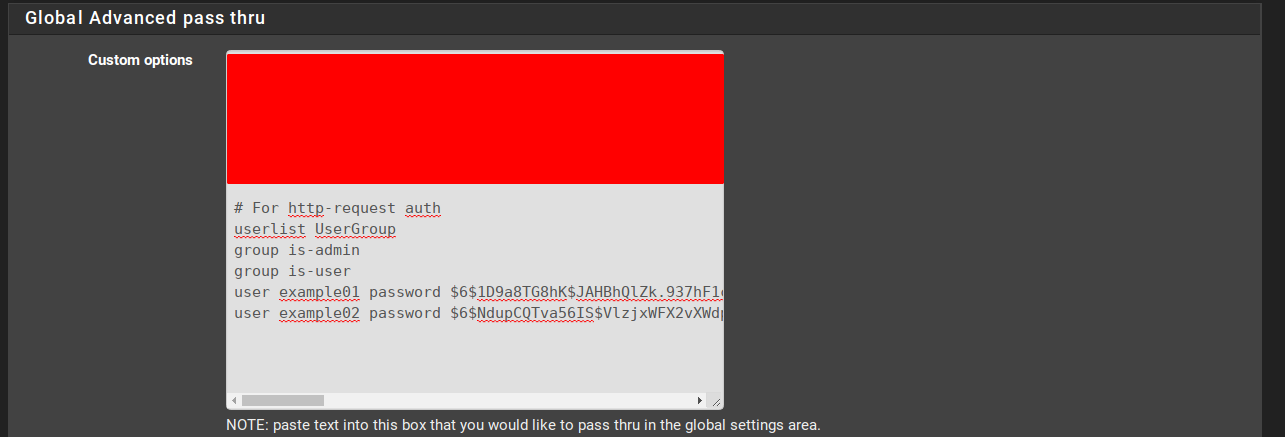
- Go to pfsense’s GUI and in Services > HAproxy, go to the Settings tab. Now find Global Advanced pass thru and paste the content from your user list .txt file. (If you’ve other things in the global pass thru, make sure to add the user list to the bottom of all other commands. Otherwise, you might get a few errors when trying to apply the settings.) When you’re done, hit Save and then Apply Settings.
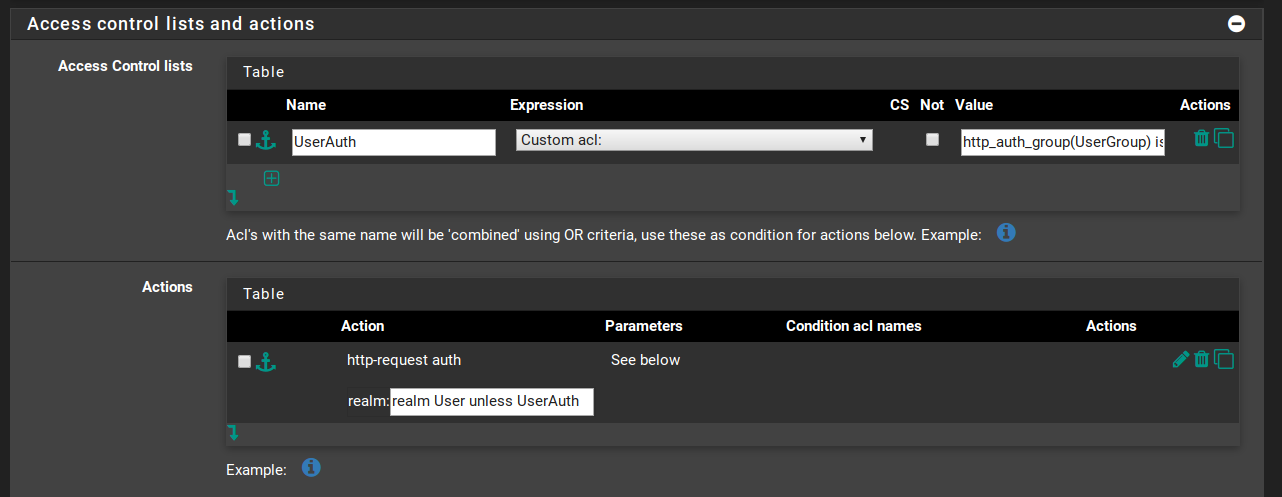
- Now head to the Backend tab. We’re going to edit one of the backends (e.g., www.domain.com). In Access control lists and actions, create a new ACL, as follows:
Name = UserAuth
Expression = Custom acl:
CS = blank
Not = no
Value = http_auth_group(UserGroup) is-user
(If you want to restrict access to admin, then you need to change the value from is-user to is-admin.) Then, in Actions, create a new one as follows:
Action = http-request auth
Parameters = See below
Condition acl names = blank
Actions = blank
realm = realm User unless UserAuth
(As before, if you want to restrict access to admin, then in realm, change User for Admin.) Hit Save and then Apply Settings.
- Rinse and repeat for each backend you want to protect with basic user authentication. Make sure to test your config before moving on to the next section.
Stick-tables to protect against brute-force
In our case, access to each backend is secured by a basic http authentication request. If the client does not provide correct credentials, it will be requested to enter new ones. By default, HAproxy will do that forever, which is not something that sounds desirable to me because it allows clients to brute force their way into my services. On HAproxy’s official blog, you’ll find a very instructive guide on how to protect your servers from bots, including a step-by-step procedure to help you mitigate brute-force attacks. In their case, however, the authentication is associated to a particular /login page, instead of using HAproxy’s own http-request auth feature, and we’d like to use the latter instead.
Fortunately, when a client provides incorrect credentials, the result is an http error code (401) and because 4xx errors should be fairly uncommon in a properly configured server, we can use the rate of such errors (http_err_rate) as a marker of misuse/brute-force. In HAproxy, a stick-table is used to keep track of a client’s IP address and both the http_err_rate and the total number of errors (http_err_cnt). In pfsense’s GUI, however, there’s no point-and-click way of enabling/disabling this, so we’ll need to make use of backend pass thru and write custom access control lists and actions.
- Edit one of your backends (e.g., www.domain.com) and in Advanced Settings, add the following to Backend pass thru:
stick-table type ip size 1m expire 30m store conn_cur,conn_rate(3s),http_req_cnt,http_req_rate(10s),http_err_cnt,http_err_rate(20s)
This will create a stick-table that will capture the IP address of each client (
type ip), will store up to 1MB of data (size 1m), will expire after 30min it was last matched/created/refreshed (expire 30m) and for each client (key), it will store the # of connections and their rate over 3s, the # of http requests and their rate over 10s, and the # of http errors and their rate over 20s (store conn_cur,conn_rate(3s),http_req_cnt,http_req_rate(10s),http_err_cnt,http_err_rate(20s)). (We won’t use all those data but I figure you might find useful for other applications. We’ll only use the last two.) -
Hit Save.
-
Now go the the Frontend tab edit the www.domain.com frontend (or whichever frontend is associated with the backend you just edited). Here, we’ll create a couple of ACLs and actions that will make use of the data from the stick-table.
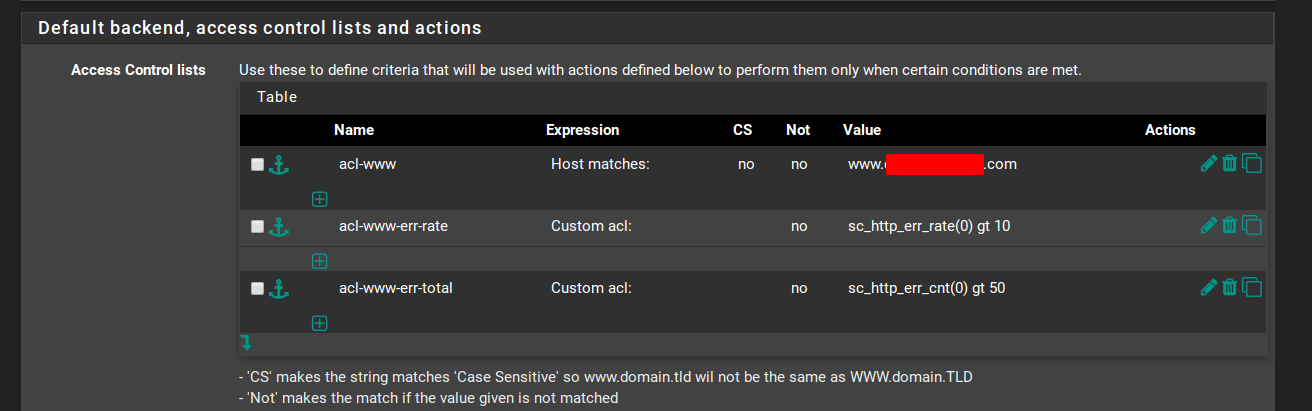
- In Default backend / Access control lists and actions, create a new ACL, as follows:
Name = acl-www-err-rate
Expression = Custom acl:
CS = blank
Not = no
Value = sc_http_err_rate(0) gt 10
This acl applies to all clients that have more than 10 4xx errors over the last 10s.
- Now, create another ACL, as follows:
Name = acl-www-err-total
Expression = Custom acl:
CS = blank
Not = no
Value = sc_http_err_cnt(0) gt 100
This acl applies to all clients that have more than 100 4xx errors stored on the stick-table (so, in the last 30min).
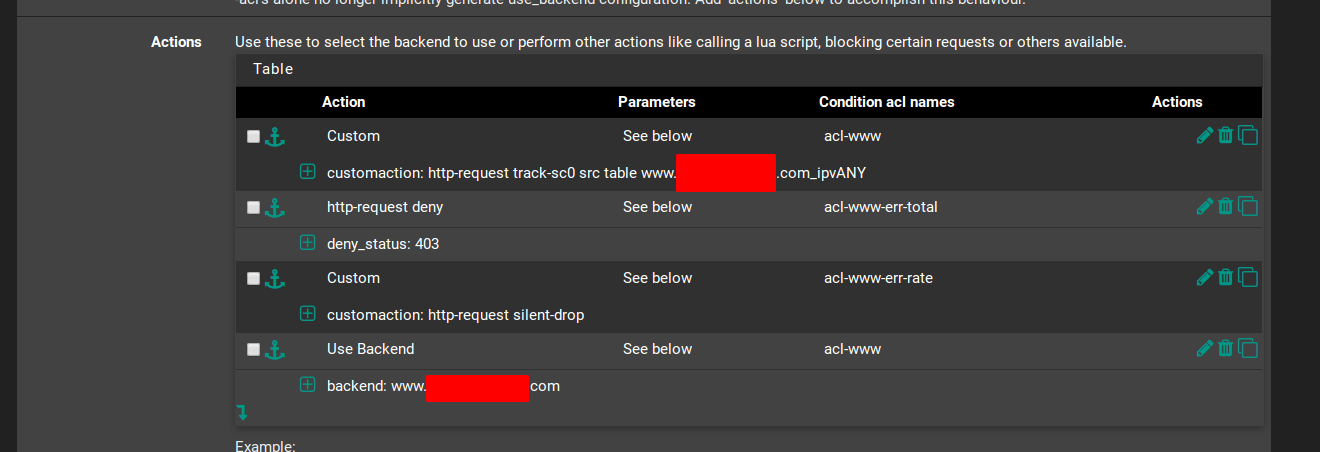
- In Actions, we will define what HAproxy will do in each of those cases. First, however, we need to instruct HAproxy to track the correct backend stick-table. So, create a new action as follows:
Action = Custom
Parameters = See below
Condition acl names = acl-www
customaction = http-request track-sc0 src table www.domain.com_ipvANY
The last sections, customaction, tells HAproxy to use the stick-table from the www.domain.com backend. By default, that table is called
{backend-name}_ipvANY, so edit it accordingly. - Now, we’re going to deny requests from acl-subdomain-err-total, as follows:
Action = http-request deny
Parameters = See below
Condition acl names = acl-www-err-total
denystatus = 403
This will return a
Forbidden errorto clients that have more than 100 errors. - Also, we’re going to drop connections from clients that have a high error rate, as follows:
Action = Custom
Parameters = See below
Condition acl names = acl-www-err-rate
customaction = http-request silent-drop
This will cause the client to wait for a reply from our server but our server will never send one, so the client will hang in there until it gets a timeout. This alone should be an effective way of dealing with brute-force attacks but I like the idea of completely denying access to persistent offenders.
- Now move your Use Backend action to the bottom of the list and hit Save.
- Apply settings and check if it’s working correctly in the Stats tab.


- If you’d like to configure stick-tables for other subdomains, just repeat all the previous steps.
Conclusion
That’s it! Let me remind you that the options described here were tuned to my own case and therefore, you should review them to make sure they’ll work for yours as well. For example, you might want to set a shorter expire for a given stick-table than 30 min., or you may not want to use http-request deny instead of http-request silent-drop.
Stick-tables are great and there are many other things you can do with them. For example, you can use a similar procedure to implement other recommendations mentioned in the official blog. This one has been working very well for me.